For crying out loud, there are TWO steps to sharpening a chain!!!!

  • Active since 1995, Hearth.com is THE place on the internet for free information and advice about wood stoves, pellet stoves and other energy saving equipment.

    We strive to provide opinions, articles, discussions and history related to Hearth Products and in a more general sense, energy issues.

    We promote the EFFICIENT, RESPONSIBLE, CLEAN and SAFE use of all fuels, whether renewable or fossil.
Status
Not open for further replies.
  • Like
Reactions: smokinj
Im still kinda green when it comes to sharpenin a chain..ive been using the husky roller guide..seems to work well...as for the depth gauges..i put the flat file on top of two teeth and keep a dimes distance from the raker...
 
Hey guys,
Probably going to start a new thread, but while we are on the subject of filing your guides. If your saw isn't cutting worth a crap and you are cutting a dead tree (pretty nasty on the outside, good wood though on the inside) does that increase the chance of your guide bar getting saw dust in it and it clogging up, preventing oiling? No joke, a piece of this tree caught on fire - some of the outside bark is like dust on the underside of the fallen tree. I'm a beginner and having issues. It isn't cutting worth a hoot. Gonna file the guides when I get home to check if that is the issue. I knew that this was part of maintenance but just haven't done it yet. Probably doing some things wrong but at least i'm doing the research to learn right?
Thanks
 
Sounds like an issue with your chain for sure. Are you sure you are sharpening it correctly? not just filing the rakers, but are you filing the cutters right? A dull chain will make lots of heat.
 
Best test is to buy a new chain and swap it on there, now that you've got enough miles under your belt to know the difference. Then, immediately get to sharpening your old chain, while the new one is still fresh and sharp, so you have something good with which you can compare your sharpening work.

In general, figure on sharpening or swapping your chain about twice a day, when out cutting. Hitting dirt, rocks, nails... replace or sharpen immediately.
 
Dead trees are harder.........especially if they are a good hard wood.

I was cutting on some dead white oak, the really dry stuff, and the saw was having trouble biting into the wood.

If you are cutting a truly dead tree that has actually dried out some before it fell, it is much harder to cut than green wood. This makes it all the more important to keep a good sharp chain.

I notice my chain being even slightly dull when cutting a dead tree. Where the same chain in green wood will still act sharp.


Best test is to buy a new chain and swap it on there, now that you've got enough miles under your belt to know the difference. Then, immediately get to sharpening your old chain, while the new one is still fresh and sharp, so you have something good with which you can compare your sharpening work.
In general, figure on sharpening or swapping your chain about twice a day, when out cutting. Hitting dirt, rocks, nails... replace or sharpen immediately.

I carry a file with me when cutting, but often that is exactly what I do, just swap chains.
 
I carry a toolbox with me when I go out cutting for the day, containing all my little chain saw tools (screnches, carb screwdriver, Stihl torx, bar groove cleaner, sprocket nose grease gun, etc.), and at least 3 - 5 spare chains for each of my saws. I always swap all my chains when we break for lunch. If I hit a rock or metal with a chain, then I'll either set that saw aside and get by with the other two, or swap it out immediately.

I collect all the dull chains by my grinder in the garage, until I'm down to just one or two spare sharp chains for each saw. Sharpening is done on the grinder in the garage with the radio playing, a few weeknights each year, after the kids are in bed.
 
gotcha. now I need to learn how to do this too. something new everyday on here.

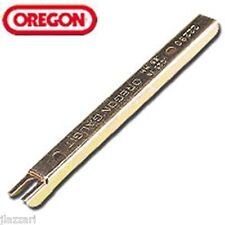
Don - something like this is usually used. There are a couple of different varieties.
gauge.jpg
 
  • Like
Reactions: ArsenalDon
Jags, and anyone else using those sheetmetal gauges... I've tried using those, but have never been confident in my use of them. Obviously, you can't file the depth gauge with the sheet metal gauge in place, or you'll quickly destroy it. So, I guess you put it on, feel with your finger to (try to) see how high the depth gauge is, remove the tool, take a few swipes with the file, reinstall the tool, check with finger... is this right?

Having never been comfortable with this method, I've been setting my depth gauges one of two ways:

1. Use hardened straight edge or parallel block set atop the cutters with a .030" feeler gauge to see if raker is too high. Take a few swipes with a flat file on each raker, until the feeler gauge just squeaks thru the gap.
2. Use same straight edge and feeler, but put a square-ground wheel on the grinder, and adjust grinder stop to take raker down to where the feeler indicates .030". Once the depth gauge is set, just blast thru all the rakers on the chain.

Either way, I'm using some straight edge set atop the cutters with a feeler to determine depth gauge height. I don't understand how anyone relies on these sheet metal tools, but I want to learn, as they look very convenient.
 
The tool is acting as the straight edge and feeler gauge that you are using. I use a grinder in a dremel, so that I can maintain the curve of the raker. I use the tool to figure out how many passes it takes with the dremel to get it where it needs to be, then simply repeat the process for the rest.

It is the same basic process that you are doing. On the loops for my 18" bar I do knock the rakers down just a bit more than the gauge indicates. It makes for an aggressive chain and the saw still has plenty of power to pull it.
 
Jags, and anyone else using those sheetmetal gauges... I've tried using those, but have never been confident in my use of them. Obviously, you can't file the depth gauge with the sheet metal gauge in place, or you'll quickly destroy it. So, I guess you put it on, feel with your finger to (try to) see how high the depth gauge is, remove the tool, take a few swipes with the file, reinstall the tool, check with finger... is this right?

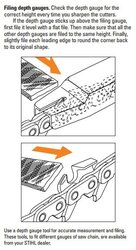
I use those tools also. You do file with the tool in place, because your file is riding on the depth gauge, not the tool. If you hit the tool, that means your raker is already as low as it needs to be. Plus the file sort of "skips" across the flat surface, and is more likely to "catch" on the side of the depth gauge, if that makes sense.
 
I use those tools also. You do file with the tool in place, because your file is riding on the depth gauge, not the tool. If you hit the tool, that means your raker is already as low as it needs to be. Plus the file sort of "skips" across the flat surface, and is more likely to "catch" on the side of the depth gauge, if that makes sense.
Your description makes sense, but I'd always read you should not file with the tool in place. Reasons commonly given are to promote longevity of the gauge, and rolling the file on the depth gauge, to maintain the profile and keep the ride of the chain less bumpy (one common problem with using a grinder on depth gauges).

While vague, the Stihl sharpening guide instructions do appear to agree with your method, Clarkbug:

stihl sharp guide.jpg
 
Last edited:
  • Like
Reactions: smokinj
Your description makes sense, but I'd always read you should not file with the tool in place. Reasons commonly given are to promote longevity of the gauge, and rolling the file on the depth gauge, to maintain the profile and keep the ride of the chain less bumpy (one common problem with using a grinder on depth gauges).

While vague, the Stihl sharpening guide instructions do appear to agree with your method, Clarkbug:

View attachment 130713


Bingo.....You got a long bar on hard wood with flat rakers even anti-vibe gloves cant help you. One big case of tennis elbow. ;)
 
Status
Not open for further replies.