Time for a new controller

  • Active since 1995, Hearth.com is THE place on the internet for free information and advice about wood stoves, pellet stoves and other energy saving equipment.

    We strive to provide opinions, articles, discussions and history related to Hearth Products and in a more general sense, energy issues.

    We promote the EFFICIENT, RESPONSIBLE, CLEAN and SAFE use of all fuels, whether renewable or fossil.
Status
Not open for further replies.

Snowy Rivers

Minister of Fire
Feb 7, 2010
1,810
NW Oregon
Well the season is coming to a close now, and it's time to make some changes to things.

I did some desperately needed repairs on the Whitfield Prodigy II last April and before that had replaced some of the electronics with after market items.

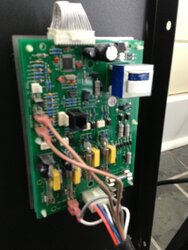
The controller in this stove is not very flexible and as such needs some serious changes.
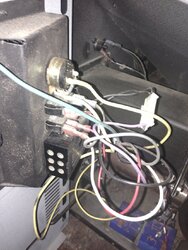
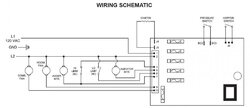
The draft fan is controlled by a solid state relay that is operated by the feed control triac, which also controls the room air fan.

The room air fan has a shunt tube that feeds combustion air to the fire pot too, and therein lies part of the issue.

The fire pot tends to fill up with an ashy clinker over a few hours and there is no way to separate the feed setting from the fan speed, as the feed setting is a 1 2 3 4 5 adjustment that ties the fan speed directly to the feed.

The draft fan needs to be on when starting the fire and it is wired through a door switch that also controls the main blower as well. The draft fan will stay on once the low limit switch is up to temp. The low limit serves no other function than to keep the fan running when the stove is shut down.

A new controller is available, but the one in the stove works as it was designed to, so no gain there.

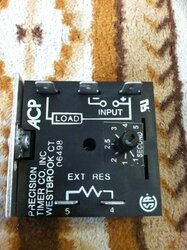
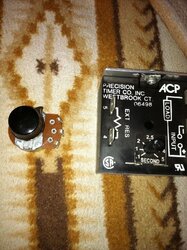
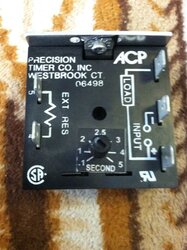
I have a new heavy duty timer that will allow a feed rate of 2 seconds on time and an adjustable off time (heat setting) from 2 seconds (high) to 10 seconds (low)

This timer has a load rating of 10 amps so it is far and away better than the micro controller on the factory controller.

I have a new heavy duty draft fan (Thank to wood heat stoves ) which is larger and more robust than the factory unit.

There has always been an issue with the factory latch out relay not wanting to reconnect after a power outage or unplugging the unit.

This too has been thought through and a new heavy duty latch relay is going in in series with the two high temp snap switches.

If the stove should over heat the snaps will open and then the power to the latch out will be cut, thereby stopping the stove and the unit will not restart unless the reset is pressed.

The snap switches are the factory equipment and other than they were not reset type, are fine.

This stove does not use a low temp switch in the start circuit, so no one shot timer is needed.

The next issue was to separate the feed rate from the blower fan, and this will be done with a Heavy duty fan speed control that will allow the fan to operate in the "sweet spot" for any fire setting.

Original equipment has a "Hall Effect" sensor in the blower fan to adjust the blower speed according to the feed rate setting (this is the main stumbling block here) unplugging the hall sensor, or possibly replacing the blower with a standard fan will accomplish the needed task.

The factory fan has been there since new, so a new fan would be nice.

The stove has a pressure switch that controls the feed motor and this will be retained to assure the feed is stopped if the fan should fail or in the case of the refit, not be turned on. (Speed control does have an off position)

Next came the issue of where to mount the new controls ????

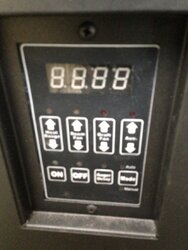
The factory location in the side of the stove is awkward and way too small of an area to mount the assorted knobs and switches.

There needs to be.

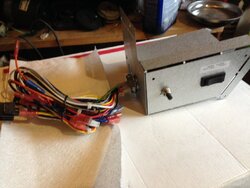
Master switch---- turns on the draft fan and sends power to the other controls
Burner switch-----controls flow of power from the timer to the feed motor
Feed rate potentiometer----controls feed motor (feed rate)
Fan speed control----- controls room air/combustion fan


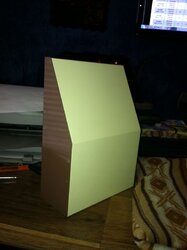
So, a nice control box was needed ????????

A recent trip to Fry's produced what I needed.

The current plan is to mount this lovely little box on the wall (above grand kid level) ;)
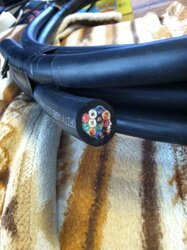
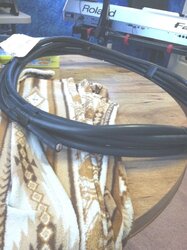
and connect it to the stove with a 10 conductor cable of heavy duty type.

The local electrical supply had just what was needed, and reasonably priced too.

This setup will work on any older stove that has a controller issue.
The only caviat is that if one needs an auto start, it would have to be set up with a separate timer unit.

All quite workable.

I am very excited about getting this new setup going.

The previous updates on the stove were good, but this refit should extend the little Whits life many many years.

The best part is that the electronics are OFF THE SHELF TECHNOLOGY, and not dependent on the whims of a stove company.


A shot of matching gray stove paint to the panel after its all done will make things dandy.

I will try to get piccys as we go along to show wasssssup.

Snowy
 

Attachments

  • stove panel1.jpg
    stove panel1.jpg
    41 KB · Views: 301
Here are some pix of the control timer and the Pot

Notice the adjustment on the timer that goes from 1/10 second to 5 seconds
This is the feed motor on time adjustment (Stove factory is 1.8 to 2 seconds)

The two terminals with the Pot showing in the pix control the off time (heat setting)

The 3 terminals connect the neutral wire to the minus spade and the L1 goes to the + spade with the load connected to the load terminal (Feed motor)

These timers have an "unlimited"rating for duty cycle and are solid state design.
The same company makes a one shot that can be used as a start timer if the need is there.
 

Attachments

  • timer1.JPG
    timer1.JPG
    99.1 KB · Views: 377
  • timer2.jpg
    timer2.jpg
    112.8 KB · Views: 389
  • timer3.jpg
    timer3.jpg
    82.7 KB · Views: 395
Have you thought of a new digital controller if could be adapted to the old stove with a new wire harness?
 
You continue to amaze, Snowy! :)
How much is that timer?
 
$51.35

The part number is a 646B-P15RO

This is a 120 volt timer with 1-5 seconds on time, and .1 to 10 seconds off time

The on time is adjustable on the timer and the off time (Heat range) is adjustable with a remote pot that is mounted to the control panel.

Not rocket science, just good sturdy tech is all.

This company used to sell these to many of the stove companies, but it was cheaper with more profit for the stove company to have proprietary boards made in China.

A pellet stove is not at all complicated, just need a timer to run the feed motor.

The basic safety systems MUST be retained and from there it's off to the rodeo.

Having the fan controls all separate from the feed controls is a great idea, as the chance for failure of both is nearly non existent.

Use a standard fuse that will handle the max amp draw for the stove and life is good.

The timer above is rated at 10 amps and the feed motor is about 2 amps max.

Placing a fuse in the feed circuit will assure that the timer never gets stressed, even if the motor gets a direct short.

I may fuse all the motors separately and then no worries at all.

6 amp main fuse, then 3 amps on the draft fan and the blower and 2 amps on the feed motor.

Easy to install the little fuse holders in the panel.

The company is

https://www.google.com/url?sa=t&rct=j&q=&esrc=s&source=web&cd=2&cad=rja&uact=8&sqi=2&ved=0CDEQFjAB&url=http://www.primetechnology.com/&ei=nfxaU-TyHdefyAT1zoLoCw&usg=AFQjCNGTKEIPrI8ZQYh9dJc-NjOEbxJixA
 
Last edited:
Thanks! I understand exactly what you're doing AND where you are coming from! KISS is your motto!
 
  • Like
Reactions: johnny1720
Thanks for taking the time to take the pictures and write up the modifications. It sounds like it will upgrade the stove quite a bit.
 
The part number is a 646B-P15RO
This is a 120 volt timer with 1-5 seconds on time, and .1 to 10 seconds off time

Hi Snowy
The timer module is very similar to what the Enviro EF-2 and EF-3 uses and similar to what the Napoleon NPS-40 uses. I have worked on many of these stoves. They also have a power relay that switches the
AC power in. There was an NPI-40 that I worked on where a prior tech told the customer he had to rewire the stove! That is a red flag if I ever heard of one.LOL After that the stove was completely dead. So after I fixed all the wiring changes, I had to replace the burned up power replay module to get the stove working! Then replace the low limit snap disc and the POF snap disc. Customer was happy, but it took me 3 visits to straighten the stove out!

Just happen to have some pics of the 2 modules. :)

These stoves are a good learning tool. I recommend everyone should examine the wire diagrams! > http://www.allseasonsheatingcooling.org/stoves/pellet/NPS40/NPS40.pdf

No fuses in these stoves so when the Ignitor blows it blows the house fuse or trips the house breaker! ROFL ! ! !


Pic 2 - Auger timing module is on left and Power Relay module is on the right. :)
 

Attachments

  • NPI40pic1.JPG
    NPI40pic1.JPG
    217.1 KB · Views: 330
  • NPI40pic2.JPG
    NPI40pic2.JPG
    244.6 KB · Views: 286
Last edited:
I thought about a power relay, but the low current draw of the blowers is not enough to really justify spending the $$$ for one, and it would do little other than add another failure point.

The relays in the pix look like the ones many stoves came with for sure.

Back in the 80's/90's many companies used the off the shelf tech, but when word got out that the relays could be had cheap, the only way the stove companies could save the parts biz was to go to all proprietary parts.

The use of the off the shelf timers was gone a few years later.

Really baffles me as to how anyone can rewire a pellet stove and screw it up, especially if they are a repairman ????

These things are as basic as 1+1 and definitely not rocket science.

Buuuuuuuuuuuuuuutttt, it happens.

Basics are simple.
Green is always ground and possibly a bare copper
White is always neutral
Any colored wire can carry voltage

A good standpoint.

The more they over think the plumbing, the easier it is to stop up the drain.


One point to consider is that the delicate micro electronics (control boards) are very sensitive to static discharge.

I have seen a stove die a quick death when the owner walked across the carpet in cold dry weather and touched the controls.
SNAP -ALL DONE.

Many years back the pellet stoves used cube relays that were mechanical types, very robust, but subject to failure in time due to the large repetition of cycles, hence the switch to the solid state units.


Another point to consider is, most stoves today have very small value fuses on the board, and if there is a direct short in a motor circuit the board goes pooooof anyway.

Having separate timers and speed triacs makes diagnostics a snap and cheap to fix.

On a cold night, the timer can be swapped out in maybe 10 minutes, same with the triac.

A complete nightmare is a control board flashing a trouble code at 2 am Sunday morning :eek:
 
Looking over that wiring diagram. !!!

Soooooo, we blow a 20 amp breaker in the house and likely knock out the room lamps (depending on the house)
so you trip over the dog, fall down and bust your butt.

Great design
ROFLMAO

Snowy
 
Looking over that wiring diagram. !!!

Soooooo, we blow a 20 amp breaker in the house and likely knock out the room lamps (depending on the house)
so you trip over the dog, fall down and bust your butt.

Great design
ROFLMAO

Snowy

Yes. LOL

That is why I carry inline fuse holder and fuses all the time now to add in for a modest fee. :)

Another great design is the digital boards with only ONE 5 - 7 amp fuse. When the ignitor goes and the fuse blows, the stove cannot be lit manually because there is no power to any component!
So I install a 4 or 5 amp inline fuse holder and glass fuse on the ignitor and bingo, the stove can be lit manually with starting gel or hand sanitizer!

However US stove company is one of the very few manufacturers that does have a nice fuse array on their control boards!
Another feature on their board is the speed of the draft fan can be set in manual mode.

Timing modules can be easier to fix and replace, but the digital boards usually have terminals for a T-Stat. My customers really want that.
In fact, I am rebuilding an older Enviro EF-3 I picked up cheap with the power relay and auger timing modules but no T-Stat capability.

So the board pic below would be really cool. :)
I may use an newer Enviro digital board to stay compatible.
 

Attachments

  • USCcontrolboard (1).JPG
    USCcontrolboard (1).JPG
    167.9 KB · Views: 333
  • USCcontrolboard (2).JPG
    USCcontrolboard (2).JPG
    200.9 KB · Views: 267
  • USstoveControlPanelDiagram (1).jpg
    USstoveControlPanelDiagram (1).jpg
    33.6 KB · Views: 350
I can see that if a stat is high on the priority list, then a digital controller is the only good choice.

We don't have a need for the stat, and simply add or subtract from the number of stoves burning to keep the house comfy.

Total reliability is more important to me than the little gizmos.

A wood stove pretty much is what it is, simple and reliable.

The pellet stove was originally supposed to be a wood stove without all the hauling, chopping, splitting and mess, but then the high tech boys figured out an excuse to bolt a computer onto the beast, and simplicity went out the window
 
  • Like
Reactions: Mt Bob
I do not qualify to comment,as my unit has electronics,but something to be said about only having a on/off switch and a rotating knob.Leaves very little for me to do,and I like it.Am still amazed at friends old whits and englanders,hanging in there with my old integra.
 
Some lovely weather is here for a few days and I decided to gather some more goodies for the project.

I called up the local electrical supply house and ordered up some 16/12 SOOW cable to wire my new "Remote" panel to the stove.

I want the panel on the wall above and a few feet away from the stove to allow operations without having to bend over, plus having the controls out of the reach of small grand kids.

Getting a 12 conductor cable is not all that hard, but not a hardware store item.

So after ordering the stuff, I had to run into the metro area to the branch office, pay for it then drive a couple miles to the main warehouse to pick it up.

The piccys shows enough cable to do both of our Whitfield's with a remote mount controller.

This cable is "the real deal" and is an industrial type, 600 VOLT 90C rated with a very robust indoor/outdoor cover.

All the wire are color coded and will allow black, white and green to be used for the L1, Neutral and ground as they normally are.

The remainder of the colored wires will handle the different functions needed.

Having the panel remote mounted should effectively isolate the solid state components (timers) from any static discharge while touching the controls.

The panel will be grounded thus reducing the chance of any static spikes reaching the sensitive stuff.

I am excited about getting this project done and operational, but decided to wire the panel, then mock up the system using a replacement fan and feed motor, then running the set up under test for a while to be sure there are no glitches ;)

Just need some crimp on fully insulated spade connectors, some cable fittings to enter the panel and the stove, a few screws and such and it's off to the rodeo.


I will continue to post pics as the project moves forward

Snowy
 

Attachments

  • cable1.jpg
    cable1.jpg
    83.7 KB · Views: 243
  • cable2.jpg
    cable2.jpg
    79 KB · Views: 240
  • Like
Reactions: Owen1508
That cable IS the real deal! I was expecting flat ribbon cable but then realized 16 gauge ribbon cable would be 'unnatural'. :) Very well thought out!
 
Some lovely weather is here for a few days and I decided to gather some more goodies for the project.

I called up the local electrical supply house and ordered up some 16/12 SOOW cable to wire my new "Remote" panel to the stove.

I want the panel on the wall above and a few feet away from the stove to allow operations without having to bend over, plus having the controls out of the reach of small grand kids.

Getting a 12 conductor cable is not all that hard, but not a hardware store item.

So after ordering the stuff, I had to run into the metro area to the branch office, pay for it then drive a couple miles to the main warehouse to pick it up.

The piccys shows enough cable to do both of our Whitfield's with a remote mount controller.

This cable is "the real deal" and is an industrial type, 600 VOLT 90C rated with a very robust indoor/outdoor cover.

All the wire are color coded and will allow black, white and green to be used for the L1, Neutral and ground as they normally are.

The remainder of the colored wires will handle the different functions needed.

Having the panel remote mounted should effectively isolate the solid state components (timers) from any static discharge while touching the controls.

The panel will be grounded thus reducing the chance of any static spikes reaching the sensitive stuff.

I am excited about getting this project done and operational, but decided to wire the panel, then mock up the system using a replacement fan and feed motor, then running the set up under test for a while to be sure there are no glitches ;)

Just need some crimp on fully insulated spade connectors, some cable fittings to enter the panel and the stove, a few screws and such and it's off to the rodeo.


I will continue to post pics as the project moves forward

Snowy

Hi Snowy
I will help you wire your controller if you help me wire mine. :)

Here is a pic of the Quadrafire Contour Control Panel new wire harness I have to install. :)

Click pic to Enlarge
 

Attachments

  • QuadContourWireHarness.JPG
    QuadContourWireHarness.JPG
    184.6 KB · Views: 248
Yours looks like plug and play :)

Mine is likely to be plug and pray. !!!
 
  • Like
Reactions: tjnamtiw
TJ
I was in heavy machinery building years ago, and we used to use that sort of stuff for remote panels.

Tad overkill, but will stand pretty much everything tossed at it.

The vacuum won't damage it if it gets a hold of it.

That heavy jacket will tolerate much abuse.

Thanks for the compliments

Snowy
 
Yep, you sure won't have to worry about it for 100 years! 'Plug and Pray' > love it!!!! ;)
 
Yours looks like plug and play :)

Mine is likely to be plug and pray. !!!
Yes "Plug N Play" I keep them mostly stock unless an upgrade makes it work better. I like to replace the burn pot bolts with Stainless steel ones!
 
Yes "Plug N Play" I keep them mostly stock unless an upgrade makes it work better. I like to replace the burn pot bolts with Stainless steel ones!
And hopefully a liberal application of anti-seize compound! :) Oooops, used a dirty word in that sentence!!! Wash my mouth out with soap.
 
And hopefully a liberal application of anti-seize compound! :) Oooops, used a dirty word in that sentence!!! Wash my mouth out with soap.

Good idea
 
Anti-seize goes on everything that gets heat in my world. A can lasts forever too. My can of 'Never-Seize' is probably 30 years old! It's moly based.
 
Never seize is a good thing.

I have been waiting to do a complete refit on this stove for some time now.

Will have a broader feed control, with adjustments on the feed from 2 sec on 2 sec off up to 2 sec on and 10 seconds off in variable increments.

The room air fan will be infinitely variable as well, instead of just only a few speeds, plus the fan speed will not be directly tied to the feed.

The latch out relay will be directly tied into the circuit to keep the stove from running after a power outage.

Gonna be sweet.


Snowy
 
Status
Not open for further replies.