Finishing off a hearth

  • Active since 1995, Hearth.com is THE place on the internet for free information and advice about wood stoves, pellet stoves and other energy saving equipment.

    We strive to provide opinions, articles, discussions and history related to Hearth Products and in a more general sense, energy issues.

    We promote the EFFICIENT, RESPONSIBLE, CLEAN and SAFE use of all fuels, whether renewable or fossil.
Status
Not open for further replies.

SteveKG

Minister of Fire
Jun 23, 2009
740
Colorado Rockies
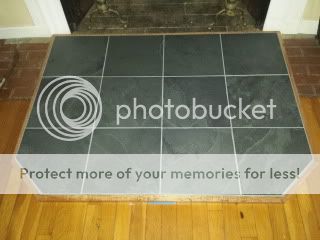
I am starting my hearth for the new Keystone. It is a simple affair, scrap redwood planks to give it the height and the usual hardiboard and topped with slate tiles. I was going to rabbet the edges of the wood, seal them and use that as my edge trim [or, border some might call it]. Then I thought, wait, that trim would be flammable. So I need to use something else. I thought about just leaving a half-inch space around the edges so I could use grout, and I may still do so [run the grout at about a 45-deg angle from the wood up to the edge of the tile]. Any other ideas out there? I don't want to use shiny aluminum or anything like that.
 
The wood trim with a rabbit will be just fine unless your hearth is made to the bare minimum. I would highly suggest making it larger than the minimum, then the wood trim isn't an issue at all.
 
What are the hearth requirements of the stove? As long as it only needs ember protection and that wood edge is beyond the minimum hearth size it wont matter.
 
I put tiger maple on the edges of my Keystone hearthpad. Not real worried about it...

20140516_173937_zps0ae7ea4a.jpg
20140611_200924_zps5b75f961.jpg
 
Thanks for the responses. I left out an important caveat: the hearth is raised enough to give me clearance to the floor. However, the front edge of the hearth will be about the distance of the length of the stove legs. In other words, the stove will sit near the edge of the hearth. That means less than 12" clearance. It may still be enough, in reality, I don't know how hot that little rabbet would get. I have the stove set up on a dolly at the height of the eventual permanent hearth so I could do a test installation of the stovepipe. I may open up the house and do a few break-in fires and see how much heat actually makes it from the bottom of the stove to the areas of the hearth.
 
If you decide to build your own heart to go over a combustible floor, start with a plywood base. Over this apply:
1) a 1/2 inch layer of an approved non-combustible insulation board (such as DUROCK cement board or WonderBoard Backer Boar
d), then apply
2) 1/4” or more of a decorative, non-combustible material such as tile, slate,stone or brick.

The hearth for a Keystone or Palladian Soapstone stove must extend 16” beyond the
loading door side. The hearth should extend 8” beyond the all other sides (front, back,
and left side). A hearth size of 44” D x 58” W will meet the safety requirements and be
more pleasing than a hearth built to just the minimum dimensions.
Hearth Sizes:
Minimum Recommended
36” D x 52” W 44” D x 58” W
For a corner installation, your hearth should measure at least 60” along each wall

Follow these instructions or refer to page 6 of your manual and you should be ok

the only thing i don't follow is why they call backer insulation board
 
The online (Woodstock website) manual for the Keystone is outdated. Woodstock changed the hearth requirements and now specifies a minimum "R" value of 0.59.

Even Durock 1/2" Next Gen. is only R=0.39.
 
Last edited:
Well that sucks that they cant update their online manual. That means the op needs to use double durarock next gen i guess or something else
 
Correct. Start with a bottom layer of 3/4" plywood then screw down two layers of 1/2" Durock NextGen per instructions, then tile using latex modified thinset for a good hearth.
 
I used 1/2" micore and 1/4" Hardibacker and then tiled. 2 layers of Next Gen. sounds fine.

I agree, WS should update their online manual - I'm just glad I happened to find out before my stove arrived with the updated manual. Otherwise that would have REALLY stunk.
 
I didn't mess with plywood. That was ok for my pellet stove with low external temps. I didn't want it that thick and I really didn't want any wood in it (except for the trim) for a stove that might actually get hot, especially below. So I welded up a solid frame of 1" angle iron. Screwed the trim to that from the inside.
 
Status
Not open for further replies.