How to remove catalyst chamber from Jotul Firelight 12?

  • Active since 1995, Hearth.com is THE place on the internet for free information and advice about wood stoves, pellet stoves and other energy saving equipment.

    We strive to provide opinions, articles, discussions and history related to Hearth Products and in a more general sense, energy issues.

    We promote the EFFICIENT, RESPONSIBLE, CLEAN and SAFE use of all fuels, whether renewable or fossil.
Status
Not open for further replies.
That damper needs to seal well, otherwise you will probably find yourself having to do this rebuild again, very soon. There aren't many negative things one can say about a Firelight 12, but they will overfire if left in bypass mode, and running with a damper that doesn't seal may be a big step in that direction.

Unfortunately, it was 2012 when I last rebuilt one of these, so I don't remember the locations of all gaskets, but it's detailed in the parts explosion and in the manual. I do recall the large back plate that held in the cat was gasketed, but that gasket was not cemented, so I had to hold it in place with masking tape when I installed that plate. The damper frame has a gasket at the damper, and I assume another one behind, but I honestly can't remember today.

The Firelight 12 is an awesome stove. There's not a stove on the market that has the same combination of looks, size, and performance.
 
BTW... don't use a Condar catalyist in a Jotul 12. The Steelcat's fail, and their Ceramic Cats will blow out your cat chamber, due to the expanding gasket they put between the ceramic and metal can. I destroyed TWO cat chambers and TWO chamber covers with Condar ceramic cat's last spring, and one of those chambers was only 2 years old.

Stick with the Jotul OEM catalysts.
 
i read in the tread i posted that the steel condar was working well it was the ceramic one that destroys the chamber some guy said he has been using his steel one from condar and it wont hurt the chamber only the ceramic with gasket ! so i canceled my order on the oem to get the steel ill try it , at least it wont hurt the chamber being steel & not the ceramic

also i thought condar is making the oem ceramic ones for jotul or was during the 90s ???
 
Hi Joe,

I ordered two Condar SteelCats in 2011/2012, and they each worked fine for a few months, but failed by distortion of the metal honeycomb, to the point where air could no longer pass thru the cats, and they were constantly clogging due to this. I called Condar, who stated that they've had a lot of calls from Firelight and VC customers (essentially all downdraft cats?) with the same problem. They recommended I switch to their ceramic.

I had concern with the ceramic, due to the mention of an expanding gasket in their marketing materials, filling the gap between the ceramic brick and the metal can. As you know, this cat is installed in a delicate refractory chamber, which could be damaged if the gasket were to expand too much.

Condar insisted this would not be a problem, so I got two of these cats to finish out last season. Both worked beautifully, eliminating the light off troubles I was having in the last few months of SteelCat use. However, when I opened my stoves for summer cleaning, I found both refractory cat chamber covers crushed and split in the middle (where the inner burn plate holds them in place), and at least one of the chambers (almost new) had large cracks in the rear wall.

I have compared the Condar cats to my old Jotul OEMs, and found they did indeed expand, causing this damage. I have not yet found a source for another Jotul cat.
 
Last edited:
Hi Hoe,

I ordered two Condar SteelCats in 2011/2012, and they each worked fine for a few months, but failed by distortion of the metal honeycomb, to the point where air could no longer pass thru the cats, and they were constantly clogging due to this. I called Condar, who stated that they've had a lot of calls from Firelight and VC customers (essentially all downdraft cats?) with the same problem. They recommended I switch to their ceramic.

I had concern with the ceramic, due to the mention of an expanding gasket in their marketing materials, filling the gap between the ceramic brick and the metal can. As you know, this cat is installed in a delicate refractory chamber, which could be damaged if the gasket were to expand too much.


I can also vouch for the steelcat problems. Joful and I have discussed this in the past I also went through two of the steel cats on my VC downdraft. What I think happens is that they are sooooo hyper active when new its all too easy to get the thing overfired if you are not watching (and vc's are temperamental to begin with). You end up having it run at temps 1700-2000 at times when its new and that burns off the catayltic wash coat and warps it. Both of mine turned from brown to all grey in just months, then I'd have lightoff trouble and mid burns stalls just like Joful.

Woodstock seems to have good luck with them based on the expeience of Dennis and others. Same Ive heard about Blaze king. somehow those updraft designs must keep the temps more reasonable.

Condar also gave me a free replacement canned Ceramic that's working well. The only difference here is that in my stove the refractory around the car is a bit thicker and its sandwiched between cast iron plates that effectively clamp it and resist the blowout effect from the expanding gasket. the actual ceramic elements i believe Condar just ordered from Sud Chemie or Applied Ceramics so if you order the Jotul part you are probably getting the same element just without the can?

Good luck, its a beautiful stove and worth the work.
 
  • Like
Reactions: Ashful
Joe,

I'd be happy to help you determine where the gaskets in your stove go. I'll let you know how my steelcat looks in a few days. I did buy the small piece of refractory that goes at the bottom. I figured the engineers at Jotul know more than I do about wood stoves.

Let me mark up some pictures and I'll reply tomorrow.
 
  • Like
Reactions: Ashful
The Jotul cat still has a steel "can", like Condar. However, the gasket material between the ceramic and steel on the Jotul doesn't expand when heated, the way the Condar does. For this, I am very irritated with Condar, as I directly questioned this and was fed a lie in response. I'll try to get photos of both soon.
 
JJ, that place looks awesome! My motto is, you can never have too much wood around you. >>
 
Sad part is im surrounded by tall pines no hardwood hardly , very little . So i have to buy it . lol Plenty of water to put out a fire though . That diverter really saves the pipe from being torn off the metal roof or any roof . They cost about $140.00 deliverd but worth it if you have ice build up. The cost of a destroyed pipe can be much more $ . Question will a magnet thermostat attached to my pipe just above stove work alright ? What would be the safe spot for temp with this type thermostat and location to operate at or optimize with out damages to the stove parts as done before by over heating it . ???? The funds just arnt there to buy a more expensive type thermostat this year !! thanks joe BTW thats not my stove pipe in first pic :)
its on other side ! For those who might have issue with ice or snow build up. http://www.metalroofsnowguards.com/VentSaver-HD-Heavy-Duty_p_57.html

View attachment 136586 View attachment 136587 View attachment 136588
View attachment 136589 IMG_0396 (2).jpg
 
Last edited:
That damper needs to seal well, otherwise you will probably find yourself having to do this rebuild again, very soon. There aren't many negative things one can say about a Firelight 12, but they will overfire if left in bypass mode, and running with a damper that doesn't seal may be a big step in that direction.

Unfortunately, it was 2012 when I last rebuilt one of these, so I don't remember the locations of all gaskets, but it's detailed in the parts explosion and in the manual. I do recall the large back plate that held in the cat was gasketed, but that gasket was not cemented, so I had to hold it in place with masking tape when I installed that plate. The damper frame has a gasket at the damper, and I assume another one behind, but I honestly can't remember today.

The Firelight 12 is an awesome stove. There's not a stove on the market that has the same combination of looks, size, and performance.
Are you saying they over fire with damper open or closed position im assuming you mean over fires when damper is open .? This makes sence . That you want to get the stove to temp and shut the damper so cat works, but they get mighty hot with it closed and even air shut right down on the air control . Ive noticed at times ive seen the cover glowing orange when checking in on it . I guess its a skill you learn to get it right after paying attention to temps
 
Yep, they overfire with the damper open. I find this to be the case within 10 - 20 minutes, no matter how far I shut down the air control. With the damper closed, they're infinitely controllable.

I have three thermometers on each my stove, but I'm an anal-retentive geek, so that may be a wee bit of overkill. In any case, here's my setup, and how I run it:

Therm 1: Condar magnetic dial on top center of top loading door (very fast reacting spot)
Therm 2: Magnetic dial on stovepipe, about 15" above stove collar
Therm 3: Catalytic probe thermometer. For this, I use a custom high-temp K-type thermocouple probe from Omega, with a cheap Amprobe thermocouple meter. There are better options out there for cat probe thermometers, but this works for me.

On reload:

1. Open bypass, rake coals, load stove.
2. Leave one front door cracked up to a minute or three, if necessary, never longer than it takes for load to light.
3. Close and latch doors, set iPhone timer for 5 - 8 minutes, depending on size of load and how vigorously it lit up.
4. When timer goes off, check stove top and stove pipe temp. If both are > 500F, and load looks well-charred, close bypass damper. If stovepipe is getting > 600F, and stove top is still cool or wood isn't well charred, then lower primary air and re-set iPhone timer for 3 minutes.
5. Check again, and adjust air as necessary to keep stovepipe from getting too hot, until stovetop is > 500F and load is well-charred.
6. Close bypass damper and set iPhone timer for 5 minutes.
7. When timer goes off, verify that cat temp is > 700F. If so, lower air to 1/2, and reset timer for 5 minutes. If not, wait until it is, then lower air to 1/2, and reset timer for 5 minutes.
8. When timer goes off, lower air to 1/4, and reset timer for 5 minutes.
9. When timer goes off, lower air to final setting. This "final setting" is full-closed on my stove with the 27 foot chimney, but maybe on the "minus" symbol for my stove with the shorter chimney. I find that going full-closed on the stove with the shorter chimney results in some back-puffing, unless temps are screamingly cold outside.

If I were strapped for cash, I would probably skip the stovetop thermo before skipping on the cat thermo. However, using mechanical thermometers for each, you're probably looking at under $100 for all three. You can use a small mirror to read a mechanical probe thermo in the back of the stove, in a pinch. There are pre-packaged electronic cat probe thermometers, but they usually cost more than the mechanicals.
 
Yep, they overfire with the damper open. I find this to be the case within 10 - 20 minutes, no matter how far I shut down the air control. With the damper closed, they're infinitely controllable.

I have three thermometers on each my stove, but I'm an anal-retentive geek, so that may be a wee bit of overkill. In any case, here's my setup, and how I run it:

Therm 1: Condar magnetic dial on top center of top loading door (very fast reacting spot)
Therm 2: Magnetic dial on stovepipe, about 15" above stove collar
Therm 3: Catalytic probe thermometer. For this, I use a custom high-temp K-type thermocouple probe from Omega, with a cheap Amprobe thermocouple meter. There are better options out there for cat probe thermometers, but this works for me.

On reload:

1. Open bypass, rake coals, load stove.
2. Leave one front door cracked up to a minute or three, if necessary, never longer than it takes for load to light.
3. Close and latch doors, set iPhone timer for 5 - 8 minutes, depending on size of load and how vigorously it lit up.
4. When timer goes off, check stove top and stove pipe temp. If both are > 500F, and load looks well-charred, close bypass damper. If stovepipe is getting > 600F, and stove top is still cool or wood isn't well charred, then lower primary air and re-set iPhone timer for 3 minutes.
5. Check again, and adjust air as necessary to keep stovepipe from getting too hot, until stovetop is > 500F and load is well-charred.
6. Close bypass damper and set iPhone timer for 5 minutes.
7. When timer goes off, verify that cat temp is > 700F. If so, lower air to 1/2, and reset timer for 5 minutes. If not, wait until it is, then lower air to 1/2, and reset timer for 5 minutes.
8. When timer goes off, lower air to 1/4, and reset timer for 5 minutes.
9. When timer goes off, lower air to final setting. This "final setting" is full-closed on my stove with the 27 foot chimney, but maybe on the "minus" symbol for my stove with the shorter chimney. I find that going full-closed on the stove with the shorter chimney results in some back-puffing, unless temps are screamingly cold outside.

If I were strapped for cash, I would probably skip the stovetop thermo before skipping on the cat thermo. However, using mechanical thermometers for each, you're probably looking at under $100 for all three. You can use a small mirror to read a mechanical probe thermo in the back of the stove, in a pinch. There are pre-packaged electronic cat probe thermometers, but they usually cost more than the mechanicals.[/quote

Yeh, actually condar mentioned a rather expensive option that went in the back of stove im prety sure they said in the 150 dollar range . ill start out using cheaper version . any suggestions on brand , i read on condars site they were like the pioneers of the thermostats i thought i read first magnet therm . i could be wrong with out scanning back to thier site . Ill start with a magnet type and as we get into the colder weather ill try and get as you describe @ least two one on pipe and one on cover . then next year . i could buy a probe type . if you can post a pic of these , set ups you have might help me understand where that cat probe one goes and how it mounts in there . im clueless . thats why i thought mag type to at least keep my temps down . So do you think a normal burn temp woulld be 500 to 600 or what temp do you say woe back off jack on the magnet type ? so ill know i could cause damage to internals . i thought these stoves went way up over 600 and still safe but i guess im wrong ! Should be interesting to see how my stove operates after all new parts and gaskets . and using a thermostat . for first time in 19 years ! do you use a blower to disperse the heat from stove ?
can you explain how the probe type in back of stove goes in ? on the firelight 12 ?
 
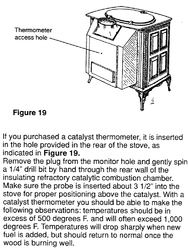
Joful sounds like he is pretty busy. I don't have the stove. This is from the manual:

Screen Shot 2014-08-15 at 8.02.04 PM.png
 
Joful sounds like he is pretty busy. I don't have the stove. This is from the manual:

View attachment 136617

oh so its normal to burn at 1000 degrees at the cat ? is this temp far from the temps the magnet type would read attached to the lower stove pipe or cover ?? i thought the internals will distort at temps around 1200 to 1300 no ? i guess im looking for the max tempi can let my stove go to with damper closed with out distorting back plates and destroying the cat
 
Yes, the cat usually runs at much higher temps than the stove top temp or stove pipe temps. This is true in all cat stoves. A good design will isolate the heat with insulation or dissipate it quickly. Stove top temps should not get much over 700F for any sustained time. Flue temp will vary depending on the point in the wood burning cycle. It will be hotter with the bypass open.
 
Thanks, begreen. Yep, typical stove top on a Firelight, as measured on the top-load door, is going to be 300 - 700 F. If your stove starts headed toward 700F, and you have the air turned down, it's time to start worrying and looking for a bad gasket / broken seam.

The cat probe will typically run 1300 - 1700 F in the early part of the burn, and spikes above 1800 F occasionally happen. That's the reason for that soft refractory box, to insulate the more delicate cast iron from the extremely high cat temps. The beauty of a cat stove is you can smoulder along at 300F stovetop temp, while the cat is cooking the creosote at 1500F, for a long and slow burn.

A quick Google search of catalytic probe thermometer brings up many options in the $25 - $30 range, although you need to get behind your stove (or use a small mirror) to see these. Just make sure it's at least 3 inches long, and not more than 5 inches long, to make it easy to use with this stove. I buy 1/16" (capillary size) thermocouple probes that are 6" long, but I bend them at the 3.5 inch mark, to control their insertion depth.
Why do you bend the probe dosent that effect the readings ? id like your reason for bending it and how much of a bend ?
 
I'm using a 1/16" diameter K-type thermocouple probe, with the thermocouple located at the tip of a long metal capilary tube, so the only thing in the tube where I'm making the bend is wires... no effect on the reading.

I bend it for two reasons:

1. It limits the insertion depth to a point where the probe tip ends up centered directly over my cat combuster.
2. It allows the probe to fit in the back of my one stove, where there is only 2" between the back of the stove and the stone wall.

I would not be bending a mechanical probe, but this one's electric.
I may have the same issue lol exactly 3 " till i hit stone work id be using a mechanical therm, i wounder if it willl go or not grrrrr im thinking not. due to when it gets by the cast and starts to hit the chamber it will damage it trying to fanagle it in there maybe .
 
  • Like
Reactions: Ashful
Yeah, you'll have to pull the stove away from the wall a moment, to get it installed.
 
That's because most, not knowing what it's for, throw it away when it gets damaged. It's very easily damaged. Talk with Jotul tech support (if you're lucky enough to get thru to them), and they'll tell you it's still part of the rig. That's what they told me, anyway.

I will say, though... I'm not sure why it's needed, either! ;lol They told me to use it, so I use it. I figure someone must have had a good reason to add this expensive silly little piece to the design, even if I don't understand what it is.
hi ashfull,how and where does the "bottom " go? just lay it in front?
 
Yep. Just lays on floor in front of cat chamber, behind removable burn plate. Not sure why it's needed there, but figured the engineer who designed it does, or else he'd have not included it in the design.
 
Joe,

I'd be happy to help you determine where the gaskets in your stove go. I'll let you know how my steelcat looks in a few days. I did buy the small piece of refractory that goes at the bottom. I figured the engineers at Jotul know more than I do about wood stoves.

Let me mark up some pictures and I'll reply tomorrow.
How are the steel cats?
 
Status
Not open for further replies.