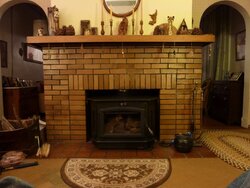
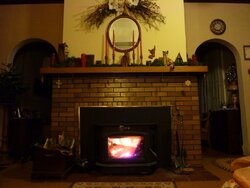
Buck 91 installed

  • Active since 1995, Hearth.com is THE place on the internet for free information and advice about wood stoves, pellet stoves and other energy saving equipment.

    We strive to provide opinions, articles, discussions and history related to Hearth Products and in a more general sense, energy issues.

    We promote the EFFICIENT, RESPONSIBLE, CLEAN and SAFE use of all fuels, whether renewable or fossil.
Status
Not open for further replies.

Jasper

Member
Jul 26, 2014
42
Upstate Sc
We have a fireplace with internal chimney and love to burn but I knew it was inefficient and didn't make much if any heat. I grew up in a house with a woodstove and remember how much heat it blasted out. Then I also remembered hearing about wood burning firlace inserts. So one cold evening last year I started doing some internet searches and stumbled upon this site. I poured over it for months researching and reading reviews. I was amazed at how far wood stoves have come since the last time I used one. I was also amazed at the knowledge and expierence on this website.

Me and my wife visited a local fireplace and stove shop that is a buck dealer. We decided on the 91 and had it installed a few weeks ago with insulated liner. The day it was installed I built a smal fire in it even though it was 90+ outside. I just couldn't resist. I couldn't believe how fast it heated up and the amount of heat it put out. I never engaged the cat as it barely reached 600 degrees.

This week we had an evening that was in the low 60's and I lit the stove again and got the cat up to temp and engaged it. Holy cow is all I can say. With a few dry ugly cut offs and knots on a coal bed this thing was blasting heat. I can't wait for winter this year.

Just wanted to tell everyone thank you for sharing knowledge and I feel that if I run into any problems I think I can find the answers here.
 
Welcome, Jasper. :) You'll like the 91, it can really toss some heat! These modern stoves like dry wood for quick start-up and the best heat output.. Hopefully you've got some dry wood to burn that has been split and stacked for a while? How fast it will dry depends on the specie; Oak is about the slowest to dry, and I like to have it in the stack, not split too big, for a couple years before I use it. But soft Maple here will be getting fairly dry in several summer months. I guess you've got a good bit of square footage to heat if you went with the big stove? Will heat flow well in your place, fairly open layout? We like pics, BTW. ==c Read your manual a few times, there's good info in there. The 91 is at my MIL's house so I load twice a day. If it were at my house I could open the air a little at the end of the burn to keep stove temp up and make for quicker cat light-off on a fresh load. You can see the cat glow through the bypass rod hole but even when it isn't glowing, the cat probe will tell you if it's burning. When ramping up a cold stove, I give it just enough air to get some decent flame in the box (not a roaring fire) and then close the bypass when I've got 900 or better on the probe. I keep some flame going for a while after I close the bypass to make sure the cat is burning well before I cut the air back. Now, I've got the old Condar probe, not the new one with the two-tone silver/black dial, and the old one reads a little higher from what I hear. My probe would go high (1800+) if I got too much of the load burning at once, and I avoid that as much as possible. I make it sound more complicated than it really is and with a little experience you'll have the stove doing what you want in no time. Don't hesitate to ask any questions that may arise. Enjoy the heat! >>
 
Welcome, Jasper. :) You'll like the 91, it can really toss some heat! These modern stoves like dry wood for quick start-up and the best heat output.. Hopefully you've got some dry wood to burn that has been split and stacked for a while? How fast it will dry depends on the specie; Oak is about the slowest to dry, and I like to have it in the stack, not split too big, for a couple years before I use it. But soft Maple here will be getting fairly dry in several summer months. I guess you've got a good bit of square footage to heat if you went with the big stove? Will heat flow well in your place, fairly open layout? We like pics, BTW. ==c Read your manual a few times, there's good info in there. The 91 is at my MIL's house so I load twice a day. If it were at my house I could open the air a little at the end of the burn to keep stove temp up and make for quicker cat light-off on a fresh load. You can see the cat glow through the bypass rod hole but even when it isn't glowing, the cat probe will tell you if it's burning. When ramping up a cold stove, I give it just enough air to get some decent flame in the box (not a roaring fire) and then close the bypass when I've got 900 or better on the probe. I keep some flame going for a while after I close the bypass to make sure the cat is burning well before I cut the air back. Now, I've got the old Condar probe, not the new one with the two-tone silver/black dial, and the old one reads a little higher from what I hear. My probe would go high (1800+) if I got too much of the load burning at once, and I avoid that as much as possible. I make it sound more complicated than it really is and with a little experience you'll have the stove doing what you want in no time. Don't hesitate to ask any questions that may arise. Enjoy the heat! >>
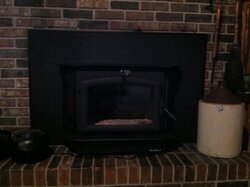
I'm heating 2600 sf 1960's ranch. The stove is in the den that shares the kitchen. There is a hallway with two bedrooms and and bathroom coming off the den. And an addition we added on coming off another portion of the den. I'm thinking I will be able to heat the original house fairly well and possibly the addition using a fan.

As for wood I already had some 2-3 year oak cut and stacked. In march of this year I cut and stacked what seems like a ton of oak for next year and the year after. I also got a ton of poplar, sweetgum and maple that I think will be ready this year. I lucked out and got two loads of hardwood sawmill slabs for free that in going to supplement with if needed. I also found that the local tractor supply sells bio bricks that I figure I can burn with the not so perfect wood this year if needed. All is stacked under an open sided shed and has been drying nicely in the South Carolina heat. I've started collected more oak to cut and stack this fall for the future.

I'm curious to see how much wood I will go through this winter. This winter I plan to only burn when I'm off work since I'm new to all this. But in later years I'd like to try 24-7. I think I'm trying to compare the amount of wood the stove will eat to the amount I used to throw in the open fire place, which I know is not a good comparison.

I'll try to get some pics up too.
Sounds like you're in pretty good shape for wood, if the air is getting to all of it decently. If that's soft Maple, I think all those woods for this year will dry pretty fast, plus you have the slab wood. Just don't load up with all small stuff, or you can get a lot of wood gassing at once. I usually start the center of the load with smaller splits and put some bigger ones to the sides for when the stove is cruising. You might be burning 24/7 earlier than you think; The 91 will easily go all day on a load. >> I really upped the heating effectiveness of my home stove last winter by sealing some air leaks, replacing door weatherstripping, etc. With the 91 at my MIL's I think I burned about five cords, but there are several factors over there that swallow up the heat that the mighty Buck cranks out. And elderly women like a lot of heat, so I went through more wood than I may have if I was heating for myself in a better layout. I'm thinking you will use about three or four cords 24/7, but obviously that's a guess...lotta factors involved. Good luck, and keep us posted as we get into the heating season. :)
 
  • Like
Reactions: Diabel
I have a buck 91 in the garage waiting for me to install. Do you have any pics of your setup? Would like to show my wife how it looks. She still wants a freestanding stove. Thanks!
 
I have a buck 91 in the garage waiting for me to install. Do you have any pics of your setup? Would like to show my wife how it looks. She still wants a freestanding stove. Thanks!

I am new to this forum stuff I will try to get some pics up in the next few days. I'm working a third shift rotation and I turn into a forgetful zombie when I'm on it. I don't know if you looked or not but on the Buck website there is a picture of the 91 as an insert. We were curious as to what the install would look like and just googled images for Buck 91 insert and saw a few. On our install the stove comes out about one foot. My wife and I both like the look of the 91 in our fireplace. She was set on wanting an insert that was flush with the fireplace front. After seeing the price difference and that the few local stove shops mostly sell Buck Stoves that are much less than the few other brands offered locally,we decided on the 91. Now we couldn't be happier with the way it looks. I was already partial to Buck Stove just because it is what I always saw growing up and they are made just a few hours away in NC. Are you doing the install or are you having it done?
 
image.jpg
Not as hard as I thought. Hope this helps. The power cord will be moved to the other side as soon. I just had it plugged in to test the blower. But even with the small fire I built with the stove pretty hot it didn't even get warm, but I'm still moving it. I have to get an outlet put on the other side.
 
Last edited by a moderator:
Thanks, looks nice. Trying to install myself. Wasn't planning on using a flue line but this site has me almost convinced to do it. Saving a few dollars for a ss 8" 25' liner. Chimney guys up here wanted a fortune to install. Did you put yours in?
 
My wife and I both like the look of the 91 in our fireplace. She was set on wanting an insert that was flush with the fireplace front.
These pics don't really capture the look of the stove installed, but the curved-down edges of the top and the taper of the top give it a more refined look than just a square steel box sitting there. I don't have it on now, but my surround has a gold trim edge, which looks nice. I also have the gold trim strip for the 'hearth' of the stove, have not put that on yet. But at the same time the stove also looks like a badass, which appeals to us guys. >>
004 (2).JPG
Thanks, looks nice. Trying to install myself. Wasn't planning on using a flue line but this site has me almost convinced to do it. Saving a few dollars for a ss 8" 25' liner. Chimney guys up here wanted a fortune to install. Did you put yours in?
Definitely put in a liner, you won't be sorry; Safer, easier cleaning, better performance. I haven't had too much trouble installing the few stoves I've done, but maybe I've just been lucky so far. ==c
 
Last edited:
P1020166.JPG
 
Definitely put in a liner, you won't be sorry; Safer, easier cleaning, better performance. I haven't had too much trouble installing the few stoves I've done, but maybe I've just been lucky so far. ==c

I agree it needs a liner for sure and many are pretty easy to put in especially for an insert. But probably one out of ten we do is a real pain and would cause serious problems for a do it your selfer. And 1 out of say 40 would not get done by one. There are also some we look at and simply say that you cant do it for what ever reason.
 
Thanks woody, love the look without the surround. I will do the same. The surround would cover all of my bricks as I have a wood mantle surround. How do these units do without the blower on? Found a liner for just over $400. Hope to get started next week. I only have 3" from top of lintel to too of box. Any suggestions on making this connection?
 
How does the surround come off? I missed it when the installers put it on and didn't think to ask how to remove it. Do you have to slide the whole stove out to get it off?
 
How do these units do without the blower on? Found a liner for just over $400. Hope to get started next week. I only have 3" from top of lintel to too of box. Any suggestions on making this connection?
Never burned it without the blower, but I would keep the fire small, not much fuel, or the stove will get hot. You have to put on an 8" to 6" reducer, right? Hopefully that will fit right into the flue collar. I would put that on, appliance connector if needed, then the flue collar. Check to see if everything looks like it will line up, put the stove in, and you can connect the flue collar to the stove from inside. Look again at the pic I posted in your other thread, and you can see the L-bolts. You can reach up inside the stove to tighten those nuts. I used a couple of wooden dowels to roll the stove back into the fireplace, close to where it needed to be. Then used a couple of crow bars on the edges to lift the stove and remove the rear dowel. Then drop the liner down.
How does the surround come off? I missed it when the installers put it on and didn't think to ask how to remove it. Do you have to slide the whole stove out to get it off?
You should be able to just pull the edge of the surround out a little to access the screws that secure the panel to the side of the stove. I think the top panel comes off last, IIRC.
 
Never burned it without the blower, but I would keep the fire small, not much fuel, or the stove will get hot. You have to put on an 8" to 6" reducer, right? Hopefully that will fit right into the flue collar. I would put that on, appliance connector if needed, then the flue collar. Check to see if everything looks like it will line up, put the stove in, and you can connect the flue collar to the stove from inside. Look again at the pic I posted in your other thread, and you can see the L-bolts. You can reach up inside the stove to tighten those nuts. I used a couple of wooden dowels to roll the stove back into the fireplace, close to where it needed to be. Then used a couple of crow bars on the edges to lift the stove and remove the rear dowel. Then drop the liner down.
You should be able to just pull the edge of the surround out a little to access the screws that secure the panel to the side of the stove. I think the top panel comes off last, IIRC.

I read in your past posts from the install of the 91 at your MIL's that you didn't do any type of block off or insulation in the flue. Did you ever put one in at a later time? The installer didn't recommend it and it's not listed in the installation instructions. Now I'm starting to wonder if I should or wait and see how this season goes before putting in some insulation in the flue. The chimney is internal single story with only about three feet exposed above the roof line. I'm wondering if the installer didn't recommend it because it's a warmer climate here or because of the internal chimney. Or because they just follow the manufacturer instructions. I will appreciate any advice.
 
you didn't do any type of block off or insulation in the flue. Did you ever put one in at a later time? The installer didn't recommend it and it's not listed in the installation instructions. Now I'm starting to wonder if I should or wait and see how this season goes before putting in some insulation in the flue. The chimney is internal single story with only about three feet exposed above the roof line. I'm wondering if the installer didn't recommend it because it's a warmer climate here or because of the internal chimney. Or because they just follow the manufacturer instructions.
She already had the 8" liner, and it was insulated. I later cut and installed a batt of Roxul as a block-off plate, and cut a smaller piece which I installed at the top, in the clay liner. I would probably do that there. You should be fine without the insulation on the flue, although it is preferable.
 
Status
Not open for further replies.