New member, just purchased a PE Super 27

  • Active since 1995, Hearth.com is THE place on the internet for free information and advice about wood stoves, pellet stoves and other energy saving equipment.

    We strive to provide opinions, articles, discussions and history related to Hearth Products and in a more general sense, energy issues.

    We promote the EFFICIENT, RESPONSIBLE, CLEAN and SAFE use of all fuels, whether renewable or fossil.
Status
Not open for further replies.
Come out a good 24" or slightly more in front of the stove to help protect if any ember pops etc that may land out further than the standard 16" requirement. It also helps when cleaning up debris from loading & cleaning the stove.

This.
I have 24"+ in front of my stove, and still get the occasional pop onto the carpet.

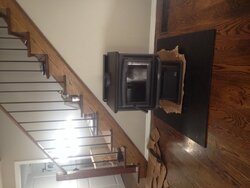
Fine choice of a stove, by the way. A real pleasure to burn in.
 
Maybe you could spray paint the steel pad with a grey crinkle finish paint. That would look nice and help hide the ash/debris that inevitably will get on it when you load the stove. I do a bit of furniture building and sometimes I will use a toothbrush dipped in black paint to add some small splatter on a piece to give a distressed look. You could experiment with something like that on a piece of cardboard and perhaps find a finish you really like. Or even more importantly one that the wife likes!
 
You don't have to use micore or anything under the plate, but I guarantee you over the years, if you ever pull that plate up, it will leave some rust spots, due to trapped moisture under the plate. There is also a chance of slight rub spots from the wood contracting & expanding. Anything as a buffer between the floor & steel plate would be a bonus.
I seem to remember another member using plate steel for his hearth pad, and he acid etched it or something similar to create a really cool color pattern, then I think he clear coated over top.
You'll have to do a search.
 
I think that will be the way I go. Paint it an ashy grey of some variance.

Ok so, just to beat the horse into the ground - I should feel 100% secure about placing my stove on 1/4 inch steel and no other buffer underneath? I may adhere some felt to the underside of the metal so I won't scratch my floors if I need to reposition the plate.
Hi Cornflakes,

Welcome to the forum. I was in the same place last year. Had my fist stove installed in late September and completely new to burning wood. I went with a Morso metal pad as well for the modern looks and because I needed only ember protection. I thought about the morso glass pads but decided against it since I feared cracking it since I was not installing a morso stove on it. I had no problems keeping it clean. I think it looks best black to match my stove so I wouldn't bother with the extra work of painting it, unless you really want to. Plus, I did not put anything under the metal pad. I think you are going to love the morso metal pad and have fun with your new stove! Here is a photo of my pad/stove.
pad.jpg
 
Last edited by a moderator:
  • Like
Reactions: Seanm
Hi Cornflakes,

Welcome to the forum. I was in the same place last year. Had my fist stove installed in late September and completely new to burning wood. I went with a Morso metal pad as well for the modern looks and because I needed only ember protection. I thought about the morso glass pads but decided against it since I feared cracking it since I was not installing a morso stove on it. I had no problems keeping it clean. I think it looks best black to match my stove so I wouldn't bother with the extra work of painting it, unless you really want to. Plus, I did not put anything under the metal pad. I think you are going to love the morso metal pad and have fun with your new stove! Here is a photo of my pad/stove.View attachment 138951

Nice looking setup! I didn't get a Moros pad, just a 40x48inch steel plate. A little on the thick side lol... But it'll do!

Do you have to clean your pad of ash frequently?
 
Nice looking setup! I didn't get a Moros pad, just a 40x48inch steel plate. A little on the thick side lol... But it'll do!

Do you have to clean your pad of ash frequently?
No, every few weeks just a little.
 
Well, I got the steel hearth pad painted, underneath sealed and felted.... and cautiously carried it into the room.

My only concern now is the rafted alignment... and boxing in the chimney pipe. Ideally I wanted the pipe to be straight up through the ceiling...I definitely don't want to move everything forward into the room to accommodate a straight pipe. Can the rafter be cut and boxed in? Or will I have to angle my pipe?


74873DF9-222B-4C12-A081-685D58B3A7DD_zpsmhdtafro.jpg


F183F387-5676-4A87-9655-812A0FA5E1FE_zpsfwf1ynrm.jpg
 
If the need arises, there is an adjustable elbow for this application. Typically it would be installed very close to the ceiling. I have one on mine and it is barely noticeable.
 
We put in 2-45's just off the stove like BeGreen's install. It looks fine and it's a lot simpler than cutting joists and sistering other joists and all of that structural stuff.
 
Looks like someone has a new play spot.
 
From the pics I might have went with a corner install but of course the cold air return would have to be moved.
I'm saying that only because i have a feeling the stove is going to seem extra big siting where you have the pad..but maybe not.
 
From the pics I might have went with a corner install but of course the cold air return would have to be moved.
I'm saying that only because i have a feeling the stove is going to seem extra big siting where you have the pad..but maybe not.

My first impression was to have it in the corner as well. I don't feel like messing with moving the air return, and actually my wife likes it better where it is, so...... if she is happy, i'm surely happy.

I don't think it will cramp that space out at all. I'm going to have the stove as far back against the wall as possible.
 
Congratulations Cornflakes! I, too, decided on a PE Super 27 for my new house. It's still under construction and won't be done until the end of November. I'll be visiting it in December. How exciting! Now, while you are waiting for the installer, you need to start getting wood together. Any stuff you get now probably won't be ready to burn until next season. There are some inexpensive "log stackers" that you stick 2x4's in horizontally and two more cut in half for vertical sides that you can then stack wood on to keep it off the ground.

One of the neat things about the PES27 is that you can burn with the door open. My daughter thinks that would be awesome so she can toast marshmellows!

Because you have tiny toes tromping that area, you might want to cushion the front edge temporarily with a little narrow edging . . . perhaps a 1/4" round trim?
 
Last edited:
Congratulations Cornflakes! I, too, decided on a PE Super 27 for my new house. It's still under construction and won't be done until the end of November. I'll be visiting it in December. How exciting! Now, while you are waiting for the installer, you need to start getting wood together. Any stuff you get now probably won't be ready to burn until next season. There are some inexpensive "log stackers" that you stick 2x4's in horizontally and two more cut in half for vertical sides that you can then stack wood on to keep it off the ground.

One of the neat things about the PES27 is that you can burn with the door open. My daughter thinks that would be awesome so she can toast marshmellows!

Because you have tiny toes tromping that area, you might want to cushion the front edge temporarily with a little narrow edging . . . perhaps a 1/4" round trim?

I've got a little head start for next year. Only about a 1/4 cord of dry oak for this winter. Still hunting for dry wood. It may be a winter of burning pallets this season. I agree about the trim.... I don't want any screaming family members with dinger up toes!

image.jpg image.jpg image.jpg image.jpg
 
Last edited by a moderator:
Hi Cornflakes,

Welcome to the forum. I was in the same place last year. Had my fist stove installed in late September and completely new to burning wood. I went with a Morso metal pad as well for the modern looks and because I needed only ember protection. I thought about the morso glass pads but decided against it since I feared cracking it since I was not installing a morso stove on it. I had no problems keeping it clean. I think it looks best black to match my stove so I wouldn't bother with the extra work of painting it, unless you really want to. Plus, I did not put anything under the metal pad. I think you are going to love the morso metal pad and have fun with your new stove! Here is a photo of my pad/stove.
View attachment 138951
Off topic I have a 16 month old I need to keep away from my Insert. what type of gate is that ?.
 
could you post a photo for me?

thanks

Arg sorry the pe's up on the island and I have to work in town this weekend so I can't get a pic to you for a couple of weeks.

BeGreen has posted the pic of his setup a few times, maybe you could pm him?
 
Arg sorry the pe's up on the island and I have to work in town this weekend so I can't get a pic to you for a couple of weeks.

BeGreen has posted the pic of his setup a few times, maybe you could pm him?

No problem! I'll pm him. Thanks!

Just moved my 27 in a few minutes ago. Still positioning... I'll prob go with double wall pipe so I can have it closer to the rear wall.
image.jpg
 

Attachments

  • image.jpg
    image.jpg
    166.7 KB · Views: 175
Last edited:
Good plan with the double-wall. It will also be safer in case wandering hands want to explore through the stair railing. I would remove all loose items on the stairs before burning too. Little guys are natural experimenters.
 
I finally got around to installing the fire bricks. The manual says I should have 18 full sized bricks and 3 cut sizes. I actually have 19 full size and 3 cut. I'm assuming the extra full size is for if I didn't have an ash pan?

Anyway, I found a little metal piece install my firebox.... Does this need to be somewhere important?

D477643E-C9B2-42F4-A4C3-66B9279FF593_zpscnyqayse.jpg
 
That is the pin that holds the stainless steel baffle in place. It needs to go through the little angled bit with a hole hanging down from the baffle, and into a hole in the back. It might require a bit of wiggling.
 
Status
Not open for further replies.