
I have some pretty serious erosion of the tiles in my gasser. It's only 2 seasons old and I'm thinking they need replacement. Any suggestions as to why this happened?
Erosion of my nozzle and secondary burn chamber tiles,why?
- Thread starter kod198707
- Start date
-
Active since 1995, Hearth.com is THE place on the internet for free information and advice about wood stoves, pellet stoves and other energy saving equipment.
We strive to provide opinions, articles, discussions and history related to Hearth Products and in a more general sense, energy issues.
We promote the EFFICIENT, RESPONSIBLE, CLEAN and SAFE use of all fuels, whether renewable or fossil.
You are using an out of date browser. It may not display this or other websites correctly.
You should upgrade or use an alternative browser.
You should upgrade or use an alternative browser.
- Status
- Not open for further replies.
maple1
Minister of Fire
What boiler?
Pictures?
There are some advisories in some boiler manuals to avoid a steady or heavy diet of oak that might not be optimally seasoned. Apparently it can give corrosive off gassing. Any chance that could play a part?
Pictures?
There are some advisories in some boiler manuals to avoid a steady or heavy diet of oak that might not be optimally seasoned. Apparently it can give corrosive off gassing. Any chance that could play a part?
Biomass next gen 60. Can't send pictures till Sunday night/Monday morning. Mostly maple and ash in the north country of NY. Burned some wet stuff at the end of the winter though.
Last edited:
flyingcow
Minister of Fire
Found a thread last night how the EKO guys have been repairing their nozzles. May have to try that route to by some time
JTWALL
Member
Phew...that's a lot of wood...at least for me! We are talking full cords, correct?Roughly 10 cord each year.
woodsmaster
Minister of Fire
I've patched my nozzle a couple times. I Took a piece of one and a half Inch thick foam block. Stuck it in the nozzle hole. Then I got some premixed refractory cement from Menard's and patched it up with a putty knife. I just vaccumed the ash out so the cement would stick. let it dry then take the foam out and good as new. I've had a replacement nozzle for almost 2 years and haven't had to put it in yet. The overlay approach seems to work good also especially on a new or patched nozzle, but I haven't tried that yet. I burn around 8 cord a year.
nrford
Minister of Fire
muncybob
Minister of Fire
I also replace my nozzle brick at about the 20 cord mark, but at least for me that's usually 3+ years. I think I'll give the patch job a shot next time.
JP11
Minister of Fire
I replaced mine at 20 cords.. once I was a third way done the job, I realized I had made a mistake and could have easily gone another year (10 cords). Mine are the cast steel now. We'll see how long those last.
JP
JP
Yes full cords or 30 face cord. Little to no oak. I'm heating around 5000 sq ft in northern NY,30 min from CA. I had no heat storage. This year the plan is to finish the aprox 2000 gal open storage tank that use to be water cistern in the basement.


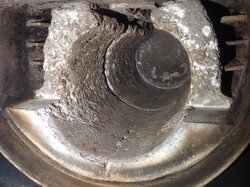
 Also has anyone seen or found any place that has the how to for removing the refractory stones. Here are some pictures
Attachments
Last edited:
woodsmaster
Minister of Fire
The bottom ones slide right out. The top ones may be stuck from creosote. Tennnman replaced his nozzle and had a hard time. I would patch the nozzle up and order replacements so when one breaks you can replace it. Those boo tom front ones prolly won't make it threw the season.
hobbyheater
Minister of Fire
Any suggestions as to why this happened?
Think of the last time you had a camp fire and to make sure the fire was out, you poured water on that fire which had the rocks around and under that fire just popping. This is rapid contraction. When you light your boiler, the opposite happens. The refractory and especially the nozzle, may only be 140 degrees or less and inside of several minutes, may be more than 1350 degrees. Every time you light your boiler, this scenario repeats itself; not as dramatic as the campfire but over time slowly causes deterioration of the refractory. Also the nozzle surface expands faster than the section that is up against the boiler's steel shell causing two different rates of expansion.
In my old boiler, the nozzle is considered to be a regular replacement item and is very easy to change.
Making an overlay on top of the nozzle looks like a good idea. If you make it out of refractory, try and find 2,600 degree or higher refractory cement and use stainless steel needles to bind the mix to give it more strength. The needles are mixed in at about 3 to 5 % of the mix. Curing is also very important to slowly drive the moisture out of the piece so if the entire section will not fit in your kitchen oven, make it in two sections. It takes about 7 hours starting at 170 degrees up to oven maximum temperature then turn the oven off and let it cool to the point that it can be picked up with bare hands.
Woodmaster's suggestion for fixing your present nozzle surface is a good one. I would add one suggestion to this - after the surface is clean, just before you apply the new refractory to the surface, if you have an old empty Windex bottle, lightly mist the old surface with water and the new refractory will adhere better.
Refractory needles.

https://www.hearth.com/talk/threads/giving-a-jetstream-base-new-life.76371/
Information on curing the refractory in this thread.
https://www.hearth.com/talk/threads/aquastat-well-question.130442/

maple1
Minister of Fire
Alan has touched on another possibility - the refractory might have not been fired very slowly when the boiler was first started up, or as slow as is needed at first to properly cure it. I built a few real small fires at first, and during that time the water was initially literally dripping out. It's possible to do a lot of damage to them if fired hard from the get go, or harder than should have been, and that damage might not show until later in the form of reduced life.
Fred61
Minister of Fire
Extreme erosion after burning 20 cords doesn't surprise me. It's a "wear item" and needs to be replaced as needed. After two seasons your oil boiler technician will replace the nozzle on your oil boiler when tuning.
Thanks guys, your knowledge is a great help. It's possible when I first started burning it was too hot too fast. If I recall correctly I was short on time and the family was complaining it was cold. Or this might be a possibility my boiler is in my basement and it gets quite damp over the summer months. Could be the refractory takes in moisture then. I will check today with my meter and let you know what I get. Can anyone give me a source for dry refractory mix or a mixture reseipe. New horizon is the only place I've found so far. They do have the needles to.
Wow Just put the meter to the nozzle and secondary refractory and got moisture readings of 81% and 73% respectively.
Just put the meter to the nozzle and secondary refractory and got moisture readings of 81% and 73% respectively. JTWALL
Member
hobbyheater
Minister of Fire

You can see the needles in the front of your lower blocks.
When the boiler has sat idle (no fire) for several days or more and I know the refractory is cold, I will burn a slow fire for about 30 minutes before going to full gasification. If the fire goes to full gasification within 5 minutes in a cold firing situation, small pieces of refractory will be found when cleaning out the ashes before the next firing.
Your bottom blocks IMO still look to be in fairly good shape but also I do not know your boiler, but as long as the refractory is protecting all metal surfaces from extreme heat keep them going as long as possible. Have a spare set on hand should they need to replaced.
woodsmaster
Minister of Fire
There are different grades of refractory. I think they must have used some soft stuff for a while. It would be nice to have a Mold to make your own.
I just used some premixed stuff I got a Menards that came in a small bucket. It seems to wear better than the original refractory on the boiler, like its harder stuff. There were no needles in it. I think it would make it hard to patch if it had needles in it. Now if I were going to cast a piece, I would put needles in it.
I usually go into gassing mode within a couple minutes of lighting the boiler and don't find pieces of refractory when cleaning. Like hobby heater said, use them till they break. the front two see the most heat and likely will break first. The weight overhanging at the top causes them to break about half way up once they get to brittle.
Woodsmaster did you use any thing like the needles or just straight refractory cement?
I just used some premixed stuff I got a Menards that came in a small bucket. It seems to wear better than the original refractory on the boiler, like its harder stuff. There were no needles in it. I think it would make it hard to patch if it had needles in it. Now if I were going to cast a piece, I would put needles in it.
I usually go into gassing mode within a couple minutes of lighting the boiler and don't find pieces of refractory when cleaning. Like hobby heater said, use them till they break. the front two see the most heat and likely will break first. The weight overhanging at the top causes them to break about half way up once they get to brittle.
woodsmaster
Minister of Fire
I called and complained about the excessive wear on my refractory after two years and Zennon said they may have used a low grade refractory and the new ones should be better. Then he sold me new ones at 50% off, so I bought all new ones but still haven't used the new nozzle. I patch it once a year. When I do install the new one I'm going to do an overlay before I fire it.
Tennman
Minister of Fire
Been on travel. Our homes are roughly the same size but ours is in a far more temperate climate near the Tenn/AL line. Your nozzle is actually far worse than the one I replaced. If you keep track of the volume of ash between a crisp nozzle and one like yours, you'll find the ash volume maybe 3-4 times that of burning with a sharp opening. That was one of the clues to the effect on boiler performance when the nozzle turns into a funnel. I keep a wheelbarrow near the barn for cleaning from the lower chamber. Sorry, since from memory not real scientific, but 2012/2013 season I filled/emptied the wheelbarrow at least 4 times. For the 2013/2014 with the new nozzle and the steel plate protector... once for also a far more severe winter. The wasted energy due to coal bed falling into the lower chamber is enormous. It made me sick to have to clean out this glowing, hot mass of energy rather than a very fine ash.
I've only owned a BioMass 60 so can't speak for other boilers, but replacing the nozzle is a very ugly job, made worse since we weren't running wide open and hot with storage. Your call whether to replace or repair, but you'll waste a lot of wood with that condition. Replacing the nozzle is a two-fold challenge. I was too big to get into the upper chamber to do anything and all the ceramics were creosote bonded together. AND I didn't know how they were supposed to come out. So I couldn't tell if they were glued or I was doing something wrong. On another post I suggested to a new BioMass 60 owner to remove the upper chamber side ceramic plates just so you know how they're supposed to come out before they get glued in place. The four (4) side plates just rest on the nozzle and rotate back into the metal pockets of the upper chamber. The top surface of the side ceramics rotate into the chamber then you lift them up and out the door. Easy to type here, but I started that task at least 4 times and quit out of frustration until I finally recruited someone smaller than me and decided I didn't care if I broke the side plate... that nozzle was coming OUT!
I think I was too anal retentive about keeping my nozzle surface nice and clean our first few years. I now leave layer of ash in the bottom of the upper chamber as protective layer. But after seeing someone here cutting a nozzle shield I did that last year and it definitely protected the crisp edge of the nozzle. I used 3/16" mild steel last year. Surprisingly the shield's edge didn't erode over one season, but it warped into a wavy surface. This year will probably use some scrap 3/8" to see how it works, but I WILL be using a throwaway shield each season. The shield was cut with a hand plasma cutter so it doesn't need to be precise. I was trying for ~ 1/8" under the nozzle opening to protect the ceramic. A previous discussion on the shield out of stainless was discussed vs mild steel. If you look up melting point in the Engineering Toolbox online you'll see mild steel has a higher melting point than most stainless alloys.... not the exotic stuff like Inconel. But for my purposes, I plan on just making a cheap shield each year, unless the thicker plate lasts a couple. But once you change that nozzle once... you won't want to do it again for a very long time. The ugliness of the job dwarfs the cost of the nozzle. I was about to take a sledge to ALL the top chamber ceramics to replace that nozzle and that is no joke! Next time I just might because it was so aggravating trying to get ANY of those parts to just move a little!
So, patch or replace but do something. If you replace make sure you can get the replacement parts and have them in hand before you start taking stuff apart. I was going to try the patching method, but decided mine was too far gone... yours looks worse than mine. Been one or two good threads on the shields, but if you just make a wood or paper pattern of the top surface of the nozzle between the side plates, trace it onto the steel, cut it with a torch or plasma and lay it in there. I call it my nozzle prophylactic.
- Status
- Not open for further replies.
Similar threads
- Replies
- 9
- Views
- 625
- Replies
- 9
- Views
- 316
- Replies
- 4
- Views
- 467
- Replies
- 14
- Views
- 896