Expeditided Wood drying / Solar Kiln

  • Active since 1995, Hearth.com is THE place on the internet for free information and advice about wood stoves, pellet stoves and other energy saving equipment.

    We strive to provide opinions, articles, discussions and history related to Hearth Products and in a more general sense, energy issues.

    We promote the EFFICIENT, RESPONSIBLE, CLEAN and SAFE use of all fuels, whether renewable or fossil.
Status
Not open for further replies.

RobertNH

Member
Sep 25, 2014
144
New England
With this year being poor for opportunity and excess, I ended up buying 2 cords of 'Green'.
I've been researching methods of expediting the drying process and found a few interesting ideas/ processes.
I also see it's bee talked about before here, but I don't see any listed results.
So, if you have done something on these lines, I'd love to hear what you've done and how well (or not) it worked.

I have 3 experiments running in the yard (ya, I'm serious about expediting drying) right now to see what works or doesn't.
The readings I will state are at full sun and ambient temp in the mid 60'sF

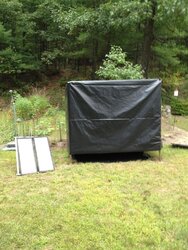
First is the 'Big Black Box'.
I took an old set of pipe staging and an old ladder (for shelves) and created a black plastic box.
The wood is stacked front and rear full, with the middle being open for air movement.
The ends of the middle was also stacked to create what I hoped to be a chimney.
Using 2 of my little solar panels and a computer fan, I set that up in the center to move air.
Since there is no vent at the top, I felt the fan is a must.
I have since added a second sheet of clear plastic, slopped off the unit to create more heat.
Unit reaches 98F in full sun inside.
IMG_0985_zpsd572eb0c.jpg
IMG_0986_zpsface77ab.jpg
IMG_0987_zpsbe84e074.jpg

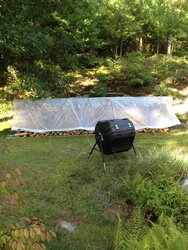
Second is the least expensive for 'anyone' to do and has been named the S&G Stack.
I thought.. Why not..
This is based on the lean-to cover.
I have since closed the front to the ground and about to close the ends & and add a piece of black plastic on the ground in front of the pile (under the clear) to build more heat.
I'm open in the back by 1/4 of the stack height and will probably keep it that way.
I can read low 90'sF along the face and 130'sF along the top.
This surprised me!
IMG_0992_zpse4320164.jpg

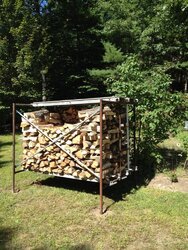
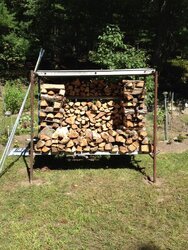
The third has been named the Display Case.
Again using what I have on-hand I decided to build something a little better contained and controlled.
I already see I could be deeper to allow for an area of absorbing material to build up more heat.
The unit is running close to 100F, but will not break that number.
I was hoping it would, so I could fan force air through it and maintain a strong temp.
Back is now closed on this unit and the top glass has been lifted for venting by 1/4".
So far, this is the only unit showing splits and cracks in the wood.
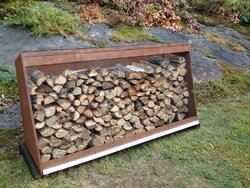
IMG_1001_zpsb7364b11.jpg

All wood has MC measured, but I don't feel this is best.. I'll also take opinions on this.
Specific pieces in the Display Case have been weighed (thought of this too late..) to better read the loss.

I've shown mine!
I'm open for suggestions!

Show me yours and tell me how and why.

 
  • Like
Reactions: edge-of-the-woods
I've not done anything like this, but I anticipate you having trouble with at least the first two designs. Tarping wood like that is the worst thing you can do for the drying process. When it's all sealed up like that, the moisture has nowhere to go when it leaves the wood. I'm betting you'll end up with moldy splits soon
 
  • Like
Reactions: St. Coemgen
Appreciate the statement and the reason for the fan in the first (debating a vent at the top). The second I'm still debating closing the ends.. So much air flowing through.. yet adding a sheet in front to increase the heat (colder temps coming) seems correct.. Than again, why I'm posting this. 'Opinions' and what you've done.
 
I put stacks on wood planks supported on a couple of bricks. Stack them loosely in single rows in the sun for at least 2 yrs. Seems to work good.
 
You can get a much better handle of what is going on drying wise if you put the moisture meter on the shelf and get a scale. Weight loss equals water loss. If you have splits from the same round in each kiln you will be able to get an real good idea of what's going on. You will discover that heat is king and so long as you can elevate it above the ambient temp airflow really doesn't matter as much as people think it does. (Airflow has a much bigger role in bringing BTUs to the wood so water can evaporate than it does to carry away moisture).

If your wood is green, fresh off the stump then it is way above the range of a moisture meter to begin with.

I have an MC/Temp gauge in the Display Case and just picked up a scale.
I have recorded key pieces in the Display Case and will be doing what you ask this weekend in the others.
Comparison is key and I agree, weight is important.

BigBarf48 makes an important point of not making 'moldy splits'.
Correct me please, but if I have lower MC readings and no change in weight, then I tend to think it may be doing what BigBarf48 warns of.
Opinions please.
 
Do you have the plans for project 3? I'd be interested in trying something similar.

Once I work out the final bugs, I will post one.
Basically it comes from this site (which if you look at the last one, links back here!).
http://www.builditsolar.com/Projects/WoodDrying/wood_kiln.htm

I will say right now, that I wish I had gone deeper (longer slope on the front).
Adding a forward stage to build up more heat.
Which I may still do...
 
Hi Robert, welcome.

I had a similar line of thought, but didn't actuall do anything yet. Thank you for posting your thoughts and sharing the results of your efforts!

I believe there's a thread here on greenhouses, one guy put a fan on one end, controlled by temperature. Another reported that he had success building a greenhouse that had a slight angle, so the warm moist air would rise and eventually exit the higher-open end.

Most appear to have positive results.

In my case, I received six cord of mixed hardwood that was supposed to be seasoned, but was actually stored in a horizontal concrete silo, no cover, just piled up deep. So only the wood from the upper parts had reasonable MC levels. Some of the oak from lower levels looked like it had been stored in a lake after I resplit it :(

Because of the quantity, I ended up just resplitting everything and stacking to get full sun and wind - as most seem to do. I just recently covered the tops only, with about 20" to 24" wide strips of plastic (slightly overhangs the 16" splits, stacked one row deep), to reduce rain water infiltrating from the tops. Was surprised to see the sides not getting as wet as expected, seems the storms so far have been fairly gentle (without strong horizontal winds).

My current plans are to build a wood shed, maybe next year, and to use clear roofing, with gaps in the walls for airflow. But the wife did mention she'd like a greenhouse, maybe a combo woodshed greenhouse is in order ;)

Good luck and please keep us posted.
 
Last edited:
  • Like
Reactions: RobertNH
I have an MC/Temp gauge in the Display Case and just picked up a scale.
I have recorded key pieces in the Display Case and will be doing what you ask this weekend in the others.
Comparison is key and I agree, weight is important.

BigBarf48 makes an important point of not making 'moldy splits'.
Correct me please, but if I have lower MC readings and no change in weight, then I tend to think it may be doing what BigBarf48 warns of.
Opinions please.

It will be rather impossible for your splits to lose in the moisture content readings while not dropping in weight. If that were to happen then something would need to be turning the water and some carbon into some sort of carbon based molecule so that the mass remained constant. I don't see any leaves on your splits that are photosynthesizing. You would be doing quite well for yourself if you could increase the mass of your (dry) wood while decreasing the water content.
 
  • Like
Reactions: RobertNH
I happened to have plywood, a few 2x4's and glass around here, so built it a little stronger and believe the glass will work better.
Also, with the glass top I was able to lift the back edge as a vent (so far liking this).
I did dis-agree with the air inlet in the front.. Felt it would release too much heat.. JMHO.

Much too simple an idea not to try and built they're way, very inexpensive.
This is what lead to the S&G stack (pic #2) and why it is done this way.

Today was a b-u-tiful Day! Low 70'sF, full sun and temps reaching 120F in the Display Case!
Next 2 are supposed to be the same and Sunday I open up and take some readings.
 
Hi Robert, welcome.

I had a similar line of thought, but didn't actuall do anything yet. Thank you for posting your thoughts and sharing the results of your efforts!

I believe there's a thread here on greenhouses, one guy put a fan on one end, controlled by temperature. Another reported that he had success building a greenhouse that had a slight angle, so the warm moist air would rise and eventually exit the higher-open end.

Most appear to have positive results.

In my case, I received six cord of mixed hardwood that was supposed to be seasoned, but was actually stored in a horizontal concrete silo, no cover, just piled up deep. So only the wood from the upper parts had reasonable MC levels. Some of the oak from lower levels looked like it had been stored in a lake after I resplit it :(

Because of the quantity, I ended up just resplitting everything and stacking to get full sun and wind - as most seem to do. I just recently covered the tops only, with about 20" to 24" wide strips of plastic (slightly overhangs the 16" splits, stacked one row deep), to reduce rain water infiltrating from the tops. Was surprised to see the sides not getting as wet as expected, seems the storms so far have been fairly gentle (without strong horizontal winds).

My current plans are to build a wood shed, maybe next year, and to use clear roofing, with gaps in the walls for airflow. But the wife did mention she'd like a greenhouse, maybe a combo woodshed greenhouse is in order ;)

Good luck and please keep us posted.

I really hoping those folks you speak of 'chime in' here!
I hoping for those that have, to post up and talk about it.

When I bought the 12'x12' round top garage (Cover-it style), I debated a greenhouse cover vs. the dark green I went for.
Back then I needed a barn type structure to store items and the cost for the unit was the cost of materials for me to build.
Easy to put up, no maintenance and not taxed on it because it's not a permanent structure!
I call that a Win/Win!
You might think of one as you decide your shed.
I now have 2.. The 12x12 holds my dry wood, the 12x20 holds my yard goodies.
Now I'm thinking about it... LOL
 
I have a Woodlot magazine. It say to single stack wood close to a fence. About a foot away. Then cover the stack with plastic sheeting and let it drape over the fence. It works like a green house. If i remember correct the plastic didnt go all the way to the ground. Prolly to allow some air flow. But i havent tried it.
 
  • Like
Reactions: RobertNH
I have a Woodlot magazine. It say to single stack wood close to a fence. About a foot away. Then cover the stack with plastic sheeting and let it drape over the fence. It works like a green house. If i remember correct the plastic didnt go all the way to the ground. Prolly to allow some air flow. But i havent tried it.

This works on the concept of the S&G stack (pic #2) I have running. Open bottom allows more air, but heat becomes the question. I closed the bottom to allow more heat to build up. Open ends and open back gives plenty of air to pass. Back side is ambient temperature of this stack. Front side, today, hit over 90F with the top hitting 120F. Back side is still ambient temp.. 68F. Full sun, great Day to experiment!

Yes,, it does work as a 'greenhouse'.
And it is better than a basic cover.
I just believe, if you're going to, there may be a simple, better way.
You've seen one!
I'm testing it.
Now let's test it and see what it does.

Thank you for your opinion!
 
Since you're going to weight some pieces that are in the houses, I'd recommend weighing a few more and putting them outside, but near, each house. Then we can see if there's any difference between outside and the various insides.
 
Since you're going to weight some pieces that are in the houses, I'd recommend weighing a few more and putting them outside, but near, each house. Then we can see if there's any difference between outside and the various insides.

Your on! I shall.
 
Your on! I shall.

Your drying houses are really doing two things, protection from the elements and heat elevation. Depending on the ratio between sunny and rainy days a significant amount of the effectiveness of the drying houses can be found in protection from rain alone (vs.uncovered/unprotected wood). Pay attention to the effect of rain on the control pieces. If they are uncovered and get rained upon you might begin to think that your scale is broken before you realize what is going on. So you might consider two controls. One with pieces uncovered and one covered with something like an old window so they get the sun but no rain.
 
  • Like
Reactions: RobertNH
Opinions please.

What I'm seeing is a moisture build-up over-night in the Display Case.
It burns off pretty quickly once the sun hits it, but I'm concerned.

My thought goes towards grabbing one of my spare batteries, extra solar panel and a computer fan to run over-night.

Your thoughts are welcomed.
 
Your drying houses are really doing two things, protection from the elements and heat elevation. Depending on the ratio between sunny and rainy days a significant amount of the effectiveness of the drying houses can be found in protection from rain alone (vs.uncovered/unprotected wood). Pay attention to the effect of rain on the control pieces. If they are uncovered and get rained upon you might begin to think that your scale is broken before you realize what is going on. So you might consider two controls. One with pieces uncovered and one covered with something like an old window so they get the sun but no rain.

I have a covered control stack, yet really like having it next to the units!
Great idea!
The S&G stack is right next to the Display Case and thought of that as a control between contained or not, but it doesn't give me what you suggest, an open stack.
It's going right between the two!

I'm also looking forward to testing using a DMM to read resistance and compare against my MC reader.
This site is full of great info!
Here's the link to a great article (and some charts) another thread here lead me to:
http://www.fpl.fs.fed.us/documnts/fplgtr/fplgtr06.pdf
 
Tomorrow will be very busy, so I did some readings today..
From the Display Case:
Lbs Oz's Total ounces
Enter previous weight 6 2 98
Enter current weight 5 13 93
95% of weight
5.10% loss Over days 3 1.70% daily
Enter previous weight 8 4 132
Enter current weight 8 2 130
98% of weight
1.52% loss Over days 3 0.51% daily

First is from second tier in the stack
Second is from second from the bottom

2 days of sun, 1 over-cast and rainy.
1 being extremely great, 1 being typical sun.
6hrs of exposure to sun
Larger piece lower (as shown above in order of height in the stack)

I am very happy with the .51%, that was the goal!
Next load is small low and bigger high
Let those chunker's get the heat

If this maintains, only time will tell. it puts me to my goal of green to burnable in 1 month.

Next true reading next weekend.
 
If this maintains, only time will tell. it puts me to my goal of green to burnable in 1 month.
Next true reading next weekend.

It gets real a lot slower as it gets drier.

Are those LB/OZ/Fraction of an OZ?

If your scale does grams I suggest you do so, its a little easier to interpret.
 
  • Like
Reactions: RobertNH
If that's fresh from the stump green wood it isn't unreasonable to see a 33% loss in weight. (That would be wood going from 80% to 20%)
 
Status
Not open for further replies.