Pellet newbie with a Whitfield full of questions.

  • Active since 1995, Hearth.com is THE place on the internet for free information and advice about wood stoves, pellet stoves and other energy saving equipment.

    We strive to provide opinions, articles, discussions and history related to Hearth Products and in a more general sense, energy issues.

    We promote the EFFICIENT, RESPONSIBLE, CLEAN and SAFE use of all fuels, whether renewable or fossil.
Status
Not open for further replies.

Krisfx4

New Member
Oct 14, 2014
4
Peach Bottom, Pa
Evening all,
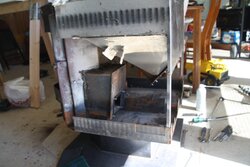
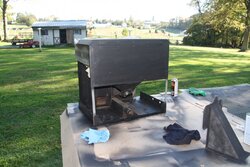
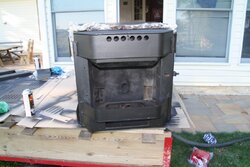
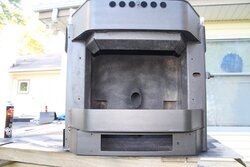
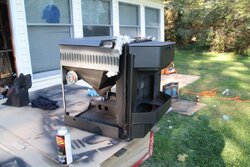
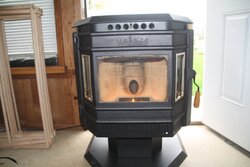
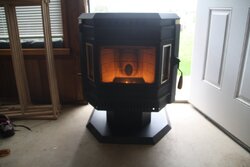
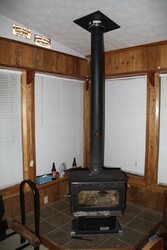
I purchased a Whitfield this evening that I can not seem to identify. The decal on the inside of the hopper lid was removed. It has the LED style control board, and there was a module on the inside with a manufacture date of 1999. Is there any way to get a positive ID on the model? In the attached pictures you can see I got carried away with dismantling since I found a decent amount of rust flaking off. I need new brick and baffles and while I'm at it maybe a paint job. The model would help me with the brick and baffles but I'll take suggestions on paint (inside and out). Thanks,
Kris
image1.JPG image2.JPG
 
Last edited:
Hi Kris, welcome to the forum and congratulations on your purchase. You won't regret it... that stove is one of the best ever made and with a little elbow grease, it will soon be throwing a lot of wonderful heat out in your rooms. I'm convinced that your stove is an Advantage II-T ( Classic? ). Your stove is similar to that on the attached photo, right? I hope this picture from the original Whitfield brochure may encourage you in the restoring job.
I also have pdfs of the original owners/installation manual and the svc manual, please let me know if you're interested. The pdf of the owners manual is 2.46 megabyte, so it is probably too big to attach directly here in the forum. E-mailing will be necessary, if you need the owners manual.
Advantage II-T Classic.jpg
 
Last edited:
I bought the Whitfield Quest last fall and has the same controls but a slightly different door glass. Several brick options available on ebay for under $50. I may try to cast some of my own. One of the best tings about this stove line is off the shelf motors an fans for cheap.
 
Well this thing has started to get a life of its own. Has anyone done a post documenting a complete whitfield rebuild? I am at the point where I should decide how far to go with this. In some of the pictures you may see the large amount of rust. This rust resembles the rust that develops from direct contact with water not just damp air. Since I have no idea what the serial number would be I believe ill be guessing on the gasket part numbers at this point. Any help would be greatly appreciated on the direction I should take this.
IMG_1778.JPG
IMG_1780.JPG
IMG_1779.JPG
IMG_1781.JPG
IMG_1782.JPG

Here are a few of the pieces I sandblasted today. Couldn't find a good high temp primer so I'm just hitting these with a base of black to keep the pieces from rusting.IMG_1783.JPG
 
I have an even older Whitfield Quest (1994) and just love that old stove. A wire brush and paint stripping pad on a cordless drill can do wonders for this rust. Wear eye protection and a good dust mask or respirator.

I found gaskets and parts at Mountain View Hearth Products, and they have a tech who can speak to you directly. Here's a link to their site: http://www.stove-parts-unlimited.com.

For paint, I use high temp black paint, available at most home centers or at any decent stove shop. Do NOT use regular paint!

These old Whitfields are work horses. MY only complaint is that mine is not made to accept a thermostat or ignitor or OAK, even as a retrofit. Yours may, as it's a later model.
 
this one has the thermostat connections (the little red jumper next to the power), and the igniter relay (the little black box laying down just behind and to the right of the tstat connector)with the red wire and fuse holder.)
Looks like the IIT (I have an insert).
As far as tearing down too much, na.
 
I just bought gasket material from home improvement store by bringing in pieces of old gasket to compare. Would suggest getting the graphite impregnated gaskets if available. I think it will last longer as the graphite will keep the rope from sticking and compressing. Igniters are overated on heavily used stoves. A propane torch is more reliable and faster. Your stove looks like it was stored outside. Even if stored under tarp there is a lot of condensate:(
 
I need new brick and baffles and while I'm at it maybe a paint job. The model would help me with the brick and baffles but I'll take suggestions on paint (inside and out). Thanks,
Kris

On pages 24 and 25 in the service manual there is detailed information that should enable you to determine what ash trap baffle kit you need to order for your Advantage stove. The parts seem to have changed around 1994. I have attached the service manual for you below this text, so you can study the details on the illustrations and see what parts that match those on your stove.
According to their webshop site, Wood Heat Stoves should have the newer ash trap baffle kit ( and the fire brick panel kit ) in stock:
http://woodheatstoves.com/kitbafflewp21994-p-2896.html?cPath=499_510

Fire brick panel kit:
http://woodheatstoves.com/whitfield-advantage-iit-iii-iit-classicfireback-p-359.html

Good luck and take care. Keep us posted
Bo
 

Attachments

  • Lennox_Hearth_AdvantageII-T_AdvantageIII_TECH_TRAINING.pdf
    1.2 MB · Views: 162
Evening all,
I haven't had time to give an update since outage season has started for me. In the pictures below you can see that I got everything painted and re assembled. I fired it up this past saturday and after a little adjusting it self ignited and had a nice active flame. But now the questions, Can i reset the damper to the factory setting? If so how? Next question, Do I have to use pellet stove piping to connect to my existing chimney or can I use single wall 28 gauge 3" stove piping? My current chimney setup is a selkirk verticle 6" double wall through my ceiling and 6" single wall connecting my stove to the double wall. Ill try to attach a photo of the current set up. Im having a hard time figuring out the safest cleanest way to get this hooked up. Selkirk doesn't seem to make a 3" to 6" double wall coupling to connect to the double wall connection. I hope this is making sense but ill try to better explain if I can later.

Kris
 

Attachments

  • IMG_1784.JPG
    IMG_1784.JPG
    134.8 KB · Views: 115
  • IMG_1786.JPG
    IMG_1786.JPG
    235.8 KB · Views: 109
  • IMG_1787.JPG
    IMG_1787.JPG
    171.3 KB · Views: 118
  • IMG_1788.JPG
    IMG_1788.JPG
    173.1 KB · Views: 131
  • IMG_1789.JPG
    IMG_1789.JPG
    202.3 KB · Views: 134
  • IMG_1792.JPG
    IMG_1792.JPG
    131.9 KB · Views: 134
  • IMG_1793.JPG
    IMG_1793.JPG
    88.2 KB · Views: 133
  • IMG_1797.jpg
    IMG_1797.jpg
    167.4 KB · Views: 148
  • IMG_1798.JPG
    IMG_1798.JPG
    144.1 KB · Views: 111
It looks to be an Advantage II-T. Open the hopper lid, there should be a decal under it with a model #. I have the same stove in an insert. There is a certain depth the collar on the damper is set at, I believe 2 1/4", but let me check mine first.
 
PS GREAT stove. I love mine.
 
Yes, 2 1/4". From the side of stove to inside of the collar. I'll attach a screen shot from my phone. Screenshot_2014-11-05-21-01-10.png
 
Thanks for the info. Unfortunately the previous owner must have thought that the decal on the inside of the lid was hideous and scrapped it completely off.
 
Ouch. They stopped manufacturing the Advantage II-T in 2000. Is a great stove.
 
Last edited:
Status
Not open for further replies.