
Hello everyone,
First, another genuine thank you to the contributors for the invaluable resource that is this forum. You've all earned some serious karma points with the fire gods. Unfortunately, this post is going to be another one of those by a newbie who failed to take full advantage of it before buying a stove and trusting it to be properly installed by a so-called professional.
the salient facts:
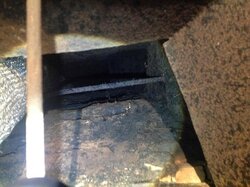
-- House was built in the 1700s with a masonry chimney. Damper plate was at the bottom and stuffed with installation below it. There was soot and brick dust, preventing the opening of the damper. Installers came to inspect, took measurements and said that chimney could be operational with removal of damper, an insulated liner & an insert.
-- After confirming that the insert would meet minimum clearances, we settled on a Hampton HI300 with oversized faceplate & blower. It was agreed that we would take care of constructing the hearth extension and installer insisted that it had best be done after the insert installation, so that they could make sure proper clearances would be met.
-- A week before install, we called to inquire about (a) whether we should construct the hearth beforehand and (b) installing a block-off plate due to the drafts that were coming through the chimney and the soot & dust dropping onto the top of the insert. We were told that (a) no and (b) a block-off plate would not be needed, but the installers would clean the chimney and install insulation at both the top & bottom.
-- Due to circumstances, we were not able to be present during the entire installation. The insert was installed crooked to the mantel. When asked why, the installer said that the hearth was crooked but that we could just "shim it up on one side" when doing the hearth extension.
-- Upon reading the manual after the install, we found that the according to the manufacturer, the insert must sit level to the hearth. It was also found that the side facing clearance is about 1/2" short of the minimum 8" when looking at the drawing (although it is very unclear of where the measurement should be taken, see below).
-- Spoke to the Regency rep for the area and asked him where the side measurement should be taken as the table in the manual states "to Side of Unit" but the drawing points to the inside column of the faceplate which is ~ 7" closer to the side. He kept responding that the measurement is where the manual states (???) and deferred any other questions to the installer.
-- On a side note, we also discovered that a regular faceplate was installed, which is good as the oversized required 11" side clearance, but bad because we were charged for an oversized one. We also found about the rebate from Regency for the blower which we were not given.
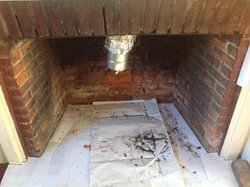
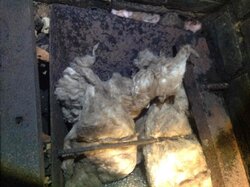
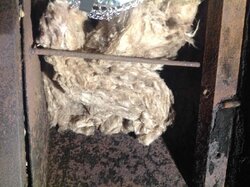
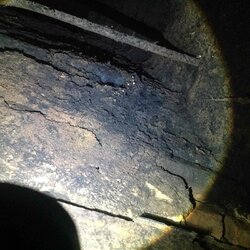
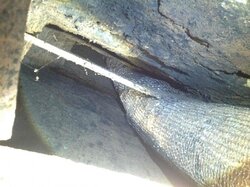
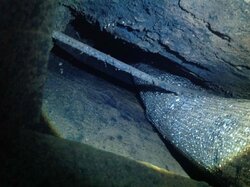
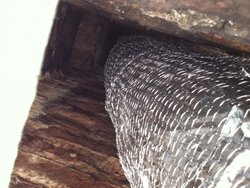
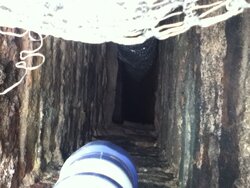
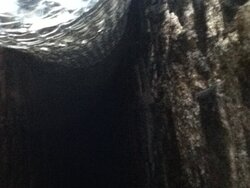
-- We continued to feel drafts from the chimney through the edges and beneath the insert, as well as heard dust fall down onto the stove. We decided to pull out the stove and remove the top plate to see what was going on. Although there was an insulated liner installed, it clearly appears the masonry flue was not cleaned at all before installing the liner.
-- Also, there was no insulation at the top and the insulation at the bottom had multiple air gaps.
-- We found a sticker on the cap stating it was a 5.5" cap from Integrity (makers of Chim-Flex I believe), however the woman there said there was no way to confirm whether the liner was an Integrity as we received no warranty information with our install packet.
-- At this point, we were planning to install a block-off plate with more insulation above the plate and within the firebox and then doing the hearth so that it's level across the bottom and has the proper clearances, but are very concerned about the creasote buildup in the old masonry flue. A short phone call to the installer about this condition resulted in a response that "we have nothing to worry about with an insulated liner. the installer's been doing this for 44 years and you are being unreasonable" which clearly seems to contradict what has been written in these forums in the past.
-- Since it seems that this may require some extreme measures to resolve these issues with the installer, I wanted to see if I could clarify some things with the crew here before initiating any further contact with them and going forward:
1) it is a correct understanding that even with an insulated liner, an old masonry flue should be cleaned prior to install and not doing so will incur a risk of a chimney fire or is that only when there is an uninsulated liner?
2) if so, short of pulling out the liner altogether and risk it tearing, is there any possible way to clean this? it appears that the area just above the firebox could be done with difficulty but 1/2 way up the chimney, the liner appears to be directly touching the old flue.
3) Does anyone with a Hampton know whether the min. side facing clearance of 8" is to the side of the actual stove (what the manual text states) or to the inside edge of the faceplate column (what the drawing shows)?
4) Is installing a metal heat shield on the side sufficient to compensate for the shortage of clearance or does there need to be an air gap between the metal and the mantel side (wood)?
We realize that there is an always the error in being too cautious, however, we have discovered that with everything else with this house so far, any shortcuts taken by the previous owner seem to have a high price somewhere down the line, and when it comes to fire, we would prefer not to go down that road.
Have attached a link to the manual below as well as some photos of the interior of the flue.
Any help or suggestions on how to resolve a bad situation would be much appreciated.
Apologies for the long-winded post, and thanks for considering.
http://www.regency-fire.com/Files/Manuals/HI300-918-240.aspx
First, another genuine thank you to the contributors for the invaluable resource that is this forum. You've all earned some serious karma points with the fire gods. Unfortunately, this post is going to be another one of those by a newbie who failed to take full advantage of it before buying a stove and trusting it to be properly installed by a so-called professional.
the salient facts:
-- House was built in the 1700s with a masonry chimney. Damper plate was at the bottom and stuffed with installation below it. There was soot and brick dust, preventing the opening of the damper. Installers came to inspect, took measurements and said that chimney could be operational with removal of damper, an insulated liner & an insert.
-- After confirming that the insert would meet minimum clearances, we settled on a Hampton HI300 with oversized faceplate & blower. It was agreed that we would take care of constructing the hearth extension and installer insisted that it had best be done after the insert installation, so that they could make sure proper clearances would be met.
-- A week before install, we called to inquire about (a) whether we should construct the hearth beforehand and (b) installing a block-off plate due to the drafts that were coming through the chimney and the soot & dust dropping onto the top of the insert. We were told that (a) no and (b) a block-off plate would not be needed, but the installers would clean the chimney and install insulation at both the top & bottom.
-- Due to circumstances, we were not able to be present during the entire installation. The insert was installed crooked to the mantel. When asked why, the installer said that the hearth was crooked but that we could just "shim it up on one side" when doing the hearth extension.
-- Upon reading the manual after the install, we found that the according to the manufacturer, the insert must sit level to the hearth. It was also found that the side facing clearance is about 1/2" short of the minimum 8" when looking at the drawing (although it is very unclear of where the measurement should be taken, see below).
-- Spoke to the Regency rep for the area and asked him where the side measurement should be taken as the table in the manual states "to Side of Unit" but the drawing points to the inside column of the faceplate which is ~ 7" closer to the side. He kept responding that the measurement is where the manual states (???) and deferred any other questions to the installer.
-- On a side note, we also discovered that a regular faceplate was installed, which is good as the oversized required 11" side clearance, but bad because we were charged for an oversized one. We also found about the rebate from Regency for the blower which we were not given.
-- We continued to feel drafts from the chimney through the edges and beneath the insert, as well as heard dust fall down onto the stove. We decided to pull out the stove and remove the top plate to see what was going on. Although there was an insulated liner installed, it clearly appears the masonry flue was not cleaned at all before installing the liner.
-- Also, there was no insulation at the top and the insulation at the bottom had multiple air gaps.
-- We found a sticker on the cap stating it was a 5.5" cap from Integrity (makers of Chim-Flex I believe), however the woman there said there was no way to confirm whether the liner was an Integrity as we received no warranty information with our install packet.
-- At this point, we were planning to install a block-off plate with more insulation above the plate and within the firebox and then doing the hearth so that it's level across the bottom and has the proper clearances, but are very concerned about the creasote buildup in the old masonry flue. A short phone call to the installer about this condition resulted in a response that "we have nothing to worry about with an insulated liner. the installer's been doing this for 44 years and you are being unreasonable" which clearly seems to contradict what has been written in these forums in the past.
-- Since it seems that this may require some extreme measures to resolve these issues with the installer, I wanted to see if I could clarify some things with the crew here before initiating any further contact with them and going forward:
1) it is a correct understanding that even with an insulated liner, an old masonry flue should be cleaned prior to install and not doing so will incur a risk of a chimney fire or is that only when there is an uninsulated liner?
2) if so, short of pulling out the liner altogether and risk it tearing, is there any possible way to clean this? it appears that the area just above the firebox could be done with difficulty but 1/2 way up the chimney, the liner appears to be directly touching the old flue.
3) Does anyone with a Hampton know whether the min. side facing clearance of 8" is to the side of the actual stove (what the manual text states) or to the inside edge of the faceplate column (what the drawing shows)?
4) Is installing a metal heat shield on the side sufficient to compensate for the shortage of clearance or does there need to be an air gap between the metal and the mantel side (wood)?
We realize that there is an always the error in being too cautious, however, we have discovered that with everything else with this house so far, any shortcuts taken by the previous owner seem to have a high price somewhere down the line, and when it comes to fire, we would prefer not to go down that road.
Have attached a link to the manual below as well as some photos of the interior of the flue.
Any help or suggestions on how to resolve a bad situation would be much appreciated.
Apologies for the long-winded post, and thanks for considering.
http://www.regency-fire.com/Files/Manuals/HI300-918-240.aspx
Attachments
-
 firebox 1.jpg217.7 KB · Views: 219
 -
 insulation 1.jpg230.3 KB · Views: 221
 -
 insulation 2.jpg253.8 KB · Views: 214
 -
 damper 1.jpg228.7 KB · Views: 221
 -
 damper 2.jpg372.4 KB · Views: 224
 -
 flue 1.jpg278.6 KB · Views: 216
 -
 flue 2.jpg244.6 KB · Views: 231
 -
 chimney top 2.JPG116.1 KB · Views: 210
 -
 chimney top 1.JPG105.9 KB · Views: 214
 -
 chimney top 3.JPG89.6 KB · Views: 221

")