
Hello fellow pellet burners. Today I took the plunge and installed an OAK on my Harman Accentra insert. Been meaning to do this for about two years now, but between the money for the OAK parts, the cost to rent a wet core drill rig and some serious consternation about coring a hole in my fireplace, it took a bit longer than expected. I had considered putting the intake through the block-off plate above the smoke shelf, but I really wanted to seal the flue liner at the top and bottom. Plus, running a three inch pipe 25 feet to the top of the chimney was just too long a run. The only alternative was going out through the back of the firebox, as I have an external chimney on the gable end of my two story colonial. Out the back is less than three feet from stove to outside, so with a three inch vent pipe there should be no resistance. I didn't really want to put a hole in the firebox, but I figured I'll never go back to burning wood in the fireplace, and if I move I'll just save the slug and mortar it back into the hole if the new owner doesn't want the stove. I know, who wouldn't?  .
.
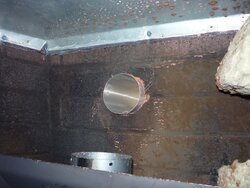
I considered buying a diamond core bit and dry drilling the hole, but the bit people said clay brick was too hard for dry drilling. So, I did a little research and found that the Hilti DD150 wet core rig, available for rent ($115 for the rig and a 3 inch bit for four hours) from HD, would be the best tool for the job. The only issue with the rig was that I could not hold it while drilling the hole - it was just too heavy. I thought about drilling a hole for an anchor bolt to use the mast that came with the Hilti, but I didn't want to put any more holes in the chimney, so I stacked up some platforms to get it to the proper height. I used my workmate with the vise top, which was perfect as the core bit sat in the space between the two wooden vise jaws and kept the drill steady as I started the hole. Once drilling, it took about 5 minutes to get through two courses of clay brick. When I broke through to the firebox, a couple cups of red clay slurry got splashed all over everything, but a couple towels and a few minutes later and all was dry.
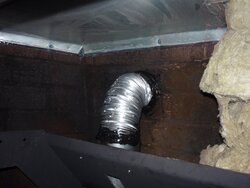
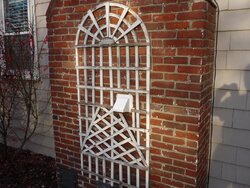
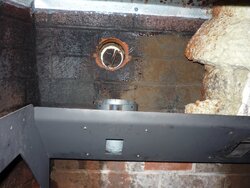
I had bought a three inch white vinyl dryer vent wall vent with a 11 inch tail from HD ($7). I took out the damper flap, and wedged in some 1/4 inch hardware cloth to keep the vermin out. I thought the 11" tail would be too long, but as it turns out it was barely enough. Once inserted, there was about one inch of the tail protruding into the firebox. I sealed the top and sides of the wall vent with some silicone to keep any rain from getting behind it and into the hole. Not really worried about it getting into the firebox, but felt it best to keep it as dry as possible. I then cut a hole in the trellis and hung that back on the chimney. I hope the giant rose bush that had been covering the trellis grows back, as I had to cut it way back to remove the trellis.
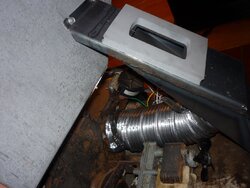
I bought some three inch aluminum flex vent, and attached the stub on the sub-frame to the tail of the wall vent, then sealed the connections with high temperature RTV silicone. I used worm-drive hose clamps to connect the bottom of the snorkel to the intake stub on the stove, and the job was done. All told, it took about four hours.
Over the last couple years I really grew tired of listening to the combustion fan run on and on long after the fire was out in the pot, knowing that all that warm air being sucked out of my house was being replaced with cold outside air that was making it drafty and would also need to be heated. I suspect that the fan will not run as long after the fire is out in the pot with an OAK, as the cold outside air should cool down the inside of the stove quicker. If all goes as planned, it'll be less drafty, I'll burn less fuel, and won't have to listen to the combustion fan as much.
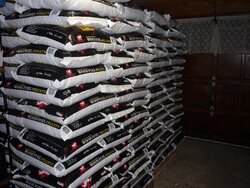
Based on the weather forecast, I finished up just in time as it is supposed to get much colder later this week (it was 65F here today). I've been burning a little oil the last two weeks or so, just waiting to finish the OAK install before firing up the stove this year. Back in September I loaded up on 3 tons of Somersets when they showed up at my local Lowes, so I am ready for the winter.
I'll post back in a few weeks with some observations on whether there is a noticeable difference with the OAK.
.I considered buying a diamond core bit and dry drilling the hole, but the bit people said clay brick was too hard for dry drilling. So, I did a little research and found that the Hilti DD150 wet core rig, available for rent ($115 for the rig and a 3 inch bit for four hours) from HD, would be the best tool for the job. The only issue with the rig was that I could not hold it while drilling the hole - it was just too heavy. I thought about drilling a hole for an anchor bolt to use the mast that came with the Hilti, but I didn't want to put any more holes in the chimney, so I stacked up some platforms to get it to the proper height. I used my workmate with the vise top, which was perfect as the core bit sat in the space between the two wooden vise jaws and kept the drill steady as I started the hole. Once drilling, it took about 5 minutes to get through two courses of clay brick. When I broke through to the firebox, a couple cups of red clay slurry got splashed all over everything, but a couple towels and a few minutes later and all was dry.
I had bought a three inch white vinyl dryer vent wall vent with a 11 inch tail from HD ($7). I took out the damper flap, and wedged in some 1/4 inch hardware cloth to keep the vermin out. I thought the 11" tail would be too long, but as it turns out it was barely enough. Once inserted, there was about one inch of the tail protruding into the firebox. I sealed the top and sides of the wall vent with some silicone to keep any rain from getting behind it and into the hole. Not really worried about it getting into the firebox, but felt it best to keep it as dry as possible. I then cut a hole in the trellis and hung that back on the chimney. I hope the giant rose bush that had been covering the trellis grows back, as I had to cut it way back to remove the trellis.
I bought some three inch aluminum flex vent, and attached the stub on the sub-frame to the tail of the wall vent, then sealed the connections with high temperature RTV silicone. I used worm-drive hose clamps to connect the bottom of the snorkel to the intake stub on the stove, and the job was done. All told, it took about four hours.
Over the last couple years I really grew tired of listening to the combustion fan run on and on long after the fire was out in the pot, knowing that all that warm air being sucked out of my house was being replaced with cold outside air that was making it drafty and would also need to be heated. I suspect that the fan will not run as long after the fire is out in the pot with an OAK, as the cold outside air should cool down the inside of the stove quicker. If all goes as planned, it'll be less drafty, I'll burn less fuel, and won't have to listen to the combustion fan as much.
Based on the weather forecast, I finished up just in time as it is supposed to get much colder later this week (it was 65F here today). I've been burning a little oil the last two weeks or so, just waiting to finish the OAK install before firing up the stove this year. Back in September I loaded up on 3 tons of Somersets when they showed up at my local Lowes, so I am ready for the winter.
I'll post back in a few weeks with some observations on whether there is a noticeable difference with the OAK.
Attachments

Last edited:

")
") but doubt I would duplicate this -- for one thing, the other side of my fireplace is now in my tight, added-on garage and the vent cover would be very close to my car. Can an OAK be routed in from underneath or some other direction, or only from the back?
but doubt I would duplicate this -- for one thing, the other side of my fireplace is now in my tight, added-on garage and the vent cover would be very close to my car. Can an OAK be routed in from underneath or some other direction, or only from the back?

