
Thanks for the info in this thread. Didn't mean to hijack it and turn it into a "solve my problem" type of thing. That being said, I can ususally load it up at 10 or 11pm and have no problem starting it up at 7 or 8 the next morning, with the stove around 200 with the blower still running.
New Osburn 2000 insert burn times
- Thread starter Renjilj
- Start date
-
Active since 1995, Hearth.com is THE place on the internet for free information and advice about wood stoves, pellet stoves and other energy saving equipment.
We strive to provide opinions, articles, discussions and history related to Hearth Products and in a more general sense, energy issues.
We promote the EFFICIENT, RESPONSIBLE, CLEAN and SAFE use of all fuels, whether renewable or fossil.
You are using an out of date browser. It may not display this or other websites correctly.
You should upgrade or use an alternative browser.
You should upgrade or use an alternative browser.
- Status
- Not open for further replies.

mstoelton
Feeling the Heat
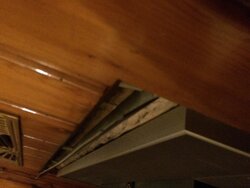
From the looks of the screen and flue pipe and the fact that you are having problems getting fires to light there is only one conclusion - your wood is not seasoned. I tried to get seasoned oak last year, it acted the same way and I struggled to make it burn. Then I found a load of mixed wood that was dry and it made all the difference.
Note: this is why you are not getting high temperatures when you burn. The BTU's are being used up to evaporate the moisture in the wood.
Note: this is why you are not getting high temperatures when you burn. The BTU's are being used up to evaporate the moisture in the wood.
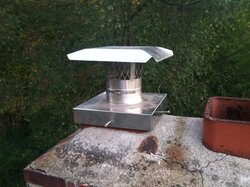
Raising the slate would be a pain for sure! It looks like you do have some room to increase the height of the screen though? On a 6" diameter liner, you have a flat surface area of about 28 sq in. If, instead of flat across the top you can have a raised mesh area (say 5"H) x the 18.84" length (circumference of a 6" diameter) you would increase your vent area to approx 94 sq", or 3+ times the area! If you made it conical (larger at the top) it would increase more.I actually have two meters, and both come back with the same reading from a fresh split face. Unfortunately, I had to have the wood delivered this year. I have a ton available from Sandy, but didn't get it split until recently, and it's not ready yet. I'd have to add some height to the brick pillars to raise up the slate.
Cut a piece of coarse expanded metal from Homedepot, Lowes, etc (yours looks fairly fine?) so you have a cylinder that fits around the 6" liner and overlaps itself 2" or so (maybe 21-22"?). For the height, measure from the top of the liner to the bottom of the slate and add maybe 2" so it can be slipped over the liner and a hose clamp to hold in place. If it meets the slate uniformly, I wouldn't do anything else. If not, leave the height about 4" longer and cut into "peels" at the point where it meets the slate and fold over inward to close the top.
Kinda like this pic (imagine the top cap is your slate)
Attachments
NP. Just glad you found the issue before any real problems! When its working well, looks like you are getting similar burn times. You get a lot of coaling?Thanks for the info in this thread. Didn't mean to hijack it and turn it into a "solve my problem" type of thing. That being said, I can ususally load it up at 10 or 11pm and have no problem starting it up at 7 or 8 the next morning, with the stove around 200 with the blower still running.

I do get a fair amount of coaling. Usually the last 2 hours during the day is waiting for them to burn down a bit before reloading. Noticed in your pic that you have a hearth level with the floor. Same as my setup. Per the manual, the town inspector made me put an extension (portable, at least) that went the required 29" from the door. There's a thread on this forum about it. It gets pretty warm down there.
etiger2007
Minister of Fire
My stove loves to run in 600-700 range, I measure with a condor medallion stove top therm on the center of the stove top as it states to do in the manual. If your burning in the 300-500 range I would think that's too low to get the clean burn. It's nice to have other 2000 users in here !
Would you guys mind posting a pic of what your initial load from a cold start looks like? Removing the clogged grate fixed my draft problem. Just loaded up and it only got to 475 before starting to drop. Checked each piece of wood; ranged from 19-21%. I have a feeling I may not be loading enough wood to get to the high temp on a cold start. Usually 3 4-5 inch splits on the bottom with two more layers of progressively smaller splits / kindling on top. What temps do you start to turn down the draft?
Unfortunately for me, I needed the heat shield for my install, so I can't read the thermometer if it's on the top, I have to use the front face.My stove loves to run in 600-700 range, I measure with a condor medallion stove top therm on the center of the stove top as it states to do in the manual. If your burning in the 300-500 range I would think that's too low to get the clean burn. It's nice to have other 2000 users in here !
Swedishchef
Minister of Fire
You need more. I load 5-7 medium splits from a cold start. It lasts me 5-7 hours.
Your burning methods kinda need to be tweaked, there is some glaze creosote there and it seems early for it to start accumulating. The quicker the Fire gets to a hot temperature and secondaries going, less junk in the chimney. My secondaries, from a cold start, normally ignite between 15- 20 mins.
Andrew
I had to install the shield as well. Design limits any use of stove top including thermometer use... A slightly steeper angle would be better.Would you guys mind posting a pic of what your initial load from a cold start looks like? Removing the clogged grate fixed my draft problem. Just loaded up and it only got to 475 before starting to drop. Checked each piece of wood; ranged from 19-21%. I have a feeling I may not be loading enough wood to get to the high temp on a cold start. Usually 3 4-5 inch splits on the bottom with two more layers of progressively smaller splits / kindling on top. What temps do you start to turn down the draft?
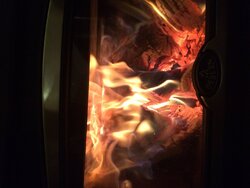
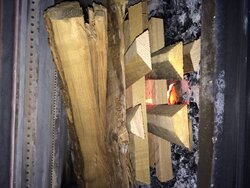
Tonight I am trying the first course laid EW and 2 courses NS on top to see if I can get longer burn. Total splits about 10 and mix of dry and ok wood (pic 1). Stove was 236 when starting. It took considerably longer to get things moving this time. I expected some delay, but was almost 20 mins before I got good flame and another 5 min to get 450. Started to cut back at 450-500. Again at 500-550 and turned fan on low here (pic 2). Waited another 10 mins before cutting back all the way. Stove was at 600-650 with full char and a fair amount of secondaries cooking. Last check, stove had settled some to 500-550 and cruising along (pic 3). Hope this helps. It's getting hot typing next to this thing!


Filled it up with my first N/S fire after the cold start was down to coals around 8:30. Put 1 peice E/W in the back to level off the bottom, then filled it up to the tubes. After about 20 minutes, the stove was around 575, then settled in at 500. At one point, it dipped back down to almost 400, but 10 minutes later, kicked back up to 500-525, where it stayed for as long as I was up. Checked it this mornign at 7:00 and the stove was at 150, with a few large chunks of coals in the back.

I think I have been turning it down way to early, and not loading enough initially. The N/S worked much better; the only issue I have is that most of my delivered wood is not stove length, and I'd have trouble getting them to fit this way.
I think I have been turning it down way to early, and not loading enough initially. The N/S worked much better; the only issue I have is that most of my delivered wood is not stove length, and I'd have trouble getting them to fit this way.
Filled it up with my first N/S fire after the cold start was down to coals around 8:30. Put 1 peice E/W in the back to level off the bottom, then filled it up to the tubes. After about 20 minutes, the stove was around 575, then settled in at 500. At one point, it dipped back down to almost 400, but 10 minutes later, kicked back up to 500-525, where it stayed for as long as I was up. Checked it this mornign at 7:00 and the stove was at 150, with a few large chunks of coals in the back.
View attachment 144892
I think I have been turning it down way to early, and not loading enough initially. The N/S worked much better; the only issue I have is that most of my delivered wood is not stove length, and I'd have trouble getting them to fit this way.
Great !
I find NS loading much easier and I dont have to worry about the front log rolling against the glass after the pile settles. That said, much of mine is cut to 16-17" with the longer pieces saved for the same rear EW piece. I did cut about 2 cord at 20" when I read it will fit in this stove. However, it would be a major effort to fill it EW due to the considerably smaller door opening... Got another year before I have to deal with that pile though!
I think your right about turning down too early, although I have started to cut back sooner since the stoves continues to run up due to the improved cold weather draft I presume? As far as not enough, you should still be able to get a hot, small fire just wont last as long. My early burns during the warmer days were 4-5 of my small splits and I could get up to 600 easy. Look for smoke from sack at 20 min intervals. I do this from time to time to see the correlation of temps to actual smoke output.
My experiment last night seems to have yielded marginal, but positive results. When I got up at 6AM, there were more significant coals left then previous, and relight was very fast. Blower still on and the laser said 220. House main was 74 and back bed 64. It was 19 out and windy so could see the difference in the house temp this AM for sure (not that 74 is cold!). Will be cold again today/tonight. 1x is not much of a sample size, but will do this again for more validation. With continued buy-in from the wife, I think this will easily be a 24/7 primary heater for me.
Bagelboy
Feeling the Heat
In a nutshell, at least for me, wait til the stove gets down to about 200 degrees. Stuff it with wood, with the bypass completely open. Let it catch until about 450 degrees, and close the bypass. It should take about 15 minutes. After shutting down, depending on your wood, you should see the temps go anywhere between 550 and 650. Repeat at 200 several hours later. This is a cliff notes version!
Bagelboy
Feeling the Heat
By the way, like I said, this is the cliff notes. You will eventually find what works best for you. But, this method is a basic method to get you going, burning hot and clean, and something to try!
etiger2007
Minister of Fire
I just threw in six splits in n/s fashion. Blower on medium all at 6pm. Pic is wood 45 minutes later , getting hot in the stove room, go to utube and type in Osburn insert secondaries and look for it being posted by etiger2007, also a pic of my heat shield I put it on the wood itself. I also load my stove with kindling from a cold start with a small split or two on top because I want to get things hot fast, I'll post a pic tomorrow when I do it, looks like I'm setting a log cabin on fire !
Attachments
Last edited:
Cold start still only got up to about 475 last night. I can't seem to get the bottom splits in the rear to burn initially if I load them E/W. If I do 3 on the bottom, the first gets going nicely, most of the 2nd, but the 3rd just chars over. I know this is what you're looking for for longer burns if you pack it tight, but I'm trying to get it hot first. I feel like the 2nd and 3rd layers of wood burn down to coals before the stove can really take off, and only 1/2 splits on bottom that are actively burning aren't enough to get the temps up. This time, I even tried putting two 1" splits N/S on the bottom to let air in.
Reloaded n/s again at 9:00; stove went to almost 600 and then settled in around 500. This morning at 7:30, plenty of coals for a relight, blower still on and stove at 200.

Reloaded n/s again at 9:00; stove went to almost 600 and then settled in around 500. This morning at 7:30, plenty of coals for a relight, blower still on and stove at 200.
etiger2007
Minister of Fire
I have to believe that your stove top is getting hotter than the left corner of your insert. Is it heating your house ? I will shoot my left corner with the digital therm and see how much difference there is.Cold start still only got up to about 475 last night. I can't seem to get the bottom splits in the rear to burn initially if I load them E/W. If I do 3 on the bottom, the first gets going nicely, most of the 2nd, but the 3rd just chars over. I know this is what you're looking for for longer burns if you pack it tight, but I'm trying to get it hot first. I feel like the 2nd and 3rd layers of wood burn down to coals before the stove can really take off, and only 1/2 splits on bottom that are actively burning aren't enough to get the temps up. This time, I even tried putting two 1" splits N/S on the bottom to let air in.
Reloaded n/s again at 9:00; stove went to almost 600 and then settled in around 500. This morning at 7:30, plenty of coals for a relight, blower still on and stove at 200.
View attachment 145033
Thanks for checking. Yes, it's heating things fine. Gets the first floor to 72-74; but I have a very compartmentalized floor plan. My concerns are more with the speed that the grating at top of the liner clogged up, and the tar on the slate cap. Obviously not burning hot enough. Renjilj seems to be getting readings of 600+ on the same location as I am.I have to believe that your stove top is getting hotter than the left corner of your insert. Is it heating your house ? I will shoot my left corner with the digital therm and see how much difference there is.
Last edited:
etiger2007
Minister of Fire
Here's a pic of my cold start, I also compared my stove top to the left corner and there's about a 100 degrees difference between the two with my set up, tar and clogging has to be because your burning green wood !
Back to the cold start load, I burn this load wide open with the air control to get the unit and the chimney liner warmed up good.
Back to the cold start load, I burn this load wide open with the air control to get the unit and the chimney liner warmed up good.
Attachments
Last edited:
PaulThanks for checking. Yes, it's heating things fine. Gets the first floor to 72-74; but I have a very compartmentalized floor plan. My concerns are more with the speed that the grating at top of the liner clogged up, and the tar on the slate cap. Obviously not burning hot enough. Renjilj seems to be getting readings of 600+ on the same location as I am.
The common denominator for the tar buildup and lack of hot temps seems to be wood. Strange your meter telling you 23% or less.. What size splits? What flavor wood? Maybe make them small, 2-3" to see if you can jack up temps? Try not raking the coals forward and spreading them even along the bottom so they engage all pieces early and at same time. When I do the first course EW, the back log is typically the last one to go. It's the one that provides the most coals for reload. I also select the largest split for this position, but that makes it a slow burner.
I have no issues getting the stove or house hot. I know Ed gets his hot as well. What if you take the screen off the top of the liner for a few fires? Unlikely to get critters this time of year especially if burning continuous. It will remove that variable anyway..
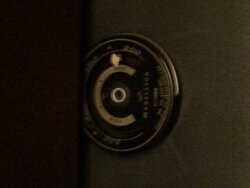
To clarify, I get 550-700 on the top of stove avg across the width about 5-6" back from edge. Until the stove is completely hot uniformly (as much as 2 hrs or more), the mag temp on front face is as much as 100 degrees off from top with laser. After a couple hours they do get within 25-50 degrees which is within the stacked tolerance of the two so I consider it a wash. Do you have a laser temp you can read the top? If not, for about $20 online it's worth it!! It pulls double duty - the dog just loves to chase the red dot around the house and yard like crazy (bonus)!
Where in CT are you?
Hey EdI just threw in six splits in n/s fashion. Blower on medium all at 6pm. Pic is wood 45 minutes later , getting hot in the stove room, go to utube and type in Osburn insert secondaries and look for it being posted by etiger2007, also a pic of my heat shield I put it on the wood itself. I also load my stove with kindling from a cold start with a small split or two on top because I want to get things hot fast, I'll post a pic tomorrow when I do it, looks like I'm setting a log cabin on fire !
I like that heat shield location better than the Osburn which is right above the stove at the bottom of the surround. It blocks the top of stove from anything useful (therm, pot, etc) and, although I have gotten used to it now, it's an ugly duckbill looking thing. How did you speck that out?
Did you try your experiment with cutting off air complete yet? Curious to see your results
Ok, so if the top is on average 100 higher then the front to start, my recent temps of 500+ aren't that bad. I began checking each peice that I've been putting in. Most are decent, between 18-22%. One peice measured at 30! I don't know who people sell this stuff. Fortunately, I should be in better shape with the wood next year.
Im in North Wilton, near Ridgefield
Im in North Wilton, near Ridgefield
Last edited:
Ok, so if the top is on average 100 higher then the front to start, my recent temps of 500+ aren't that bad. I began checking each peice that I've been putting in. Most are decent, between 18-22%. One peice measured at 30! I don't know who people sell this stuff. Fortunately, I should be in better shape with the wood next year.
Im in North Wilton, near Ridgefield
Just a bit south of me. Got some friends in Wilton. 30% is on the wetter side but the 25 and under crowd should work ok. <20 best. I keep a rack of my 23-25% Oak in the room next to stove and burn it slowly (2-3 pieces per fire) with my drier stuff and no issues at all. It also continues to dry very quickly in the 80 degree, dry room. By the time we get to the bottom, they are all close to 20. Tonight the stove is very hot. Been choked down for 2 hours and still at 700+. Must be the cold. Been burning for 4 weeks now and plan to get on the roof this weekend to check for any buildup.
How's the fire today?
etiger2007
Minister of Fire
Ok, so if the top is on average 100 higher then the front to start, my recent temps of 500+ aren't that bad. I began checking each peice that I've been putting in. Most are decent, between 18-22%. One peice measured at 30! I don't know who people sell this stuff. Fortunately, I should be in better shape with the wood next year.
Im in North Wilton, near Ridgefield
Hey Ed
I like that heat shield location better than the Osburn which is right above the stove at the bottom of the surround. It blocks the top of stove from anything useful (therm, pot, etc) and, although I have gotten used to it now, it's an ugly duckbill looking thing. How did you speck that out?
Did you try your experiment with cutting off air complete yet? Curious to see your results
i just went with the manufacturer specs from the home saver heat shield , no real scientific method. It comes packaged much larger you just cut to size , I wish I would have made it alittle bigger and for roughly $70 I can order a new one and do it again. I did do the air all the way closed and had a better coal bed to start with in the am but useful heat was gone in the eight hours it was running because the furnace was on, it was in the single digits at this time .Hey Ed
I like that heat shield location better than the Osburn which is right above the stove at the bottom of the surround. It blocks the top of stove from anything useful (therm, pot, etc) and, although I have gotten used to it now, it's an ugly duckbill looking thing. How did you speck that out?
Did you try your experiment with cutting off air complete yet? Curious to see your results
- Status
- Not open for further replies.
Similar threads
- Replies
- 16
- Views
- 1K
- Replies
- 23
- Views
- 2K
- Replies
- 4
- Views
- 621