
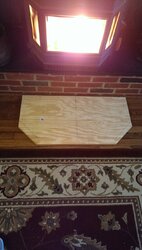
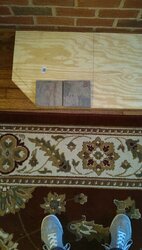
Ok, it's really not a pad as I have an insert, but directly below the front of the stove is wood floor which has always bothered me. That and the manual calls for a minimum of 6" of non combustible material out from the front of the stove. Anyway, not going nuts, just some 6" square slate tile. The base is 3/4" plywood, I'll put some durock or wonder board on top of that and then tile. Before grouting I'll trim it with some sort of trim, probably oak and either paint it matte black or stain in the floor color. Overall dimensions are 36" X 18"
Started making a hearth 'pad'
- Thread starter Ranger72
- Start date
-
Active since 1995, Hearth.com is THE place on the internet for free information and advice about wood stoves, pellet stoves and other energy saving equipment.
We strive to provide opinions, articles, discussions and history related to Hearth Products and in a more general sense, energy issues.
We promote the EFFICIENT, RESPONSIBLE, CLEAN and SAFE use of all fuels, whether renewable or fossil.
You are using an out of date browser. It may not display this or other websites correctly.
You should upgrade or use an alternative browser.
You should upgrade or use an alternative browser.
- Status
- Not open for further replies.
CTguy9230
Feeling the Heat

funflyer
Burning Hunk


John Fortier
Feeling the Heat
- Sep 29, 2013
- 450
Nice, As a tile setter for 30 plus years. When you set your backer board to ply it needs to be thinset to the wood. When setting a natural stone , again needs thinset, not an organic adhesive. Being it is a hearth pad all should be ok because there will never be a traffic pattern run on it, yet there still is a chance for failure. Give it one coat of seal before you grout. On natural I always lay out the slate, stone and seal and then set. Then grout. Let dry 24 hours and seal the whole job again.
John Fortier
Feeling the Heat
- Sep 29, 2013
- 450
Ranger,
Being it is slate you could cut down pieces as a bullnose and grind them down to make a natural trim.
Being it is slate you could cut down pieces as a bullnose and grind them down to make a natural trim.
Thanks for info! I am a painter by trade, first time messing with stone/ tile. I know your supposed to thinset the backer board to the ply, but figured since it's getting zero foot traffic, I went fast and easy and used a more than fair share of PL and some screws. I thought about bull nose for the edges, but think I'll like the wood better.
John Fortier
Feeling the Heat
- Sep 29, 2013
- 450
Wood will be fine, only difference is find a matching caulk color because the grout will eventually crack out between the slate and wood.
John Fortier
Feeling the Heat
- Sep 29, 2013
- 450
Black is a whole new ball game. Stains like crazy. Get yourself a piece or burlap, a bucket of sawdust and vinegar. Do not set your trim until after the grout. Build a dam to grout to. As little wash as needed because it is very easy to over wipe and take the color grains out which will end up a gray. Mix the vinegar and saw dust to a moist combo and when the grout has set for a bit sprinkle on the mix and circle with the burlap. Slate needs a very good seal or it will soak up the black color. If you are the least bit unsure I would be more than happy to speak to you via phone..easier for me to explain to you what you need to do...please feel free.
John Fortier
Feeling the Heat
- Sep 29, 2013
- 450
I agree with John F. completely but here's another .03 to .04 cents worth.
Black is a highly staining grout as well as other deep colors. Thin Set will stain raw wood also. Even lighter colors when touching raw wood briefly will stain. Period.
I have messed up numerous times and know this to be a fact. Here's a twist though and another option. Set it up, grout, and evenly rub the grout stain throughout the raw wood. It can turn out pretty cool. Then clear coat it or add more stain accordingly and clear it. No need to buy more stain if this might suit you. Better yet, Run it by the boss lady. Pin stripe it with high-vis orange if you can pass it with the wife and she digs it. Good Luck there Amigo!
PLAN D:
Here is another angle though. Cut your border trim, stain & /or clear it to your specs to finish it and install finished product. Then you can go ahead and install trim, set tile, and grout without worries unless you slop grout all over it and don't wipe it off. Be sure to have a sponge, clean bucket of H2O, and rags while doing so. The grout will not permeate the finish on the sealed wood and will easily wipe off so you can grout the finished trim in place no worries. Just be neat and clean. And Again, be sure to wipe it all off. If you miss some little stuff no big deal. Let it dry and scrape it off like getting some burn pot scraping practice but use a plastic putty knife or gently use a metal one. NOTE: (Wife's kitchen tools, pan cake flippers, etc; work great here as long as you have kids to blame it on.) If not, Good Luck and don't get caught. Grout will shrink over time at the wood trim but it will be minor if you seal the wood. Very fine bead of black silicone.
PLAN E:
Another option but the grout line is likely to bust up and head south with minor movement: Make a temporary ripper of whatever wood for the boarder. Gently and sparingly tack it to where the good stuff goes. Set & grout. Gently pull after completely dry and set finish trim. Install final trim with a fine bead of silicone between the trim and grout. Have your final trim already set, glued, and nailed for the perimeter and cut to fit exactly. Then glue and/or tack it into final resting place ever so delicately.
When you nail it even with a gun up against the tile and grout line it will likely pop. But if you get lucky, in given time, you will silicone it anyway. Or you could make cuts on a bugs nut, ......." How big is a bugs nut, you ask?" So tight,,, that where the tile meets the trim you do not need a grout line nor caulk at the leading edge. Pretty tight and it can be done. Then you drop a Bud bottle and it hits just right.
Last time I checked I was still uncertain how big a bugs nut was and it is very difficult to verify. I'd start with a big beetle or praying mantis first. Mouse nuts would be good enough if you can spare some wiggle room. Couldn't even find the whole nut sack last time a bug flew into my eye! Options, Bro! Get -R- Done!
Have you thought about some inlays within the field? Or a boarder and the field laid on a 45?
They make black silicone. You'll do just fine!
Thanks!
Hopefully it was some educational and/or helpful hot air. John F. was setting you up in the right direction and had good pointers. I am beat. Ironically, I have been laying tile all damn day finishing stuff up to install the used PC43. Very tedious cut up stuff here. I love it when I actually get to set a 12 x 12 here or there. I'll be sleeping in the fetal position tonight. Kinda naturally curedl up that way after hours of it. I am now having a Bud Lt. winding my beat up knee and hand riding azz down.
Looks like you have it figured out and did the cuts and layout from what I briefly looked at with your photos. Not rocket science but time spent planning and stuff is time well spent. Slate is great and cost effective on current pricing. I am all for natural stones and prefer them to ceramics or porcelain. Personal pref. Natural tiles can split and crack when you cut and handle it though. Plus it has irregularities but that is all in the beauty of it IMO. Many different colors and variations with slate too. Nice choice in materials if I might say so myself.
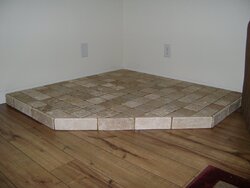
Get it done and post some pics! Happy to see another tile schmuck suffering currently. I almost have all of mine done. GREAT! Then I get to grout it all............ Fun, Fun! Then on hands and knees again for final clean. OUCH!
Hopefully it was some educational and/or helpful hot air. John F. was setting you up in the right direction and had good pointers. I am beat. Ironically, I have been laying tile all damn day finishing stuff up to install the used PC43. Very tedious cut up stuff here. I love it when I actually get to set a 12 x 12 here or there. I'll be sleeping in the fetal position tonight. Kinda naturally curedl up that way after hours of it. I am now having a Bud Lt. winding my beat up knee and hand riding azz down.
Looks like you have it figured out and did the cuts and layout from what I briefly looked at with your photos. Not rocket science but time spent planning and stuff is time well spent. Slate is great and cost effective on current pricing. I am all for natural stones and prefer them to ceramics or porcelain. Personal pref. Natural tiles can split and crack when you cut and handle it though. Plus it has irregularities but that is all in the beauty of it IMO. Many different colors and variations with slate too. Nice choice in materials if I might say so myself.
Get it done and post some pics! Happy to see another tile schmuck suffering currently. I almost have all of mine done. GREAT! Then I get to grout it all............ Fun, Fun! Then on hands and knees again for final clean. OUCH!
By the time you think of using knee pads, it's too late. Haha. I like the natural 'imperfections' in natural stones. That is why I went with the slate. Well that and .... I spent about 10 dollars in tile. total Haha
I did a bath out of it. About $1.30 or so a SQ FT from Home Depot at that time. I have used nice gel knee pads all day. Otherwise I'd be in the ER about now. I'd take breaks and it would take a few to straighten up. I'm 45 now so I'm feeling more abuse.
$$$$$ Exactly.... How much are those hearth boards again? High Dollar! It kills me what the vent or exhaust pipe costs. Say $36 for 3 ft. I know material cost is a fraction but they have ya cause ya need it.
Just like fire caulk for penetrations. Just like X rated or fire resistant drywall vs, regular. Sure it may cost more to produce, but that much more? Sure! Specialty products with real, real special pricing.......
I missed out on a nice Whitfield a couple of weeks ago. $500 and it looked great in the 3 pics and supposedly worked great. Guy said it sold it in less than two hours from posting it. Would have liked to have gotten it. He had taken it out for some older lady that no longer wanted it or could use it. Have you had good luck or use with yours?
I'm 45 now so I'm feeling more abuse.$$$$$ Exactly.... How much are those hearth boards again? High Dollar! It kills me what the vent or exhaust pipe costs. Say $36 for 3 ft. I know material cost is a fraction but they have ya cause ya need it.
Just like fire caulk for penetrations. Just like X rated or fire resistant drywall vs, regular. Sure it may cost more to produce, but that much more? Sure! Specialty products with real, real special pricing.......
I missed out on a nice Whitfield a couple of weeks ago. $500 and it looked great in the 3 pics and supposedly worked great. Guy said it sold it in less than two hours from posting it. Would have liked to have gotten it. He had taken it out for some older lady that no longer wanted it or could use it. Have you had good luck or use with yours?
Bought my house in 2011 and the stove was all ready in the fireplace. (albeit all wrong). Iurked this forum, unplugged the stove from an insane amount of ash, redid the exhaust and this thing, which is just about 25 years old, runs like a champ! It is sad that Lennox ultimately killed them off, they are some solid stoves!
Kills me when items are overpriced just because they can be. I don't mind paying extra for a quality product. My example being pphenoseal brand caulk. Sure it's double the price of Dap, but it's worth the money! Now, for example, pink foam boards or blue painters tape. I bet the Mark up is insane.
Kills me when items are overpriced just because they can be. I don't mind paying extra for a quality product. My example being pphenoseal brand caulk. Sure it's double the price of Dap, but it's worth the money! Now, for example, pink foam boards or blue painters tape. I bet the Mark up is insane.
Last edited:
Oh yeah, DRIcore sub floor panels! Great product, but 6 bucks for a 2'X2' panel! It's osb and plastic. Haha
I've seen those 2 x 2 panels but never used them. The $6 would make it cost $48 bucks for a 4 x 8 sheet. Not way out of line but a little considering OSB is about $9 to $13 a sheet depending on thickness and what it is. So yes, I don't see the plastic being worth $30 bucks or so. The price of finished oak or poplar plywood is at least $50 a sheet now. Used to buy it all day long not long ago for $22 to $25 per sheet.
I did my basement with the DRIcore. That coupled with the 2" polystyrene foam panels I put on the foundation walls, makes the basement dry as can be. Just the price on the DRIcore was ridiculous. I think they were around 5 bucks a pop then.
That's what the Dricore was designed for. That 2" foam will set you back too. I ran that under my concrete radiant floor heat in an 1,100 SQ FT great room with 12 to 14 ft ceilings. Good stuff but if I recall I paid about $40 bucks a sheet there. Still have about 5 left over stored away.
Bottom line:
The more you can insulate the better. You will recoup that money over and again as time goes. IF I build another house for myself I will be off the hook with insulation and stuff. House will be smaller when kids fly the coup too. If it has a basement I will do ICF's Insulated Concrete Forms.
Went over kill here with 2 x 6 and 2 x 8 exterior walls and tons of insulation. All the ceilings have a minimum of around R-30 plus depending how much space there was. Then I ran 1/2" foam board on all the ceilings and foil taped the seems before drywall. So at min. I have about R-32 in the weakest places which is good for here and slim to no air leaks. My place is pretty tight but could always improve as I learn repeatedly. Down side is I did too many big window walls and oodles of all glass doors. Love the natural light but it would be tighter with less. Glass is a poor R value. Even top of the line insulated glass and windows suck in all reality.
- Status
- Not open for further replies.
Similar threads
- Replies
- 13
- Views
- 748
- Replies
- 1
- Views
- 813
- Replies
- 8
- Views
- 1K
- Replies
- 2
- Views
- 530