Winter Solar mode

  • Active since 1995, Hearth.com is THE place on the internet for free information and advice about wood stoves, pellet stoves and other energy saving equipment.

    We strive to provide opinions, articles, discussions and history related to Hearth Products and in a more general sense, energy issues.

    We promote the EFFICIENT, RESPONSIBLE, CLEAN and SAFE use of all fuels, whether renewable or fossil.
Status
Not open for further replies.

peakbagger

Minister of Fire
Jul 11, 2008
8,845
Northern NH
Well the forecast for snow and the early winter conditions in general forced me to switch the solar panels into the winter sun angle. I have three arrays, one roof mounted (2 KW) that is fixed and is snow catcher as its a shallow angle, a pole mount (2.2 KW) that is adjustable and a wall mount (660 KW)that is also adjustable.

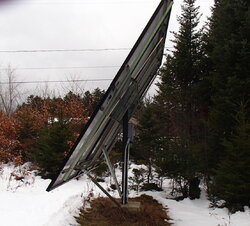
The pole mount takes about 15 minutes to change angles. The array pivots at the center so I just pull the bolts on the supports that set the angle and move the array with one hand and then swing the supports to a set of predrilled winter holes. That sets the array to about 30 degrees from vertical. I also add to sway braces from the corner of the panels to the pole foundation. Winter winds tend to be more extreme and the braces keep the array from whipping around in high winds.

The wall mount requires a hydraulic floor jack and customized 2x8. Basically jack up the bottom of the array a bit, remove two bolts on the angle supports and then lower the jack down until the supports line up with the winter angle holes. The panels are now at 30 degrees off vertical.

I will take a slight power loss for a couple of weeks but once snow is on the ground, I gain some of it back. Of course once the snow gets on the ground, the roof array starts to get covered with snow for long stretches so in general I will be raiding my built up surplus for a couple of months.

I ran my mini split real hard last year to see what it will do. I expect I will run it a bit less in extremes conditions this year. The goal is to run my kwh surplus down to zero around the end of April.

I will leave the panels this way until about the end of March or early April. Contrary to popular opinion, if the snow conditions are right, snow does build up on 30 degree panels and it can take a couple of day for them to clear off.
 
Can you post a picture or two of the pole mount array? We are putting in a pole mount array soon. I'd like to see your bracing system. Due to our topography I want to swing the array to due south in winter with a ~45 deg tilt. In the summer the angle would be less and the array would get pointed SW. With our northern latitude we are missing out on a lot of sun with our late sunsets in the summer. From April -Sept. the sun angle is high enough to clear the trees. We have our primary fixed 2.9KW array facing south so this would be to pick up afternoon and early evening rays.
 
I second the request for photos, "pretty please". I appreciate the information you already provided. I'm presently designing an array for 45.9°N, and need all the real world experience I can acquire. What's the actual pitch on your roof? 5/12 or less?
 
It may take me a few days but I will get some photos
 
It almost seems like you could heat a PV panel briefly to create enough melt to allow the snow to slide off. Of course this would require power use.

Its funny...
Heat a thermocouple and it produces current. Pass current through it and it the Peltier effect heats one side and cools the other.
Spin a generator and it produces current. Pass current through it and it will "motor".

Yet,
I don't think energizing a PV cell will create a light emission though it probably would heat.
Wonder what happens when you expose an LED to a photon source?
 
I don't think energizing a PV cell will create a light emission though it probably would heat.
Wonder what happens when you expose an LED to a photon source?

These things ARE reversible, but the devil is in the details. The bandgap voltage (characteristic energy barrier for the electron-hole pairs) in a PV application should be small...to get efficient operation you want E_photon > > E_bandgap. In LED mode, then E_photon <= E_bandgap. That's why they use different semi-conductors for different color LEDs and engineering the blue LED was the great triumph of science in the 90s..(in Japan)...had to find an exotic high bandgap semiconductor.

If you could get light emission from a Si photodiode/PV device, it would emit in the near infrared.
 
Last edited:
Pitch of my garage roof is 4/12. So pretty close to the right angle. So far I've seen it shed the snow within a few days of the end of the bit of snow we've had. I'm sure I'll be blanked out for days at a time. I don't have the banked power credits as my system was installed 22 aug. I'll be buying some electricity this winter.. but it will be the LAST winter I do!

Would like to see your pics too.

JP
 
Here's mine. drone pic.

JP
photo 1[1].JPG
 
Last edited by a moderator:
I like your solid stored solar energy shown in the bottom right of the photo.
 
  • Like
Reactions: sloeffle
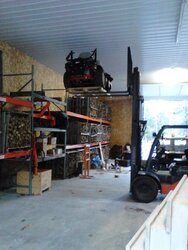
Just as much in the barn as well. about 10 cords of 'stored solar' on the racks. :)
IMGA0172.jpg
 
  • Like
Reactions: sloeffle
Nice system!
 
Sorry for the delay. Here is a photo of my pole mount system and the two sway braces I added for winter. The one in the foreground is adjustable and I leave it on all year while the one in that is hidden in the except for the array attachment in the background is only set for winter. The array pivots on a stainless steel bolt that runs through the two rectangular columns. The array is pivoted off a center piece of unistrut sandwiched between the two columns with two other struts on the outboard sides. I don't clamp the struts in, The angle adjustment is pretty obvious unbolt the sway braces, then unscrew the bolt on each support, push or pull on the bottom of the array and then swing it up or down until the angle support lines up with another threaded hole. I could make it more rigid by moving the short aluminum strap and making a solid joint but it makes things a lot easier to line up the bolt holes when making the adjustment solo.

Please note, this pole mount was modified from a prior smaller array where I replaced 1000 watts of panels with 2100 watts. I uses standard height unistrut as the local electrical distributor charged a major markup for double or triple unistrut. Home Depot stocks limited unistrut so I used what they had. If I had started from scratch I would probably use double height strut. for much of the frame.

sway brace 12_05_14.JPG
 
Last edited by a moderator:
Thanks for the photo! That gives me some ideas.

How deep did you have to go with the concrete footer?

Is the center pole square, or round?

P.S. I think I would transplant the little pine or cedar sprouts growing to the southwest while they're still small enough to move.
 
The footing is 2' by 2' by 6' deep. There are actually two rectangular posts that run from the base of the footing to the top of the pole. I think they are 3x6 by 1/4 inch wall (maybe 3/8). They are spaced the width of one unistrut. The two posts were spaced with lengths of threaded rod which are poured into the footing. I think I mixed 55 bags of sakrete by in hand mixer and poured them into the footing. Generally up north the footing depth is set by the frost line more then the load although I think I did do some load bearing calculations when I built it.

In northern NH, softwoods are weeds. If you leave a patch of ground bare for a year or two they will sneak in. The array is sitting on the cusp of a hill with the prevailing wind coming in from the west. so I need to leave the small stuff to the west to act as a snow fence. I cut down the tall stuff every year or so it doesn't block the sun to the array. I think in a southern climate the depth may be less but the size would be bigger.
 
  • Like
Reactions: Where2
Our 8" pole will be 7' deep with a 30" cement surrounding jacket. This was determined by the DPW solar engineers that designed the array rack support. It is for an 10 panel array. I like the idea of putting a raised curb on it for attaching braces. Thanks for posting the pictures showing this detail.
 
Last edited:
Status
Not open for further replies.