Should I get a better stove?

  • Active since 1995, Hearth.com is THE place on the internet for free information and advice about wood stoves, pellet stoves and other energy saving equipment.

    We strive to provide opinions, articles, discussions and history related to Hearth Products and in a more general sense, energy issues.

    We promote the EFFICIENT, RESPONSIBLE, CLEAN and SAFE use of all fuels, whether renewable or fossil.
Status
Not open for further replies.
My feeling is that you are trying to heat a pretty good space without enough btu's. It's not the stove, its that the stove needs to be allowed to burn more pellets. 10 foot ceilings in every room, stone and 3,000 as feet, even if well insulated is a lot of space to heat.
You spent 4,000 on propane and 800 on pellets (3 Tons?). I would spend about 3,500 on propane alone to hear my 2000 sq feet. To heat with just pellets I use 5-6 Tons. So if you were to go just pellets I would guess you are around 9-10 Tons!!! Now I am just approximating, but my point is I think you need to burn a LOT of pellets to heat your house because you need a LOT of BTU's regardless of where they come from.
It's not the stove ...it's you dude! Maybe try bringing the stove inside the house next time!
 
  • Like
Reactions: IHATEPROPANE
I found the thread IHP was talking about with the rope gasket. I will do that tomorrow along with sealing up the top of the auger cover.
Just be careful to only use a thin piece of gasket so the burn pot still seats correctly and lines up with the igniter. I have since upgraded to a piece of sheet metal that I cut precisely to fit around the burn pot. Both work the same but the sheet metal will be more permanent. I was getting a very dangerous level of build up prior to adding the rope gasket. Now my stove only needs to be touched to empty the ash.
 
Last edited:
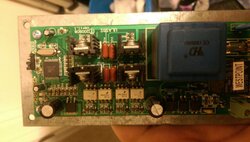
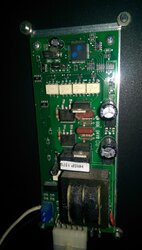
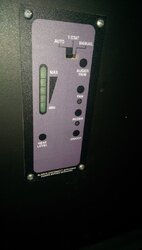
It looks like you have the old board. Below is a pic of my older board and then my newer board. I took a pic of the front of my newer board as well. There is a jumper that dictates what kind of feed rates you are going to get. The jumper can be in three different positions that is why Smokey revered to all of the available heat level settings. It looks like yours is set up correctly, it is at least the same as my original which burned the same as my current board. Your air temp was a little lower than mine but in the ball park. Outside temps, pellets and cleanliness of stove would effect this number but I think it is feeding appropriately for level one. The ignitor stating on is of concern.
 

Attachments

  • IMAG0253.jpg
    IMAG0253.jpg
    160.8 KB · Views: 177
  • IMAG0256.jpg
    IMAG0256.jpg
    181.6 KB · Views: 164
  • IMAG0255.jpg
    IMAG0255.jpg
    160.9 KB · Views: 155
IHP, if you made a metal spacer does that mean instead of putting a gasket on the burnpot I can just soap stone the edge and weld a bead around the pot to close the gap?

I will contact Hudson to see if they would replace the board to the newer version. If it's not a recal what is the ballpark for a new board?

Anything that will close the gap and still maintain the proper seating (and of course not burn) will work. In fact, I think doing what you suggest would be better than either of my two options.
 
There is no gasket or rim around the burnpot if I am understanding what you're saying. I will search what IHP mentioned about adding this.

If the gap in the end cap you are talking about is at the top of the auger right where they fall down the chute then there is definately a large one there, I think the previous owner even pried it open wider as there are pry marks and I can put a pellet through the gap if I wanted.


Auger flight covers should have no gaps, as when the pellets drop below where that end cap is more air will be sucked in through that gap and the burn will degrade and the ash will pile up faster than it should. There are changes made by the manufacturer over time so what happens is updates are not always incorporated into stoves that have gone through the door. Some changes are minor some not so minor, I usually ask for a picture or a description of parts, or places I know have been areas that change. The goal with the combustion airflow is to get it all going through the pile of pellets burning in the burn pot. The only air entering the firebox other than that should be going through any air wash system. The air wash system is factored into the combustion blower rates, other sources of air entering the fire box aren't, this is why there are gaskets and such. They maintain the correct airflow as well as stopping "bad" stuff from entering your rooms. IHP has learned well.

The last I knew the entire line of those stoves was using a single controller (I am aware of at least three versions of the controller that was on my stove) but I haven't paid particular attention to your stove. I will do some searching sometime today.

There are also places on the stove's feed assembly that can lossen up during shipment. I'd like to think that your dealer/installer made sure every thing was sealed in those areas so I'll just mention them in passing.

All pellet stoves have areas that can come loose during shipping and handling that need to be checked.
 
I would not recommend welding anything to that burn pot, if one were to do that all bets are off, you have to have a proper metal match to the burn pot or you will be dealing with a cracked and warped pot (hell just using what is there with prolonged burning with ash build up in the pot can do enough damage to it) and have negated the safety testing and certification of the stove.
 
It's not the stove ...it's you dude! Maybe try bringing the stove inside the house next time!

Why Scott, the stove is inside the house.

Now go over and play in the pile of grudged up stoves in the various threads on ESW units to give Mike a hand :)..
 
I would not recommend welding anything to that burn pot, if one were to do that all bets are off, you have to have a proper metal match to the burn pot or you will be dealing with a cracked and warped pot (hell just using what is there with prolonged burning with ash build up in the pot can do enough damage to it) and have negated the safety testing and certification of the stove.

Smokey brings up a good point about the safety testing and certification of the stove. Any changes made however minor, even though it may make the stove burn better, have the potential for unforseen consequences and the company could no longer stand behind their product, never mind insurance claims One should proceed with caution and understand that they are likely held responsible if any adverse condition arises.
 
What feature did the original (my board) not have that it was supposed to?

I can use that information when I call the manufacturer.

I understand the concern with modifying the stove and I will keep that in mind. As far as welding the bead, that ship sailed about an hour ago. I'm just waiting for it to cool so I can make machine the bottom lip of the bead flat so it mates with the plate the pot sits in.

I have a faily well set up shop and decent background for general mechanics. If I had a layout of the board design I would be able to do what I think I want. I think (think) I would be happy if I could keep the auger and OAK induction fan at low speed and bump the circulation (room) fan up to level two or three. With a board schematic I could tie in a rheostat or split the board in a way that would give me control of the circulation fan independent of the control board.

Again, I realize the limitations and implications involved but I am also very much a person living the the real world application of things and not in what the engineers deem appropriate.

This forum is great, wish I had more of a reason to get into these stoves. Most other forums I'm involved with are geared towards pushing the envelop of existing technologies.

We just chopped down our Christmas tree. Once that is in the house I will scour the stove checking if leaks. I'll power on the intake fan independent of the stove and use a smoke pen to track down air loss. Now that I get the concept that is my goal. Seeing as the auger base in the hopper can't be sealed at all why wouldn't the lid to the hopper have a seal to keep airflow down?
 
  • Like
Reactions: IHATEPROPANE
What feature did the original (my board) not have that it was supposed to?

I can use that information when I call the manufacturer.

I understand the concern with modifying the stove and I will keep that in mind. As far as welding the bead, that ship sailed about an hour ago. I'm just waiting for it to cool so I can make machine the bottom lip of the bead flat so it mates with the plate the pot sits in.

I have a faily well set up shop and decent background for general mechanics. If I had a layout of the board design I would be able to do what I think I want. I think (think) I would be happy if I could keep the auger and OAK induction fan at low speed and bump the circulation (room) fan up to level two or three. With a board schematic I could tie in a rheostat or split the board in a way that would give me control of the circulation fan independent of the control board.

Again, I realize the limitations and implications involved but I am also very much a person living the the real world application of things and not in what the engineers deem appropriate.

This forum is great, wish I had more of a reason to get into these stoves. Most other forums I'm involved with are geared towards pushing the envelop of existing technologies.

We just chopped down our Christmas tree. Once that is in the house I will scour the stove checking if leaks. I'll power on the intake fan independent of the stove and use a smoke pen to track down air loss. Now that I get the concept that is my goal. Seeing as the auger base in the hopper can't be sealed at all why wouldn't the lid to the hopper have a seal to keep airflow down?

If you look at the face of my control board you will see three settings, manual, auto, and tstat. My original only had two modes. Basically it only ran manual or hi/lo. The upgraded board does both if these plus on/off. Which is an important mode to be able to run in the early Spring and Sept-Dec for me.

Also, some hoppers do have gasket material to create a proper seal.
 
I definately want that! I did hook it up to a tstat but just hi/low was pointless. I wanted it to turn itself off at night and on in the morning but found out I couldnt (because of the hi/low).

Since creating the lip on the hopper and sealing the auger cap I have noticed something. It started and lit with one turn on instead of the three it normally takes. The flame is also more pronounced, i can see that more air is blowing through the pot than before.

I didn't find any other large leaks. To look for them I unplugged the stove, supplied power to the induction fan, placed a smoke pen in the stove and then blocked the chimney exhaust. The door seals were fine. More smoke came from the auger bottom than anywhere else but sealing the hopper would take a bit of work. Maybe in the spring when I take the unit out for cleaning.
 
I can't find any information on that older controller in what I have on my hard drive or online. I thought I had some older copies of the Westpoint manuals and other stuff I can't find. I can find a source for that in Canada under the part number that is in the online Westpoint Manual which is SPSW1008. Maybe my old stuff is on the hard drive in the old computer.

Other places for air leaks include the joint between the top portion of the auger flight and the drop tube, where the air intake meets the back of the burn pot, then there is the spot the drop tube goes through and into the firebox.

I'd also check that bottom auger bushing area and where the plate for the auger motor / auger assembly mounts to the stove ( another possible low pellet situation).
 
Last edited:
What feature did the original (my board) not have that it was supposed to?

I can use that information when I call the manufacturer.

I understand the concern with modifying the stove and I will keep that in mind. As far as welding the bead, that ship sailed about an hour ago. I'm just waiting for it to cool so I can make machine the bottom lip of the bead flat so it mates with the plate the pot sits in.

I have a faily well set up shop and decent background for general mechanics. If I had a layout of the board design I would be able to do what I think I want. I think (think) I would be happy if I could keep the auger and OAK induction fan at low speed and bump the circulation (room) fan up to level two or three. With a board schematic I could tie in a rheostat or split the board in a way that would give me control of the circulation fan independent of the control board.

Again, I realize the limitations and implications involved but I am also very much a person living the the real world application of things and not in what the engineers deem appropriate.

This forum is great, wish I had more of a reason to get into these stoves. Most other forums I'm involved with are geared towards pushing the envelop of existing technologies.

We just chopped down our Christmas tree. Once that is in the house I will scour the stove checking if leaks. I'll power on the intake fan independent of the stove and use a smoke pen to track down air loss. Now that I get the concept that is my goal. Seeing as the auger base in the hopper can't be sealed at all why wouldn't the lid to the hopper have a seal to keep airflow down?


I caution you that your insurance company will have a totally different view of the situation. That auger base can in fact be sealed if you put it in a case and use RTV on wire intrusion or high precision bushings as one example. The motor is on intermittent duty and produces little heat of its own so keeping it within spec should not be an issue for the so inclined.
 
My neighbor has a Westpoint and I maintain it for her. When she got it last fall it would not burn all night without loading up on pellets in the burn pot. I made a gasket out of high temp rope gasket and stainless wire. Cut the wire about 6 inches longer than the perimeter of the pot and the gasket about 4 inches longer. Thread the gasket on the wire and wrap it around the pot tighten and tie it off. This fixed the pot issue and the stove will burn just about any pellet you can stick in it. She burned 8 tons last year for 100% of her heat in a 1200 sq ft house. The room where the stove is was in the high eighties all winter and the rest of the house in the middle to high seventies. burning Pro Pellets this year she the pot will remain clean for days. That stove will put out a lot of heat but as Smokey says you have to burn pellets to make the BTUs that heat the room.
Ron
 
  • Like
Reactions: IHATEPROPANE
I think part of my buildup problem is also due to having the original burnpot and not the newer more open version.

Thanks to all so far!
 
Have you ever resigned yourself to the fact that you will have to burn more pellets to get the 70k btu's that you need to start heating up that tremendous heat sink (walls)? Yes, the family room is stick construction but the rest of the house/barn will suck heat right out of it. There's no way around pellets in = btu's out. Sounds like you're burning better now but you still need to feed the beast.
 
The familyroom however is wood construction with stucco covering on the exterior which was added around 1870.

You may have insulation in the ceiling and under the floor, but none in those walls right? I tore out the plaster/lathe walls of our first house that was circa 1903 (homework in the wall ... a little late;lol) ship lap exterior ,dead air space with the 2x4 balloon construction, and plaster/lathe.
 
Those stone walls are nothing but solid THICK rock with an air space, if you're lucky, in the middle. They are great in the summer as they retain the coolness of the night and in the winter as they retain the heat from the sun and the stoves, IF you put heat into them! That's how farmhouses were built 200 years ago.
 
Last edited:
No balloon construction here. That's more of a Midwest thing.

Since IHP and Smokeys posts the stove runs much better. Getting the airflow through has made it burn hotter. I've also altered the room fan to blow at whatever speed I want it to instead of the factory lowest/highest speed. I keep it in the middle and it is happy there, the stove kicks out way more heat, and you can still hear conversations over the fan.

There is less ash in the pot but I still have to empty it daily. The new style pot has larger holes in the bottom. I think that is what I'm going to address next!
 
That sounds like you still have an air leak or missed some crud somewhere.

Did you check the seal on the ash pan drawer? Are the clips holding it tightly against the stove body?

Is the door fully latched?

Someone played with the auger cover maybe they also played with the air wash.

Balloon construction was used all over the place.
 
  • Like
Reactions: IHATEPROPANE
No balloon construction here. That's more of a Midwest thing.

Since IHP and Smokeys posts the stove runs much better. Getting the airflow through has made it burn hotter. I've also altered the room fan to blow at whatever speed I want it to instead of the factory lowest/highest speed. I keep it in the middle and it is happy there, the stove kicks out way more heat, and you can still hear conversations over the fan.

There is less ash in the pot but I still have to empty it daily. The new style pot has larger holes in the bottom. I think that is what I'm going to address next!
Altering the fan speed to suit your ears instead of to suit the stove may not be the best thing for your stove. Your stove is the thing that needs to be kept cool by removing all the heat you can. If you're running it on max heat, which I hope you are to keep the barn warm, then you want the fans on high too. Actually, some of us with Quads have changed our wiring to keep the fans on high all the time to remove as much heat as possible by creating turbulent flow rather than laminar flow.
 
  • Like
Reactions: SmokeyTheBear
Thanks smokey. The smoke pen should've shown me all the leaks when I applied positive pressure to the system. No leaks in the ash pan were detectd. It has improved greatly since sealing the auger fly and burnpot. My room air temps even went up to 145 even when the circle fan is on high and the OAK is on low.

Would you recommend a different way to test for air leaks? I figured air going in and blocking the exhaust would be the easiest way to detect leaks but perhaps I missed something.

I'm going to order the new control board so I can heavily modify the old one. I've already tied in a micro controller to control the room circ fan. I linked that microcontroller to my wifi so I can control the micro controller and therefore fan speed through my phone from anywhere. It tell me what setting the fan is on and allow me to cycle. So now I can tell if the stove chit itself off even if I'm at work. If I get the new board I should be able to pirate the old one to be able to control all the functions remotely.

My house is cobblestone and built prior to 1815 which is the earliest I've ever heard of balloon construction being used. I know it was used everywhere but it is not common to see its use outside the Midwest before the Victorian Era.
 
Status
Not open for further replies.