New Grandpa Bear/ & also Fisher insert Owner. Looking for advice from Coaly.

  • Active since 1995, Hearth.com is THE place on the internet for free information and advice about wood stoves, pellet stoves and other energy saving equipment.

    We strive to provide opinions, articles, discussions and history related to Hearth Products and in a more general sense, energy issues.

    We promote the EFFICIENT, RESPONSIBLE, CLEAN and SAFE use of all fuels, whether renewable or fossil.
Status
Not open for further replies.

greenhill

New Member
Nov 18, 2014
5
Maryland
(Other opinions are welcome too.)
Hi Coaly, My wife and I recently bought a home (rancher) that was built in the mid 70's in northern Maryland.
Upstairs is a Fisher Insert & and downstairs in the basement is the Grandpa Bear (from what I can tell from this forum, I'm pretty sure it is a grandpa).. We've had several chimney companies come out to the house to inspect our chimneys and give estimates for repairs. (3 flues total, both Fishers, and also the furnace flue).
All existing flues are clay tile and show signs of wear (the plan is to have them all replaced with modern stainless liners).
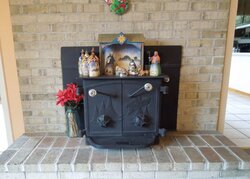
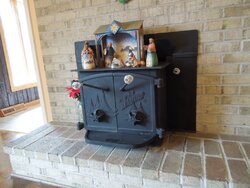
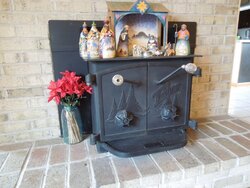
Question 1: All the chimney companies agreed that the Fisher insert (which they all called a "slammer") needed to be removed (for safety reasons) and replaced with a modern insert in combination with a 6-inch stainless liner. I've read about "slammers" on the internet and there does seem to be a safety concern out there that is consistent with what the chimney companies were saying. So my question is, are "slammers" dangerous, and should I replace the Fisher insert.. It seems a shame because it is a cool piece.. I thought I would ask you (who seems to be a Fisher expert) if you had any thoughts on the "slammer" matter.

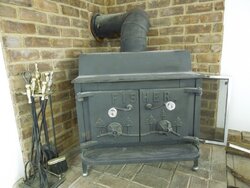
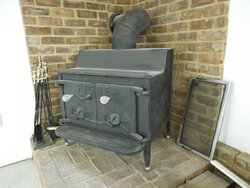
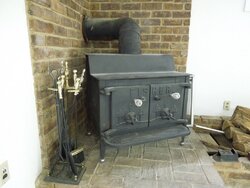
Question 2: The downstairs Grandpa Bear is connected to 7inch square clay tile chimney flue. 2 out of 3 chimney companies said that the existing flue was fine. All three companies want to replace the black stove pipe from stove to wall (this makes sense as it is a bit rusty).. 1 out of 3 companies (and the one we like the best) wants to break up and remove the clay tile flue and replace with a 8inch stainless steel modern liner and then connect the grandpa bear. I've been getting some pressure from outside opinions to replace the "old" fisher (grandpa) with a more efficient/modern woodstove with a 6inch outlet/liner (avoiding breaking out the current 7inch tile). I've read on some of your posts about the baffling trick to add some efficiency. I may inquire more about that later. Right now I'm planning on keeping the grandpa bear and letting the chimney company reline the chimney with a 8inch liner and replace the black stove pipe and light a fire. I really like the stove and just want to use it. It seems as though there is a high regard to Fisher Stoves and I think it would be a shame to take out the grandpa bear. Any thoughts on this Coaly?? Does the plan make sense for the 8 inch liner?
Anyway, Thanks for thoughts and opinions in advance. I'm very new to all of this.
Tom.
-I've uploaded some photos of my stoves so you can see what I have. (hopefully the photos work).
 

Attachments

  • DSCN9972.JPG
    DSCN9972.JPG
    130.5 KB · Views: 1,711
  • DSCN9966.JPG
    DSCN9966.JPG
    139.8 KB · Views: 703
  • DSCN9967.JPG
    DSCN9967.JPG
    141.3 KB · Views: 759
  • DSCN9969.JPG
    DSCN9969.JPG
    141.5 KB · Views: 606
  • DSCN9970.JPG
    DSCN9970.JPG
    112.8 KB · Views: 686
  • DSCN9971.JPG
    DSCN9971.JPG
    108.9 KB · Views: 710
Last edited:
Welcome to the Forum;

The Insert was designed before liners existed and was UL approved when installed as shown in the manual. With the use of a "boot" to connect to a liner it will connect the same as any new insert. The main factor is not installing into a hearth with a huge flue that was the norm for a fireplace. You simply don't allow enough heat up a larger area than the stove outlet to keep it clean. A few advantages are not removing the Insert every time you sweep the chimney, and all the air will go through the Insert instead of around it if there are any leaks at the face plate seal. Any air that leaks around the faceplate rushes up the chimney cooling it, and prevents the needed oxygen from going through the Insert. So there are definite advantages. Local codes are going to vary as per installation, but normally when an appliance was installed up to code at the time, and was UL approved, as long as it remains unchanged, it is still approved. UL listings don't expire as far as I know. The problem with the installation is that it can become unsafe if the faceplate leaks or is used incorrectly. By all means, every one of these Inserts should be connected to a liner with what we know today about the history of problems with the installation.

It is a Grandpa. I wouldn't invest in an 8 inch liner since most any newer stove is going to require 6 inch. Codes do not allow the reduction of pipe or flue smaller than the stove outlet. The problem is, that code was written to prevent anyone from choking off a stove since the outlet was normally sized to the square inch of the firebox. The firebox size of the Papa Bear is just as large as your Grandpa and was built with a 6 inch flue. So If you want a Fisher, That's the stove I'd recommend connected to a 6 inch liner that could be used with a newer stove in the future. You lose the ability to view the fire, but gain a whole lot more.

That said, your stove will physically work fine connected to a 6 inch liner. The reason for the larger 8 inch outlet is due to open door burning with spark screen in place. Many are in use reduced down as well as Inserts reduced to 6. A quick search of Craigslist will show many for sale with 8 to 6 reducers, and a few members here have added baffles with both stoves and Inserts reduced with no problems. Not saying it's legal to do so, but they physically work with no smoke roll in problems with a good chimney. Like an engine with a restricted exhaust or intake, you're limiting output and won't get full throttle, but that much heat is rarely needed. Another plus is the faster velocity in a smaller flue decreases dwell time. The larger the flue, the slower the movement and the longer the smoke particles have to cool and stick.
 
I've got a new desktop for Christmas ! Thanks !!

Every year my wife makes me a calendar with a stove picture each month. I'll bet yours makes the cut for next December.
 
I've got a new desktop for Christmas ! Thanks !!

Every year my wife makes me a calendar with a stove picture each month. I'll bet yours makes the cut for next December.

Ha! If i had known that, I would of taken a better picture. Obviously the insert isn't being used right now due to the instilled fear and the fact that it is not connected to a liner. Unfortunately the insert may have to go... I think the ultimate goal is to Veneer over the brick, add new hearth stone, and install a more modern/efficient insert (with blowers) and do a 6 inch liner all the way up..(this will be a big project, I know)... My wife would prefer something more flush anyway... we'll see. It's good to know the option with "the boot" exists to attach a liner... Like I said we are trying to figure it all out. The house is still pretty new to us.

For the Wood Stove in the basement (Grandpa): As I am not qualified to do any liner installation work or pipe reduction work, this will have to be hired out. and as you say, I may have a hard time finding a company that will reduce the pipe size due to legal reasons. I also don't plan on replacing the Grandpa anytime soon, in fact I would hate to see it ever leave. I don't see a way around installing a 8 inch liner for it though. I want to use it and for a long time. I understand what you are saying and in theory I would be ok with reducing from 8 to 6... but like I said I'm not sure I could find a company that would do it... Would a 8 inch liner be the end of the world? Would adding a baffle help a little?? Hypothetically if we did get a new wood stove YEARS down the road, what would it mean to run a 6 inch stove pipe into a 8 inch chimney liner? ..But like I said, I think we'll get many years of use with the Grandpa...Why not install a 8 inch liner now and run "Full Throttle"??
 
Sometimes what you need and what you want are two different things. Bob was a blunt kind of guy and would sell you what you NEED, not always what you want, so you would be satisfied with the efficiency in the end. Unknown factors like if you have an unlimited wood supply and square footage are main factors to consider.

You didn't mention the flue size above the Insert now, so that would be a major factor in the consideration of use as is. (also if they cleaned the entire flue and removed Insert to clean behind it) The reason for rapid creosote formation installed without a liner is having a much larger flue built for a fireplace.

How many square feet are you heating with the Insert? It probably should have had a blower or two as well. (They were available single under the bottom or dual on the sides. A new unit is not required to add a blower. ( Here's a good thread for homemade or original blowers; https://www.hearth.com/talk/threads/made-a-blower-for-my-fisher-insert.117672/ ) The portion that sticks out into the room is for radiant heat as well as the cast doors. It gives you a place for water kettle for humidification and cooking. With a power outage they continue to heat with natural convection around the box in the back like yours does now, and radiate from the portion outside the hearth. You loose that with a more flush unit that requires a blower to convect more than radiate.
These are the things you need to cook and heat with no electric. That is what the Insert was designed for, that may not be what you want.

The later Grandpa had a Smoke Shelf Baffle and I would certainly install one.

You'll find running a stove hard with lots of draft raises the flue temp more than the stove temperature. It's finding the balance between stove temperature and flue temperature to get the best efficiency while keeping the chimney clean. Like cruise on a vehicle, that isn't wide open throttle. Open door burning with screen in place is as close to "full throttle" as you get. ALL your heat is going up the chimney and you're giving it as much air as possible. It isn't even considered a radiant heater in fireplace mode. A bigger flue isn't better with a stove. A bigger flue takes more fuel to run the stove.

The liner gurus can give you an idea changing sizes and lining liners with smaller sizes. It's only a cost factor.
 
I assume the brick wall next to Grandpa is solid non combustible and not in contact with any combustible material?
 

Thanks again Coaly. The upstairs insert is becoming a mute point.. My wife does not like it and it will be replaced (future project). We will not use it in the meantime either. For now it is our manger scene stand :) I understand what you are saying about radiant heat and possible power outages...
We will invest in a whole new setup.

For the Grandpa: My chimney guy has a agreed to go down to a 7inch liner... we are scheduled for later this month... He is too uncomfortable to go down to a 6. I think this is a good compromise. This will allow me to keep the Grandpa for now and hopefully use it for many years.. and if there is ever an upgrade to a modern future wood stove, we'll hook up to the 7inch liner and run with it. It may not be the most efficient ever, but I think it will work just fine.
Both stoves will be secondary heat to cut back on oil usage. I can see if these stoves were all we had, I may be more motivated to get every ounce of energy out of them.
About the Baffle. Yes, I see where I could rest a baffle at the top of the stove like i see in the pictures on this forum..
Does anyone sell these?? Or is this something I need to have made at a metal shop.
Thanks.
 
I believe the newer stoves that require 6 inch must be 6, not 7. They will not work. The low pressure created in the chimney is what causes the air to enter in their tubes that look like a gas burner in a BBQ grill. Think of it as sucking up a tiny cocktail straw compared to a big soda straw, or garden hose. It takes much less suction to pull air through the smaller straw. That is done by atmospheric pressure with very minute pressure differentials. I'm sure these guys see the double doors reduced down to 6 all the time. Most people have no clue that you buy a stove to match your chimney size, or need to make the chimney the stove size.

If you take a piece of cardboard and cut to the size you need, when set it in place, you have a template for the steel. Some fabricator shops have steel plate in stock to cut it for you, others order it pre-cut to the size you need from their supplier. There may be a small cut charge, but it's not expensive. You want "5/16 HR steel plate A36". That is Hot Rolled mild steel, 5/16 thick. I pay 1.42 / lb. sheared to the size I need. They are usually 10 to 15 lbs. around $20.
 
Hi guys. Brand new here. Been reading through lots of threads and seen this conversation that is pretty similar to the conundrum i've been having. Sorry for jumping in the middle here, but I'd like to ask a similar question about my grandpa bear...

I'll try to explain as best i can. I have an 8-inch top flue grandpa. Trying to assemble stovepipe to fit an existing through-wall masonry chimney. Because the hearth, crock, and chimney were existing when we bought the house back in July, I've been stuck trying to make this woodstove we bought fit and burn safe while doing so. The hearth is in a completely finished (drywall ceiling) basement. The total chimney height is about 30 feet high. The back wall of the hearth is brick laid against block, no combustibles on the back wall. The ceiling clearance to drywall is only 12 inches, so I had to go to double-wall stove pipe. Here's where it got tricky...the crock is about 7 3/4 inch diameter round terracotta pipe that is connected to an 8 inch by 8 inch square terracotta chimney flue. I purchased all the double wall stovepipe including a masonry adapter to go into the crock. The masonry adapter was necessary to make the double-wall connection. The 8 inch single wall rear portion of the masonry adapter does not fit in a 7 3/4 inch crock. I played with a scrap piece of 8 inch, crimping and cutting to try and get it in there, but it did not work. So I ended up going to a local store to purchase an 8 inch to 7 inch reducer to fit to the back end of the masonry adapter, and a piece of 7 inch to attach to the reducer to slide into the crock. My plan is to fit all that in the crock and seal it with chimney cement. Now, the guys at the store urged me not to do this because it is not per code. They cited the part about never choking down a solid fuel burning appliance from the size of it's flue outlet. They said I may have draft problems.

What I've read above is that, while it may not meet code, you can actually run these 8 inch fisher stoves to a 6 inch flue? If that's a safe situation, do you think the layout i've explained for my application is safe? Do you think I would have any problems burning? Is this a risk for a chimney fire?? I've had so much anxiety stress over this. I don't know if i should sell the stove we just bought, if i should bust out the hearth and start over, or if i should just keep on going with my plan here. Any and all advice you can provide would be so much appreciated. I'll grab some pictures later if you think they'd help illustrate.
 
Welcome to the Forum !
7 inch works fine and you won't have any smoke roll in unless the larger chimney flue isn't warm. That would happen even with 8 inch all the way. Yes, code doesn't allow reducing. The size of the firebox is no larger than a Papa Bear with 6 inch outlet, but since yours was made for fire viewing with doors open and a screen in place, the outlet was made larger. Even people who have added baffles with reduced flues don't have smoke roll in problems with a good chimney. (Maybe yours is the more common 7 X 7) ?
If there is any single wall at the adapter closer than the 18 inch clearance, simply make a heat shield above it with at least 24 gauge sheet metal or piece of single wall pipe with at least 1 inch clearance between pipe or ceiling. There are commercially made ones as well as seen near the bottom of this page;
http://www.rockfordchimneysupply.com/singlewallblack.php Just like with double wall pipe, the clearance is reduced to 6. Some people just don't like the looks of a shield, but they don't have to look like a piece of tin from 1880 above the pipe ..........

You could have saved the expense of the double wall pipe, and possibly over crimp the 8 inch end into the thimble with hand crimpers? They shrink the crimped end down much smaller than a factory crimp.
 
The risk of chimney fire is greater with a flue larger than the outlet on the stove. The larger the inside diameter, the more heat required to keep it hot enough to draft properly and not condense inside causing fast creosote build up. Plus, the larger the flue, the slower the rising particles, increasing the time they are in the flue allowing time to cool and condense sticking to the sides.
 
That's great to hear. Makes me feel much better. Thanks for the information.

Wish i would have known about the heat shield. It probably would have saved me over $200 and a lot of headache making all these pieces fit together. I bought all the double-wall Selkirk DSP from northlineexpress.com.

As for the chimney, it could be 7 x 7, but i didn't measure it. A chimney sweep gave me the 8 x 8 when he inspected the chimney for us.

I might look into the baffle setup in your other thread. Our home is 3500 square feet. I don't plan to use this as a sole heat source, but just to help cut down propane cost.

Happy New Year by the way!!
 
It is a shame that you will be replacing the insert. I have one, and it heats my 2048 square foot house perfectly. All it took was a little bit of patience to find the required parts and the time to put it all together. My wife was a little "iffy" at first, but when that first cold snap hit, she was loving that heat and much lower electric bill.
 
Thought I would update my own Thread. I LOVE my Grandpa Bear Stove, and I don't plan on replacing it EVER!! (with the help and advice from my local chimney sweep), I ended up getting a "smooth wall", 7" insulated SS liner connected with a 8" to 7" reducer and all new 22 gauge black stove pipe. It's a basement stove and I am not experiencing any "stacking" effects (which I was worried about). It seems to draft very well. It just seems to work really well (no other way to explain it).. I could'nt be happier! And I just love the way it looks. And most importantly this baby, can kick some heat. We have made an impact on our oil consuption which was also our goal.. Anyway way, thanks to Coaly and others for their advice and commments. I have'nt had time figure out the baffle trick, but that will come eventually.
-No updates on the upstairs "insert" yet. Still not in use due to lack of connection from insert to chimney flue... not taking chances. Will keep updated.
Thanks again to all.
 
Thanks for the update!
Let us know if you have questions with the baffle plate. Pick up two firebricks (1 1/4'" thick) at a masonry supply store if you have any locally. They are only $1.50 to $3.00 each, depending. Then when the stove is out, make a cardboard template the width of inside across stove and from back above existing bricks aim it towards the bottom bend in top. The open square inch space (smoke space for exhaust to travel) can be 38 1/2 square inches in yours with that chimney. Set the bricks on edge above the existing ones, and set the cardboard on top to measure the smoke space opening. Slide bricks fore and aft to adjust tilt towards the bend. When you get the template the right size, you will have a pattern to cut the baffle plate to match. Or just order a piece of 5/16 thick A-36 steel plate from a steel supplier or fabrication shop. They order steel all the time and supply companies shear it to the size you want for a small cut charge. Should be no more than 30 to 35.00 and ready to set in place.

Here's a video in post #28 with a stove not only reduced to 6 inch, but a baffle added for his chimney size as well. This puts to rest how well they work reduced to 6.
https://www.hearth.com/talk/threads/cant-seem-to-figure-out.119184/page-2#post-1617042
 
Thanks again for the Baffle info.
Coaly, what do you recommend for "squeaky" door hinges, and "squeaky" door spinny dampers (ha, not sure what those are called).. Is there a lubricant you recomend?
Also, I was looking for my manual on your manual page.. I don't see a manual for the Grandpa with flat top doors.. Is it missing or am I just missing it?
Thanks again.
 
Silver anti-seize works good and is higher heat resistant than most greases. Carefully tap the pins up and out if they move easy enough. May need penetrant and rotate them to remove. Wire wheel or remove rust and coat with lubricant. They should swing free and easy and the pins should lift right out.

Most call them Draft Caps, they were patented by Bob Fisher's dad Baxter as Air Dampers.
Reach in from the back through the air intake hole and brush silver anti-seize or high temp grease on the threads.

Keep both of these moving parts greased since they are the only wear items on the stove and worn hinge pins and holes can let air leak when the doors become misaligned. Some Draft Caps have steel inserts that is actually a steel nut cast into the aluminum cap, so they don't wear as much as the cheaper all aluminum caps with softer threads. They should spin free without much wobble.

You want the first manual Pre '78 that includes Papa, Mama , Baby as well as the two double door stoves Grandma and Grandpa. It's the only manual that includes all the models at the time. That is NOT a UL listed manual and the stoves didn't come with one until customers were asking for one. The Pennsylvania fabricator came up with it and they were supplied with stoves until Fisher printed their own for the UL listed stoves.
 
Status
Not open for further replies.