Insert Install
I wanted to take some time and describe my experience from start to finish. I’m 25 years old. I have played with fire my whole life. I bought a house in Feb. 2013 with a centrally located chimney (one of my “must haves”). After taking out the vented gas logs, burning a few open fires, I realized I was ready to make a bigger investment. My chimney was unlined according to my best guess. I called out a local chimney service to receive a description of my options and confirm my opinions. I paid Buck’s Chimney Service 60 bucks to confirm my guesses, hear a sales pitch for Buck Stoves, and quote me an install price for an insert: $550 labor $1,500 for parts. I knew it would be high but my goodness, what a quote! I knew I could do it better! I plunged into the hearth forums and YouTube videos letting you people teach how to do everything. I also continued my search for a good used insert. I was hoping I could find a good insert with a seller willing to include a chimney liner that could fit my situation.
I finally found one with which I could not live without: a Hearthstone Clydesdale with porcelain enamel finish. I contacted the seller who was willing to part with his 6” and 15’ flex liner. He used the stove for one winter on only weekends after it was professionally installed in his residence in Springdale, AR, three and a half hours north. I called the local equipment rental place and rented a material handler. I didn’t know these existed. It is basically a four wheeled dolly with forks that can be winched up to 15’ by hand. I drove to Springdale, paid the man, loaded the stove, drove home, and unloaded the stove. It weighs 550 lbs., so the material handler really helped since I usually work solo. I built a track system with rollers out of conduit to get the stove close to the fireplace. I then built a ramp using the same philosophy. Now that the stove was close I needed to work on the flue. I examined my chimney and came up with the conundrum: remove or damper or ovalize liner. I reviewed some discussions on here and opted for the damper removal. I used a cheap grinder to make two cuts from north to south. I pulled out the piece between them.
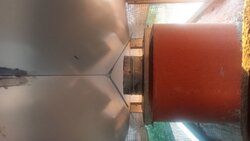
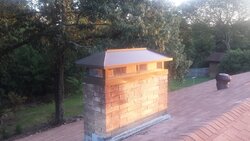
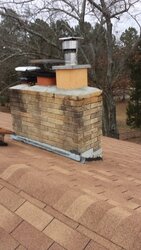
Wanting to protect my new stove, house, chimney, and draft, I decided to build a blocker plate using instructions I found on here. I am very proud of the way mine turned out. After this, I ran the liner down the chimney, easiest thing ever. I moved the stove into its final position. I connected the liner to the flue collar inside the stove and per the hearthstone manual. I had to run to Congo Stove and Patio the next day (3 hour there and back) for a 6” black pipe crimped on both ends. I later found this part at my local Lowes (20 minutes there and back). I fastened this all together, attached the flue collar, put the stove back together, reversed the door, and capped the flue liner using hi-temp silicone between chimney and cap. I have since been enjoying great heat output from the insert. I wanted to thank everyone at hearth for the ideas and discussions that got me through this project. You all saved me thousands of dollars. I wanted to post this so you would know, YOU make a difference! I would love to help anyone as I have been helped. Please, feel free to ask questions or add comments.


I wanted to take some time and describe my experience from start to finish. I’m 25 years old. I have played with fire my whole life. I bought a house in Feb. 2013 with a centrally located chimney (one of my “must haves”). After taking out the vented gas logs, burning a few open fires, I realized I was ready to make a bigger investment. My chimney was unlined according to my best guess. I called out a local chimney service to receive a description of my options and confirm my opinions. I paid Buck’s Chimney Service 60 bucks to confirm my guesses, hear a sales pitch for Buck Stoves, and quote me an install price for an insert: $550 labor $1,500 for parts. I knew it would be high but my goodness, what a quote! I knew I could do it better! I plunged into the hearth forums and YouTube videos letting you people teach how to do everything. I also continued my search for a good used insert. I was hoping I could find a good insert with a seller willing to include a chimney liner that could fit my situation.
I finally found one with which I could not live without: a Hearthstone Clydesdale with porcelain enamel finish. I contacted the seller who was willing to part with his 6” and 15’ flex liner. He used the stove for one winter on only weekends after it was professionally installed in his residence in Springdale, AR, three and a half hours north. I called the local equipment rental place and rented a material handler. I didn’t know these existed. It is basically a four wheeled dolly with forks that can be winched up to 15’ by hand. I drove to Springdale, paid the man, loaded the stove, drove home, and unloaded the stove. It weighs 550 lbs., so the material handler really helped since I usually work solo. I built a track system with rollers out of conduit to get the stove close to the fireplace. I then built a ramp using the same philosophy. Now that the stove was close I needed to work on the flue. I examined my chimney and came up with the conundrum: remove or damper or ovalize liner. I reviewed some discussions on here and opted for the damper removal. I used a cheap grinder to make two cuts from north to south. I pulled out the piece between them.
Wanting to protect my new stove, house, chimney, and draft, I decided to build a blocker plate using instructions I found on here. I am very proud of the way mine turned out. After this, I ran the liner down the chimney, easiest thing ever. I moved the stove into its final position. I connected the liner to the flue collar inside the stove and per the hearthstone manual. I had to run to Congo Stove and Patio the next day (3 hour there and back) for a 6” black pipe crimped on both ends. I later found this part at my local Lowes (20 minutes there and back). I fastened this all together, attached the flue collar, put the stove back together, reversed the door, and capped the flue liner using hi-temp silicone between chimney and cap. I have since been enjoying great heat output from the insert. I wanted to thank everyone at hearth for the ideas and discussions that got me through this project. You all saved me thousands of dollars. I wanted to post this so you would know, YOU make a difference! I would love to help anyone as I have been helped. Please, feel free to ask questions or add comments.
Last edited by a moderator:


")