Rain coming in from flue?

  • Active since 1995, Hearth.com is THE place on the internet for free information and advice about wood stoves, pellet stoves and other energy saving equipment.

    We strive to provide opinions, articles, discussions and history related to Hearth Products and in a more general sense, energy issues.

    We promote the EFFICIENT, RESPONSIBLE, CLEAN and SAFE use of all fuels, whether renewable or fossil.
Status
Not open for further replies.

SpAmSoNiTe

Member
Mar 22, 2014
75
Jefferson, OH
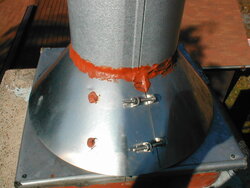
Hey all... Today when I fired up my stove for the first time in two days(it was in the 50's this weekend), I noticed a little bit of water (maybe the size of a quarter or 1/2 dollar)puddled around the collar of my stove where the double wall pipe meets it. As we had a little rain this evening, I'm guessing its rain water coming down the flue?

Is this something that occasionally happens? It's the first time I've noticed it since the chimney was installed in early September. Should I be concerned or just keep an eye on it?

Chimney is a Selkirk Supervent from Lowes with their included "deluxe" chimney cap.
 
Should not be wet at all.
There is most likely a leak up top. Check the storm collar for proper caulking seal. Check the piping for any seams that may let water in.
 
Water has a way of getting into areas that seem impossible. Finding the exact location of the leak can be sheer madness. While it's still warm enough, you can try putting some dyed water in and around the pipe at the roof. If you use different colors for different areas, you should be able to find the location of the leak a bit easier. Once winter sets in, the leaks should stop but it will probably get worse in the Spring so it's better to find it sooner than later.
 
You can also start with the water low, and keep checking, and work your way up. No need for messy dye that way. There is only a few possible leaks and they are all going to be up top.
Check the obvious first, starting with the storm collar.
 
You can also start with the water low, and keep checking, and work your way up. No need for messy dye that way. There is only a few possible leaks and they are all going to be up top.
Check the obvious first, starting with the storm collar.

I will definitely check the collar but I, in my limited knowledge, would venture to guess its gonna be an issue With the cap or a seam where the pieces meet since it isn't running on the outside of the pipe.. I really hate getting up on my steep roof but I gotta do what I gotta do :eek:
 
Yes, check storm collar first. Know that improper caulk can contract more during wintertime but expand enough in summertime to not cause an issue.
 
I had endless issues with water getting in and pooling around the top of the stove where double wall meets. Silicone pulled away from Selkirk pipe at the storm collar. I read a post a short while ago where someone mentioned that the Selkirk may have a thin film of oil it on it that should be cleaned off prior to applying caulking.
 
There have been cases where the vertical seams in the piping leaked, allowing the insulation between the two pipe shells to absorb the water , the water then ran down the insulation between the casings and ended up running out onto the stove. So check your pipe seams also. A bead of silicone tooled in well with your finger will solve most of the issues up there.
I have pointed out many times, caulk that is not worked/tooled in well, will not stay adhered. And cleaning any dirt/oil off the surface is a must.
 
I also had that issue, besides the collar the roof jack / flashing ( proper name? ) that the flue pipe passes through was leaking due to caulk not adhered between it and the flue pipe. Clean re- caulking of that and the storm collar corrected the issue for me.
 
Just re-read the manual for the Selkirk.. kinda sounds like I should have used some silicone on the storm collar instead of the same roof sealant I used on the flashing.. still gotta go up and take a look but will be interesting to see if I find a leak. ;sick
 
Last edited:
If you used asphalt based sealant, roof cement, or muck as we call it, that is the wrong stuff, and will crack and eventually fall off as the piping expands & contracts.
Clean it off real good, leaving no residue, and seal well with tooled in silicone caulk.
 
If you used asphalt based sealant, roof cement, or muck as we call it, that is the wrong stuff, and will crack and eventually fall off as the piping expands & contracts.
Clean it off real good, leaving no residue, and seal well with tooled in silicone caulk.
Any recommendations for a quality silicone calk from the big box stores(Lowes and home depot)? Unfortunately weather is looking quite crappy for the next week with mixed snow and rain :-(
 
100% silicone sealant is pretty much all the same. Well, except the price.
 
Any typical caulking tube a 100% silicone as Bart advised. If you want to spend a few bucks more, you can get the high temp stuff. Any will do the job.
 

Attachments

  • P1010070.JPG
    P1010070.JPG
    51.6 KB · Views: 414
Had a problem after initial install, caulked vertical seams and no problem since.
 
I've had a little leak on my duravent plus chimney, it would only happen in mist rain. It drove me nuts, I sealed everything with silicon, the storm collar, the seams on the outside walls of the pipe, I even went up in the attic during a rainstorm to see if I could find the small leak, turns out is was my chimney cap, the mist rain would enter so how and drip in between the outside and inside wall, run down the pipe and drain into the ceiling support box, then drip onto my stove (this was my old setup), when I moved everything to the basement I reused some of the pipe but bought a new through the roof kit, I got a new chimney cap, when I got outside I sealed everything the same and installed the cap, so far no leaks, I think I might have had the cap on wrong or it was torqued when I installed it, never the less check your cap if you have no water signs on the outside of the pipe.
 
Just wanted to add: Silicone Sealant does have a shelf life- so use within one year (ideally, 9 months). As with painting, prep is the key. Clean that surface with a de-greaser, and apply the silicone when the surface is DRY. Silicone will NOT adhere well to a wet surface. It will look as though it does, but the seal will fail within a couple of weeks.

You also get "one chance- just one" (Braveheart movie reference) as fresh silicone will not adhere well to "old" silicone.

Yep.. Know that from some other diy's around the house :cool:. Next dry day we get I'm gonna get up there. Just hope keeping it warm will help keep the stovetop dry and rust-free. It's kinda warm inside due to it being almost 60 outside today. Darn strange Christmas eve for northeast Ohio...
 
Status
Not open for further replies.