EKO Nozzle Replacement

  • Active since 1995, Hearth.com is THE place on the internet for free information and advice about wood stoves, pellet stoves and other energy saving equipment.

    We strive to provide opinions, articles, discussions and history related to Hearth Products and in a more general sense, energy issues.

    We promote the EFFICIENT, RESPONSIBLE, CLEAN and SAFE use of all fuels, whether renewable or fossil.
Status
Not open for further replies.

Eric Johnson

Mod Emeritus
Nov 18, 2005
5,871
Central NYS
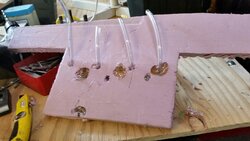
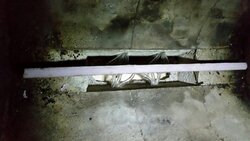
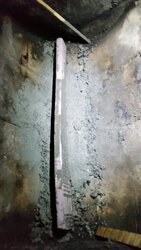
My EKO 60 is about 8 years old and has had more than 80 cords pass through it, so while I haven't inspected them in any detail, I believe it's time to replace the nozzles. I just ordered them from Zenon at New Horizon.

My question is pretty simple: Is replacement just a matter of digging out the old ones and dropping in the new ones? If not, what are the challenges?

Looking forward to another cold winter here in upstate NY. But I've got a barn full of dry wood, so bring it on, as they say.

Thanks!
 
I cast a new nozzle in place. It went pretty easy,the old one came right out with a little help from a small jack from below.
Of course I had to make some modifications with the new nozzle. I made it a bit narrower and slightly longer than the original.
I also made the secondary air passages different. Instead of 2 big holes on each side I used smaller plastic tubing and split them into multiple air passages.

I used the castable refractory cement from Menards.

It went pretty good overall ,probably taking a couple hours total.

Not sure on how long it will last compared to the original,but sure works better. The secondary flame seems more responsive to air adjustments,whereas before it didn't seem to make much difference other than if you closed them off most all the way. 20140713_094040_resized.jpg
 

Attachments

  • 20140713_103934_resized.jpg
    20140713_103934_resized.jpg
    140.5 KB · Views: 286
  • 20140713_113627_resized.jpg
    20140713_113627_resized.jpg
    138.5 KB · Views: 399
  • 20140713_122112_resized.jpg
    20140713_122112_resized.jpg
    127 KB · Views: 364
Last edited:
Very helpful information and photos. Thanks!
 
The nozzles were delivered the other day. I have to plan out a strategy for replacing them. I'm also going to switch controllers (got the newer model repaired and ready to give it another try) & generally clean things up in the boiler room before winter really sets in.

As loathe as I am to move the original flame receptors, I think I'll move them and try to jack the old nozzles outtathere. I'm sure you could make replacement nozzles for a lot less than the $103 each that Zenon gets for them ($85 plus shipping), but I think there's something to be said for the convenience of going OEM.

I know my original nozzles are shot, because I'm getting charcoal-size chunks of unburned coals in my ash can. As I recall, it produced nothing but fine ash when newer. I've never been shy about sticking the end of a poker up into the nozzle openings (from both sides) to try to keep them clear. That's eight years of abuse, folks.

Hi Eric,
I replaced mine this year after seven years. I had to shave off the top sides to get them to go all the way down. I put a masonary blade on my table saw and made several passes moving the fence in each time. Be carefull jacking the old ones out. Don't go too close to the edge or you may lift the large refractory inside. Good luck!

Don
 
Eric, if your blocks crumble (in the lower chamber) when you move them, you can 'make' a replacement real easy with fire bricks. I used a mix of thin and thick ones, some standing on edge. Works great and I'm guessing they should last longer since they can expand and contact unlike the big lump that can only crack.
 
Eric, if your blocks crumble (in the lower chamber) when you move them, you can 'make' a replacement real easy with fire bricks. I used a mix of thin and thick ones, some standing on edge. Works great and I'm guessing they should last longer since they can expand and contact unlike the big lump that can only crack.

Thanks, Don. I plan to proceed with caution. Just like me to wait until the heating season to undertake heating system maintenance projects. Had all summer, spring and fall……

Great idea on the firebrick, easternbob. I notice that Econoburn uses a big, flat piece of firebrick.
 
Eric, if your blocks crumble (in the lower chamber) when you move them, you can 'make' a replacement real easy with fire bricks. I used a mix of thin and thick ones, some standing on edge. Works great and I'm guessing they should last longer since they can expand and contact unlike the big lump that can only crack.
That sounds like a damn
Eric, if your blocks crumble (in the lower chamber) when you move them, you can 'make' a replacement real easy with fire bricks. I used a mix of thin and thick ones, some standing on edge. Works great and I'm guessing they should last longer since they can expand and contact unlike the big lump that can only crack.
Great Idea. I noticed a hairline crack last year after I moved them. I was going to order nozzle and block but instead try your and Mr. Fixits casting job. Use the money for a spare fan and temp sensor.
 
I can't claim credit for the firebrick in the bottom chamber idea, I got it from someone else here on the board. But it does work great.
From memory in my EKO 25 I think I used a half thick bricks for a bottom row, then full thick row on top of those, then full thick bricks sitting on their long edges for the sides. You end up with something similar dimenisons and shape of the orig. U shaped block but with a flat bottom (easier to clean)
 
I got the old nozzles out by putting pressure on from the bottoms with a hydraulic jack, then just kind of tapped and persuaded them out of there. No big deal.

But of course, the nozzles are too big. They stick up about an inch.

To cut them down, do I try to shave an 1/8 inch off of each side of each nozzle, or is there a way to figure out how much to cut if just cutting down the top couple inches? My tools are limited to a bench grinder and a circular saw with masonry blade. I'm not opposed to buying a wet tile cutter if that's the best approach.

Any suggestions?
 
I used a right angle grinder and with the same grit disc I use to sharpen the bush hog blades. Grind, trim, grind till it drops. Merry Christmas
 
Measure your opening and cut the appropriate amount off each of the four sides perpendicular to the top on a table saw using the fence.
 
I know where you are and it's quite a distance from me but I understand your work sometimes brings you to Vermont. I have every tool known to mankind and I be glad to loan them to you. Perhaps you don't frequent my neighborhood but I could meet you somewhere convenient to the two of us. Next time you're contemplating a job like this, let me know. I used a cheap low speed diamond tile saw. My good tile cutter spun too fast and didn't like the stainless needles.
 
Thanks, Fred. I appreciate it. I'm sure I'll be able to get it going tomorrow when HD is open. I just replaced the older controller with the new one, which I want to get used to using so that I can show Mom how to run her new boiler. I've used the newer controller and like certain features--especially the ability to modulate the blower speed on cold nights. I think that saves some wood! On the downside, I have to figure out to get it from shutting down in the middle of the night for reasons I don't entirely understand. At least that's what it did before I replaced the blown capacitor. The only other thing is to clean up the blowers and figure out a better way to attach the cover. Those little spring-grippy things all fell out and there's gotta be an easier way to keep that thing mounted.

I'm surprised the nozzles showed as little wear as they do, although there are places were the erosion is more severe than others. That said, the overall slot width isn't much different. I imagine it will run better with the new nozzles in any event.
 
Here's what the front nozzle (the one closest to the door) looked like. You can see some erosion towards the front, although some of that is the result of me banging on it with a hammer to break it loose. It was intact when in place. There's more erosion towards the top because the front end tends to get jammed up with ash and therefore sees less action than the rest of the nozzle. This reminds me to keep the ashes clearer in the future as better gasification on the front nozzle would probably result. The other nozzle is too broken up to reconstruct, but it's in somewhat worse shape, owing to the fact that it works harder than this one for the reason just explained. Overall, I'm impressed with how well it held up for all the wood it's seen and various forms of torture from me, namely sticking a poker into both sides in attempts to clear the slot.

oldnozzle.jpg


In related news, I upgraded the controller and it works very well. Secured the blower cover with machine screws rather than the original clips. One screw at each corner mounted to the blower plate with the cover bolted in from the front. Works great but it's a bit crooked so I don't want to post a pic. But it's nice and tight and not hard to remove with a socket wrench.
 
'm impressed with how well it held up for all the wood it's seen and various forms of torture from me, namely sticking a poker into both sides in attempts to clear the slot.
So am I.
 
Here's what the bottom looks like. This is actually quite instructive. As you can see, there's almost no wear at the bottom and some signs of erosion at the top end. This tells me that I was only getting partial gasification with this nozzle, thanks to poor ash removal practices. Now I know where to put the extra effort, and why. Very useful information, I think.

OldNozzleBottom.jpg
 
Status
Not open for further replies.