
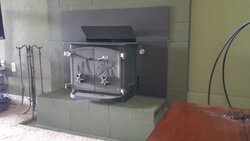
I bought a house and already had this stove installed in the basement. Currently am going through 7 20in. Logs in around 5 hours us this normal or am I running it too hot. Also trying to figure it what type it is.
New fisher owner
- Thread starter sepulvd
- Start date
-
Active since 1995, Hearth.com is THE place on the internet for free information and advice about wood stoves, pellet stoves and other energy saving equipment.
We strive to provide opinions, articles, discussions and history related to Hearth Products and in a more general sense, energy issues.
We promote the EFFICIENT, RESPONSIBLE, CLEAN and SAFE use of all fuels, whether renewable or fossil.
You are using an out of date browser. It may not display this or other websites correctly.
You should upgrade or use an alternative browser.
You should upgrade or use an alternative browser.
- Status
- Not open for further replies.

Welcome to the Forum;
Is this your first wood burning experience?
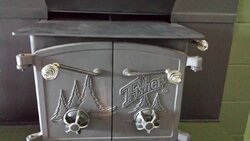
It's a "Fisher Fireplace Insert"; no bear name given.
Did you check the chimney flue for size, cleanliness, and if it has a liner connected to the insert that goes all the way to the top? This makes a huge difference in wood usage.
You may want to put a magnetic thermometer on top to get an idea of the temp you're running.
Are the logs split, and what kind of wood? Diameter of logs or splits? 7 pieces at 20 inches doesn't give a clue as to the size they are. A piece split about 4 or 5 inches of the radius would be about right depending on the heat needed. A blower will reduce your burn rate making it much more efficient too.
Damper usage will make a difference, but the chimney flue will determine how you set it.
The manual is available in the Manual Thread at top of Fisher Forum sticky section on main page. It was standard procedure to install as shown in manual when built. That is no longer considered good practice and should now have a liner connected with what's called a boot to the Insert. It also makes cleaning much easier so the Insert doesn't have to be removed each time the chimney flue is cleaned. Everything will then drop into the stove for removal.
Is this your first wood burning experience?
It's a "Fisher Fireplace Insert"; no bear name given.
Did you check the chimney flue for size, cleanliness, and if it has a liner connected to the insert that goes all the way to the top? This makes a huge difference in wood usage.
You may want to put a magnetic thermometer on top to get an idea of the temp you're running.
Are the logs split, and what kind of wood? Diameter of logs or splits? 7 pieces at 20 inches doesn't give a clue as to the size they are. A piece split about 4 or 5 inches of the radius would be about right depending on the heat needed. A blower will reduce your burn rate making it much more efficient too.
Damper usage will make a difference, but the chimney flue will determine how you set it.
The manual is available in the Manual Thread at top of Fisher Forum sticky section on main page. It was standard procedure to install as shown in manual when built. That is no longer considered good practice and should now have a liner connected with what's called a boot to the Insert. It also makes cleaning much easier so the Insert doesn't have to be removed each time the chimney flue is cleaned. Everything will then drop into the stove for removal.
Yes this my first wood burning experience. It's around 4 in and yes its split also its oak wood. No blower installed
Last edited:
OK, you want to be sure you know the condition of chimney flue and what you've got. You'll notice my response is all about the chimney more than the stove. That's where the heat and fuel goes when not right. The ideal is an insulated flue the same size as stove outlet on any stove or insert. Keeping the flue above 250* f all the way to the top is the object to avoid condensing any moisture going up the flue. Below that temp, smoke particles stick and can form creosote rapidly. Correctly seasoned wood makes a big difference as well. In theory, keeping the inner flue hot enough all the way up without leaving excess heat up is the most efficient use of the fuel. With a stove having single wall pipe that you can check the temp where it dumps into the chimney flue, it's then a guess as to how much heat is lost by the chimney. An Insert in your case is difficult to judge, so you need to check for creosote often until you know how much you're creating. Indoor chimneys are best for keeping hot, and the flue size is critical for how much heat you need to leave up. Some fireplaces were built with very large flues and require much more heat to keep above the 250* threshold. A liner in the flue reduces the internal size and can be insulated to make even more efficient. So you need to know the size of flue all the way up to have an idea of how much heat to leave up. Your insert outlet should be about 50 square inches, or a 7 X 7 masonry flue. You can see when the flue measures larger, it can require twice as much heat. This is not just to prevent creosote, it is the basis of what makes the stove work. ALWAYS remember the basics; The chimney is the engine that drives the stove. The rising gasses in the chimney cause a low pressure area in chimney and stove, and atmospheric air pressure pushes the air into the stove intakes to fill the void. This is the oxygen that makes the stove go. So it's more about the chimney than the stove. The lever on the right operates the damper which controls how much heat goes up, changing how much air comes in. A large or inefficient chimney will eat wood using most of the heat to keep the flue hot enough to work. (Damper open) The more efficient chimney flue (correct size) the more the damper can be closed. No one can tell you where to set it since all chimneys are different as well as outdoor temperature, elevation above sea level changing air pressure, and weather related low and high pressure areas. As temperature and air pressure changes, you will find minor adjustments are necessary much like keeping a steady speed with a vehicle up and down hill. With practice it becomes easier and you will get better efficiency.
Always open damper fully before opening door.
Once you get good and end up with a pile of coals in the morning, you'll find you can remove some fine burned ash from the front each day and rake the coal pile ahead to reload on. Cleaning ash with warm stove and damper open draws any fly ash into the stove preventing ash dust in the house. During times of burning coals down there is no smoke, so damper can be closed more to take advantage of this heat extending burn times. This burn cycle prevents the need of leaving fire burn out to clean ashes. Always put ashes in METAL bucket for disposal. There will be glowing coals for many hours in the ash. Learn proper ash disposal !
Here's a thread with blowers shown.
https://www.hearth.com/talk/threads/made-a-blower-for-my-fisher-insert.117672/#post-1600025
You only have natural circulation to bring the heat out from around the back. Your Insert is double wall and instead of radiating like a single wall stove, you're heats the air with convection around the inner shell and the hot air only drifts out. The blower makes a huge difference removing the heat from the hottest part of the insert around the outlet vent area.
The manual has a cut away to show the air flow path on page 7.
Read the entire manual.
Read up on any threads about Inserts on this forum and you'll get a good idea of operation.
Idk if it has a liner I guess I would need to climb up on my roof and look down. Am sorry am a city man living in the country now lol
Yes, you can only tell from the top of yours without removing the hearth faceplate cover. I would remove the plate above Insert to be able to see in with a flashlight to see if the top of Insert just exhausts up the chimney like a fire in a fireplace (hearth) or if it has a metal pipe connected to it. If it has a pipe, that could be only a pipe going up beyond the smoke shelf built into the fireplace, or a liner going all the way to the top. You need to be sure it is a liner going all the way to the top, and best to be inspected by a professional sweep. Chimneys can be a hollow wood chase with a prefab type insulated double or triple wall chimney pipe (flue) inside, or masonry. Masonry is solid block or brick with square, round or rectangular flue liners inside the hollow block all the way up. If you have no idea what you're looking at you should have a professional sweep inspect it and ask what size the liner is, or if it's insulated. If you want to learn to clean it yourself, there is plenty of do it yourself advice on the Hearth Forums, but this Fisher Forum is a sub-forum more for the stoves that were made until 1988. Use the search box at the top right with keyword related to chimney, flue and liner for results in the main forums.
A quick Google search of "chimney liner" Images will give you pics of liners both masonry and metallic which can be solid like a stainless stove pipe or a long flexible slinky type pipe that is installed down the chimney.
You should also read up on how to tell when wood is seasoned properly. It makes a huge difference and can cause rapid creosote formation. This is covered in the manual as well. NEVER go by what the seller tells you wood is. They may consider wood "seasoned" if it was cut down a year ago, but seasoning doesn't start until it's split. Know what you're looking at by weight and cracks in the ends, or measure the moisture content with a moisture meter.
This is the top of your insert designed to vent up the existing chimney;
 If it looks like this behind the faceplate, you need a boot on top of the Insert to connect to a liner that extends all the way to the top.
There is no boot made specifically for a Fisher, they are a retrofit and custom fitted. Best to check it to see what you have before getting into details.
 This is a "boot" that would be mounted to top of insert to connect to the liner.
http://www.yourashismine.com/id27.html
A quick Google search of "chimney liner" Images will give you pics of liners both masonry and metallic which can be solid like a stainless stove pipe or a long flexible slinky type pipe that is installed down the chimney.
You should also read up on how to tell when wood is seasoned properly. It makes a huge difference and can cause rapid creosote formation. This is covered in the manual as well. NEVER go by what the seller tells you wood is. They may consider wood "seasoned" if it was cut down a year ago, but seasoning doesn't start until it's split. Know what you're looking at by weight and cracks in the ends, or measure the moisture content with a moisture meter.
This is the top of your insert designed to vent up the existing chimney;
If it looks like this behind the faceplate, you need a boot on top of the Insert to connect to a liner that extends all the way to the top.There is no boot made specifically for a Fisher, they are a retrofit and custom fitted. Best to check it to see what you have before getting into details.
This is a "boot" that would be mounted to top of insert to connect to the liner.http://www.yourashismine.com/id27.html
OK, I would make sure the liner is connected directly to the Insert. The flue liner could go down and just stop above the Insert not being connected. You never know.
If difficult to remove top faceplate cover, you can try to see from inside the firebox when cold. If no one has added a baffle, you should be able to look right up the exhaust - a mirror eliminates the need to lay in the Insert. With damper open, you should be able to see with a flashlight if there is some sort of boot connecting the liner. Wear a glove if you feel it with your hand. There could be screws sticking through towards your hand! I would want to remove the faceplate to make sure it is fastened to the Insert top as well as screwed to the liner with at least 3 screws. It could have a poor seal around the damper rod. Any leak into the flue liner will not leak smoke out. The rising gasses cause the low pressure inside the flue so air behind the faceplate will leak into the chimney. This cold air mixes with the hot exhaust cooling it - reducing draft - reducing efficiency and causing creosote.
Once you're sure the liner is connected, clean and safe, it's time for a fire. I know you already burned it, and that scared me.
You should keep the draft cap threads greased with silver anti-seize through the intake hole on back side of doors AND lift each door off to remove and grease hinge pins. Doors shouldn't squeak and should move freely. Other than cleaning, this is the only maintenance required on the Insert. Dry hinge pins and dry draft cap threads are wear points and not easy or cheap to repair. High temperature grease is fine too if you have it.
When starting a fire with paper, cardboard, and kindling, spin the draft caps open a few turns. Open damper fully. Light and close doors. If you hear it roar up the flue, close damper until roar stops. You don't want all the heat going up the stack that can be used to get the kindling and wood burning. You could slow it down by closing air intakes, but this slows the fire by depriving it of oxygen. This can create excess smoke and you want it to have all the oxygen it needs to get going. Always remember to open damper fully before opening doors !! Once started, a turn or two of each cap should be enough air. Once established you should be able to set the air from 1 turn or less for the amount of heat required. This is where experience and a thermometer on the stove top along with frequent checking of flue for creosote formation is important. Closing the air intakes or damper too far and burning too low can cause rapid creosote formation.
This is not complete instructions for safe burning. Read the manual until you understand all of it. You should have a screen for open door burning that is required for a certain time period each day. This assures you are getting the flue hot and clean. When doors are open, the only thing you have to slow the fire is the damper. Close slowly until smoke rolls in at top. Open slightly and that is the setting that holds as much heat as possible in the Insert allowing smoke to rise up the chimney. The screen is very handy starting fires with damp wood giving it all the air it can get and you can see what it's doing. They will not heat well with screen in place. Like a fireplace, most of the heat is going up the chimney.
Next is a blower of some type to extract more heat form your work and wood. Air will naturally circulate out of the upper slot with cool air moving into the slot under the ash fender, but blowing in the bottom or side openings comes out the top removing the heat from the hottest part which is that piece of pipe you can see in the upper slot that the exhaust travels through between firebox and outer shell. Huge difference in heat output blowing air into the bottom or side air slots!
Yes i made sure the liner is hooked up to the insert. I greased the draft caps today with some high temp grease. Thank you for the help
- Status
- Not open for further replies.
Similar threads
- Replies
- 3
- Views
- 184
- Replies
- 3
- Views
- 2K
- Replies
- 1
- Views
- 812
- Replies
- 1
- Views
- 854