Sidearm install question

  • Active since 1995, Hearth.com is THE place on the internet for free information and advice about wood stoves, pellet stoves and other energy saving equipment.

    We strive to provide opinions, articles, discussions and history related to Hearth Products and in a more general sense, energy issues.

    We promote the EFFICIENT, RESPONSIBLE, CLEAN and SAFE use of all fuels, whether renewable or fossil.
Status
Not open for further replies.

perchin

Member
Nov 30, 2010
126
I have done a lot of searching on this forum for my answer, but the search bar on here is not very friendly.

I am installing a outdoor wood boiler. My current system is a propane fired boiler, running baseboards throughout the house.

I will be installing a sidearm to my existing electric 40 gallon hot water heater.

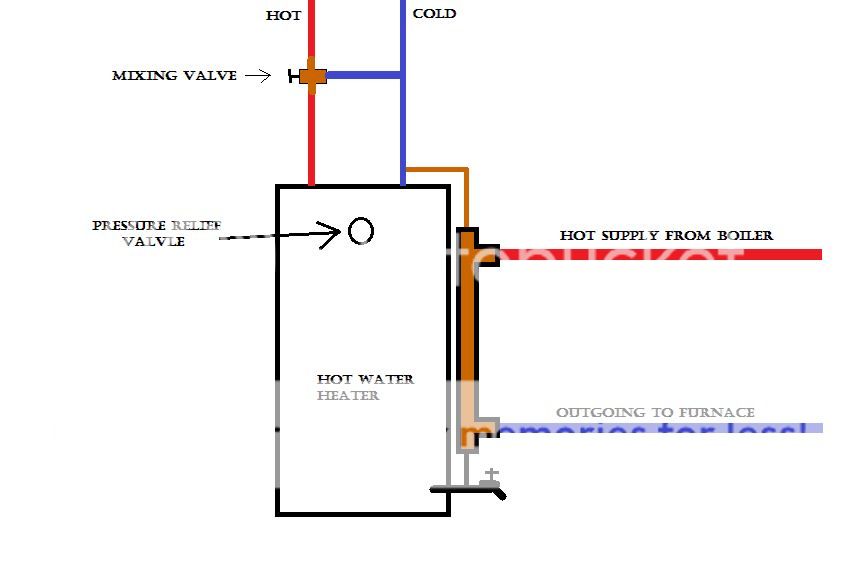
My question is this: I have read, and been told by two different dealers two contradicting methods to install the sidearm. Both say to install the DW on the bottom side to the drain via a tee, but one says to hook the top side DW to the outgoing hot water line from the top of the tank via a tee, and one says to hook it up to the cold side going into the top of the tank via a tee. Which method is correct?

I can't install it via a tee to the relief valve location because it is not located on top of the hot water tank, but out the side near the top???

Is the top diagram correct or is the bottom one correct?


I'm no expert but I would think the top one is correct. I doubt you would want to tee into the cold water inlet due to the dip tube that goes to the bottom of the tank which would short circuit the flow of water through the tank.
 
The more I think about this, the more the two examples I gave above don't make much sense to me. I would think that if I'm trying to achieve thermo siphoning (I probably didn't spell that right) by using the cold inlet it wouldn't work due to the dip tube that goes to the bottom area of the tank...right? And if I use the hot output setup, wouldn't the water have the choice to just drain the contents of the sidearm and only give a short burst of hot water?

I think I'm going to just try raising the hot water tank up on blocks and and adjust the level of the sidearm to use the relief valve as my top hook up. I'll tee into it and re-attatch the relief valve.... we'll see I guess
 
The top drawing is the correct one. Whether your connection of DHW (tan line out of top of sidearm) to the 1.) red "hot out" line or 2.) the (black circle) TP relief port is your choice. It all depends on the plumbing you want to do. Either will work. DO NOT use the bottom schematic.
Basic principal of thermosiphon: hot water is lighter than cold. Cold water settles and warmer water drifts up. The greater the temperature differential in the tank, the faster the loop will circulate. This would be created in the case where you draw hot water out of the tank, and it's replaced by cold well-water.
 
  • Like
Reactions: Floydian
Yeah, the bottom pic makes no sense. You'd only have heat transfer to the tank when a hot faucet is open and poor stratification. Crazyness.

I think using the T&P valve port on the side of the tank would have a slight advantage over teeing into the hot line as the hot water can easily rise to the top of the tank vs having to fall that little bit back down to the top.
It will work though, as stated.

Another plus for the T&P port is you won't have to remove the heat trap that is likely installed on the hot line-a must if teeing into the hot line and easy to do, of course.

Noah
 
The more I think about this, the more the two examples I gave above don't make much sense to me. I would think that if I'm trying to achieve thermo siphoning (I probably didn't spell that right) by using the cold inlet it wouldn't work due to the dip tube that goes to the bottom area of the tank...right? And if I use the hot output setup, wouldn't the water have the choice to just drain the contents of the sidearm and only give a short burst of hot water?

I think I'm going to just try raising the hot water tank up on blocks and and adjust the level of the sidearm to use the relief valve as my top hook up. I'll tee into it and re-attatch the relief valve.... we'll see I guess

That's not exactly 'proper' either - but it's the best way to do it. The 'proper' part applies to moving the relief valve a bit, it will end up further away from the tank water. Some might call that a safety issue, but I still did it that way. One thing to watch, depending how you orient the T & relief, and maybe an added ball valve - the relief valve has a stem on it, so if you re-install it close to a ball valve it might interfere with the closing of the ball inside. I added a short nipple in between to get the stem to clear the ball valve. And while you're at it, add in an extra boiler drain valve up top along with the ball valve, and a ball valve at the bottom, so you can isolate & flush the sidearm out easy. They sometimes periodically require flushing - so plumb for it now.
 
A couple points of interest:

1.) It's no big deal to install a tee into the pressure relief tapping and circulate through it, which is the way I do it. You need to get the relief valve far enough away from the rest of the tank so that the thermostat installed in modern prvs doesn't open the valve when it gets too hot and dump steaming hot water all over your basement floor. You will, on occasion, exceed the temp that the valve is set for. If you choose to let the thermostat remain active, then at least plumb the relief valve overflow into a drain.

2.) Speaking of thermostatic protection, your water heater has a breaker built into the thermostat, which will trip if the water gets hot enough (probably > 200 degrees). You will need to reset this breaker before your electric water heater will work when it's not being heated by hot water from the boiler. It's easy enough to do, but can be a real head scratcher at the end of the heating season when your water heater doesn't work. Just push the button on the thermostat in until it clicks. If it doesn't click, then it never tripped, but most boilers will, at some point in the heating season, get hot enough to trip this breaker.
 
  • Like
Reactions: woodsmaster
Well, I don't think you can have a valve before the T&P valve for safety reason. You can get T&P valves with longer probes.

Post partially deleted because I don't know what I'm talking about.
 
Last edited:
You're absolutely right that you can't have a valve after the T&P valve. That would be a huge safety violation.

Here's what my setup looks like. Don't hate on me for using galv tees--they last as long as a water heater, 8 or 9 years.

I guess it never occurred to me to try to plumb the top into the supply like on the water heater. You wouldn't get convection when the hot water is being used, which may or may not affect performance. But plumbed this way, it's convecting 24/7.

TPV1.jpg


TPV2.jpg
 
Thanks for all the help guys... as luck would have it, I began draining the tank today in order to do the install, and it was barely dripping out of the bottom of the tank. I knew it was a silly idea to unscrew the drain at the bottom before even trying it..... there was so much sediment, and rust in the bottom that it wouldn't even drain, that is until a finger was poked into it, releasing 40 gallons of regret all over the basement.

I am picking up the new hot water heater in the morning, and will be able to continue with the install... pics to come
 
Got her installed... water is getting up to temp as I type this. It has been a crazy, frustrating last couple days, and I'm thankful to only need now to insulate the pipes, and turn up the thermostat. Thank you all again for the help.


Last edited:
Status
Not open for further replies.