PE Porn, new baffle design & 2014 cleaning

  • Active since 1995, Hearth.com is THE place on the internet for free information and advice about wood stoves, pellet stoves and other energy saving equipment.

    We strive to provide opinions, articles, discussions and history related to Hearth Products and in a more general sense, energy issues.

    We promote the EFFICIENT, RESPONSIBLE, CLEAN and SAFE use of all fuels, whether renewable or fossil.
Status
Not open for further replies.

Hogwildz

Minister of Fire
Okay, I took some photos of the new baffle design when I cleaned the stove in November.
The baffle has been redesigned, some things added, other changed.
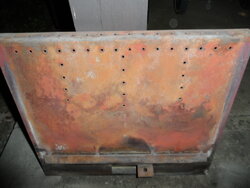
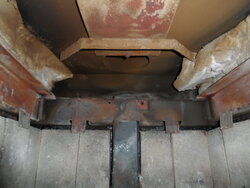
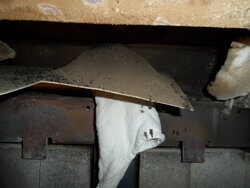
The first changes I noticed right away are the jet ports, burn holes whatever you want to call them. The standard front face and bottom front ports are left as they were. The center run back is the same. They did add 2 more runs of ports on the bottom, one run each side of the center run of ports.

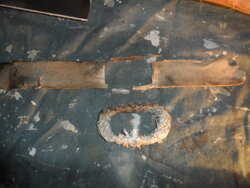
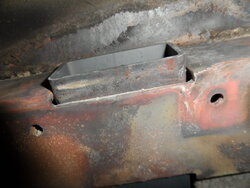
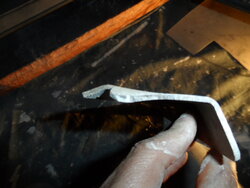
They also moved the pin tab on the back from the left side, to the right. There are also 4 welds on the back curled bottom edge I imagine for more structural integrity. Inside that curled pc in back, there are ports as there was in the previous model. I have seen them on both style baffles, and this is why you will get some flame fans from back there, nothing to do with the baffle gasket. As much as I tried, I could not get a photo of the ports in there as it was too tight a space to get the camera to see into.

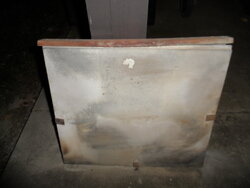
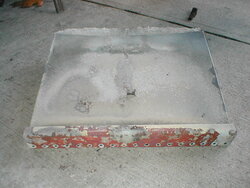
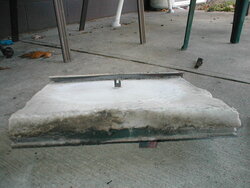
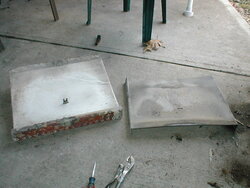
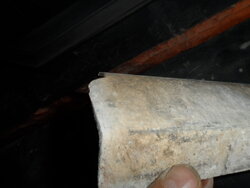
Second major change, is there is no longer an insulation blanket with a s.s. shield plate over it on top of the baffle assy. It is now an insulation board, prolly similar to the same material everyone else is using.
Photos of old baffle system, insulation blanket, and insulation blanket cover plate, and photos of new baffle and insulation board, no board cover plate on the new baffle system.
 

Attachments

  • SAM_7262.JPG
    SAM_7262.JPG
    86.4 KB · Views: 370
  • SAM_7261.JPG
    SAM_7261.JPG
    50.7 KB · Views: 351
  • PE BAFFLE FRONT & TOP.JPG
    PE BAFFLE FRONT & TOP.JPG
    62.2 KB · Views: 414
  • PE BAFFLE REAR WITH FLAME SHIELD OFF.JPG
    PE BAFFLE REAR WITH FLAME SHIELD OFF.JPG
    59.1 KB · Views: 474
  • PE BAFFLE WITH TOP BAFFLE FLAME SHIELD REMOVED.JPG
    PE BAFFLE WITH TOP BAFFLE FLAME SHIELD REMOVED.JPG
    58.2 KB · Views: 488
Last edited:
  • Like
Reactions: GeneralBill
Next major change is the S.S. inner stove ceiling flame shield plate. It is now much narrower than the A series style, and has what appears to be a dam of some sort, I guess to slow the flames &/or heated air down prior to going out the outlet, keeping the heat inside longer and creating more heat transfer to the stove top plate. I like the idea of the "flame dam" on the new flame shield plate, but I do not like the fact that they made the protector plate narrower. Coincidentally, the unprotected areas of the stove top plate are right where the new dual blower design air routing is on top of the insert.

The problem is, the stove steel top now will get much hotter due to the resistance caused by the "flame dam", & the narrower flame shield plate heating the top of the stove up noticeably more, along with the thinner insulation board which may or may not let more heat radiate to the stove top plate. This has a greater chance of heating the top stove plate up to cherry.
I would have liked to see the older, full protection plate with the flame dam. The narrower protection plate now gets cherry red quickly, as I am sure the older version got cherry also, but not sure as fast or hot. And this creates a hot spot where the flame dam is bottle necking the heated air and flames, causing the heated air & flames to go to one side or the other.
Think similar to cat stove with hottest point at the cat. But this is not a cat stove, and I do not like this much heat directed in a small area.
Photos of new flame shield plate & old style plate.
 

Attachments

  • SAM_7249.JPG
    SAM_7249.JPG
    93.1 KB · Views: 312
  • PE STOVE TOP INNER FLAME SHIELD.JPG
    PE STOVE TOP INNER FLAME SHIELD.JPG
    72.4 KB · Views: 316
The baffle gasket has been redesigned also. Pretty much same style, but now has wings off each side to run the length of the baffle side to side.
Still same subpar material, so plan on replacing each cleaning, or make your own. I will be developing my own Hog style gasket to solve this issue.
Photo of new gasket style and old Hog gasket, need to add wings.

And, they still left a drop ledge at the front of the mating surface where the baffle gasket fits around the rear vertical secondary channel, which lets the gasket sag, and drop down. Mine brokke there already and is hanging out where the drop down is. The Hog gasket does not do this, but how hard can it be while manufacturing, to include a nice ledge there for the gasket to mate flat to with the rest of the surface? These are my pet peeves, but I feel they are legitimate things I am pointing out.
 

Attachments

  • SAM_7259.JPG
    SAM_7259.JPG
    99.3 KB · Views: 256
  • SAM_7252.JPG
    SAM_7252.JPG
    95.8 KB · Views: 248
Last edited:
  • Like
Reactions: GeneralBill
The side insulation is the same blanket materials as always used, but wraps up on top of the baffle, where the old one just filled in the side gap between the baffle and stove walls.
You can see this in the prior flame shield photo posted.
 
The boost manifold plate is still a touch too tight, and hence the corners have bent slightly due to no room for expansion. Didn't have this with my old one. I guess and can swap em out. I'll have to look at the old one, but the new one seems like the holes are so close together, the material between then holes will fail sooner down the road?
I forgot to take a photo of the holes, and ain't sticking my hand or the camera in that hell right now. Will have to wait for Spring.
 

Attachments

  • SAM_7267.JPG
    SAM_7267.JPG
    53.8 KB · Views: 238
  • SAM_7268.JPG
    SAM_7268.JPG
    76.7 KB · Views: 229
The rest of these photos are just of the cleaning.
I not only stuffed a rag in the rear secondary channel top opening, but I also made a little ash/soot diverter to divert the sweepings into the stove, away from the channel.
Worked pretty well, and cost nothing.

Photo of the section of flex liner I have through the smoke shelf to the outlet. Remainder is insulated rigid double wall all the way up. I LOVE that stuff!

And, the results of the sweeping on the stove floor.
I am happy with the results. I must be doing something right.
 

Attachments

  • SAM_7255.JPG
    SAM_7255.JPG
    89.4 KB · Views: 266
  • SAM_7251.JPG
    SAM_7251.JPG
    86.1 KB · Views: 274
  • SAM_7266.JPG
    SAM_7266.JPG
    104.9 KB · Views: 252
After reading, this, I don't want to seem like I am bashing PE of the Summit.
I love this insert, it is a true workhorse. The cosmetic changes are simply so much better then the A body.
Performance wise, I have not really noticed any real differences. The added jet ports do seam to burn the wood more evenly and completely.
The EBT I still have doubts whether it does much.
Bun times are similar, maybe a tad longer with the new style, still undecided on that.

I may try and install the old flame protection plate in the new stove, or maybe incorporate it behind the new plate and see how that works.
The dual fans vs 1, no verdict on that yet. But seams now there are 2 that can need replacing rather than 1.
I love the cast ash lip and top plate, but, as with all cast iron and all those nooks and crannies, sucks to clean. I just brush the ash lip off at each reload with a hand brush.
The side grilles can now be removed if needed for access to the fans etc., without having to remove the ash lip plate or the top plate. Something I had to do with the A series.
Again, the cast iron and the cosmetic changes really set the Summit up 10 notches. Looks like a completely different insert, and should gain more prospective buyers attention. Good thinking PE, and great changes.
I would love to see this insert available in a T6 Version, more cast, more cast, more cast. More to clean though also.
Many know the issues I had with the first A series, along with some others. I can only say, PE stood up to the plate and paid for repairs. The critical repairs held. The face repairs did not.
I was okay with that, as the insert still ran flawlessly( after i straightened to EBT issue and door gasket issues out, and I was content with the stove in every sense.
PE then out of the blue stood up again, and offered the B series, with a new door! Even offered a plated door, but I did not feel right taking more than I had. Just how I felt, and was happy with the new stove and new door. I almost asked for the nickel door, but my conscience wouldn't let me. I am no saint, but I only wanted what I had, that's fair enough for me.

I give 2 thumbs up to PE. I do wish they would consider addressing some of the things I discussed above, and feel like anything, try to keep evolving and improving, can only continue to win customer base and trust. I realize some changes are costly on tooling and such, but some can easily be addressed with little effort or cost.
I am happy, and will continue to burn this my Summit with pride, content and trust in the product.
Not pushing PE, just giving feedback & kudos where it is due.
 
With the real wood stove holding up pot plants in the addition. ;lol
 
That's a pretty puny pile of sote. Looks like you are living cleanly, bro. Must be doing something right. I'm sure you'll make up for it elsewhere. ::-)
 
Hell, he is the only member that has ever slept with a hearth.com moderator. ::-)
 
Has webwidow left the room?
 
Administrators don't count.
 
Nice documentary!
 
With the real wood stove holding up pot plants in the addition. ;lol
You Son of a.............stitch! It's holding up construction materials. Gets your facts straight!
The addition is close to done, but on hold until I get my cathedral ceiling reno in the main house done. Which is going to take some time.
I have seriously been considering a BK for the addition. That area is screaming for low & slow with any residual heated air flowing into the main house as a bonus.
But then again, with the 30, I can work in the nude and still have to crack the slider a bit.
 
Get the BK.
Well, I can always dial that up and still prance around nekid. Not the best sight, but I can!
Hey, that would make a great promotional commercial, I can picture it now.......
 
The rest of these photos are just of the cleaning.
I not only stuffed a rag in the rear secondary channel top opening, but I also made a little ash/soot diverter to divert the sweepings into the stove, away from the channel.
Worked pretty well, and cost nothing.

Good idea, but it ticks me off a bit -- why didn't I think of it? :)

PE should be sending yearly test models and a couple of bucks to you.
 
Good idea, but it ticks me off a bit -- why didn't I think of it? :)

PE should be sending yearly test models and a couple of bucks to you.
LOL, I don't have to the time or energy to be fooling with the stove I got, let alone test stove. Will be adding a second stove in the future. Of course by that time, I will prolly be old and not want to do it at all. Just turn the thermostat up ;-)
 
Status
Not open for further replies.