New Stove, Lots of Smoke/Screeching Fire Alarm

  • Active since 1995, Hearth.com is THE place on the internet for free information and advice about wood stoves, pellet stoves and other energy saving equipment.

    We strive to provide opinions, articles, discussions and history related to Hearth Products and in a more general sense, energy issues.

    We promote the EFFICIENT, RESPONSIBLE, CLEAN and SAFE use of all fuels, whether renewable or fossil.
Status
Not open for further replies.

Sosalty

New Member
Jan 11, 2015
6
Northern Alabamie
I fired it up my Homestead stove at my newly built to be retirement home. Didn't get the results I'd hoped for. Both evenings I smoked the place pretty bad in starting the fire and then it burned out of control and cold again 6hrs later.

I expect the stormy wind plays a roll.

Using newspaper, small 1" and progressively larger to 3" oak to start. Smoke from the door until shut. All wood oak/hickory mix from trees downed 11months ago. Once it flames up, the control is pushed away toward back of stove to slow the air. An hour or 2 later with flames licking down, I slowly open door and east/west stack 2 3" dia and 1 5" dia hardwood (16 to 18in); smoke pours into the room at this time setting off the fire alarm. I haven't bought a thermometer yet (kinda disappointed at the lack of info when buying stove and set up), the room gets 78, my drywall is too hot too touch and the place cold 6hrs later. The stove emits an ominus roar. There's about 15' straight up triple wall 6" flue. It's needed most nights to back up the minimally performing reverse heat pump.

I read that some use foil around the air control to slow the overburn. Also I've ordered a stove backing to help with the drywall temps. I'll be out there again this last week of January. I don't need it during the 40+ degree days as the reverse heat pump takes over so firing up every evening may be routine.

Should I hold off using the stove running little 110volt heaters instead if windy? I seem to be doing a balancing act between getting easy to start wood and hot coals vs long burning wood and tamer coals. Any suggestions?
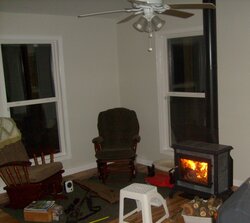
HomesteadOverHeating.jpg
 
Last edited by a moderator:
What is the hearth requirements for that stove? Clearances to combustibles? At first look from your picture it looks like itssitting on hardwood floor and cery close to the dry wall. Was this stove put in by a dealer or by you?

Is the house very air tight? You can try opening a window a little bit and ser if that resolves the issues. But first verify your hearth and clearances!! Would hate for your new house to burn.
 
The Homestead has a very high hearth insulation requirement. There is no hearth showing for this stove, just a wimpy pad underneath. Makes one wonder what other shortcuts have been taken? Is that single-wall stove pipe? How close is it to the wall?

This is not a safe installation. Use electric heaters until the stove is properly installed.
 
Last edited:
Clearance to combustibles have to pass muster before you keep burning if you can't touch the drywall. Do you have an IR thermometer. Once you are sure its safe then its time to talk about chimney length and other issues that can cause or contribute to slow draft. How long have you been burning the stove?
 
That Homestead has the tall legs and the bottom shield, so it has slightly lower hearth requirements then the one I installed, but I am pretty sure you can't set it on a hardwood floor, which what it looks like is being done in the picture.. As far as "long burn times" burn times are relative, and one of the things that wood stoves need is firebox volume. That is a 2 cu.ft., shallow firebox, and you can only stuff so much fuel in there at a time.

I would very much like to see a closer picture of what the stove is sitting on, how the pipe looks and is assembled, and a measurement from the back of the stove to the wall.. Distances in pictures can be deceiving, but that looks way to close to me.

EDIT: after re-reading your OP.. did you read the manual for this stove? If that is a brand new stove, and a pictures of one of the first 2 fires, you didn't do any break in fires, and this can and will break stones in a soapstone stove due to moisture inside the stone..
 
Last edited:
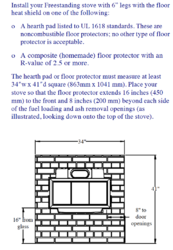
Hearth pad needs to be at least 34" x 41" and R = 2.5.
Screen Shot 2015-01-11 at 3.52.45 PM.png
 
Wow......you gotta read the literature!
 
And welcome to Hearth.com. :)

Sorry for the short responses. We'll help you get burning better once we know the installation is safe to burn in.
 
A few issues right off the bat . . .

11 month old oak and hickory . . . generally this wood is far from being ready to being burned in a modern woodstove.

As mentioned . . . no apparent floor protection is a major concern here.

Draft issues may be due to the wind . . . or other problems.
 
Honestly, when I first saw that pic I cringed in fear.

But then I thought for a moment and came to the conclusion that I am REALLY VERY glad the OP found this site and came on here to post his setup.

I hope he/she will seriously read and FOLLOW the info which is certain to be coming in this thread.

Welcome Sosalty!

PS: at least the OP has a working smoke alarm.:)
 
OK, my trepidation at least has a basis! The house went way over schedule to be built and I'm living 2100 miles away. There was heavy tile that didn't get installed for the hearth and wall. Was gald to button up the build and be done. Probably forgot what was needed and then scanned later, the manual said several times, "Freestanding" I may of jumped to conclude a hearth was only required for the 4" legs, big oversight on my part there. But the wall clearance should be in spec once the back cover gets installed. There's 16" now and 13" is required with a back cover. Will check that. No more fires 'till a hearth is in place. By the way, not too many wood stoves here in southern Cali. as there's bad air issues. Didn't know paint stored outdoors would freeze either. Anyway, the 1st I heard of checking stove temps was after this experience and doing some reading on this forum. Like I say, dissappointed that the seller just wanted to take my money and load the stove.

I did start with 2 little 'break in' fires. Then a severe cold Nov snap hit the week I was in there and tried regular fires. Seems the air control ought to choke a fire down to at least mild mannered or even put it out. I had no idea the burn couldn't be controlled. To restate, the flue is triple lined 6".
 
The hearth requirement for the Homestead is stiff. It will need significant insulation under the tile to reach the R=2.5. If the flue pipe is single wall the pipe clearance requirement is 18" to the wall regardless of the stove requirement. Single-wall pipe gets hot! The remedy is to switch to double-wall connector or to put pipe heat shields on the connector.

http://www.chimneysweeponline.com/horvalue.htm
 
Adding the rear heat shield makes a significant difference in how much heat gets transferred to the rear wall. Even the window trim looks too close to the stove pipe but photos can be deceiving. Glad you have found this site. Be careful and be safe.
 
Was this installed by a stove shop or did you do the install yourself? You don't have any problems that cant be fixed so you should be burning soon enough then everyone here can help you to get it burning the way its supposed to.
 
"Single-wall pipe gets hot!"

Flue pipe is triple-walled. Had to drive an hour plus away to find an additional 2 feet.
I mean the interior connector not the chimney pipe.
 
"Single-wall pipe gets hot!"

Flue pipe is triple-walled. Had to drive an hour plus away to find an additional 2 feet.

You have triple wall CHIMNEY, that's the stuff above the ceiling (hopefully) and out the roof.. the "stove pipe" or single wall, is the stuff directly connected to the stove, and running up to a ceiling interface box, connecting to the chimney. "Stove pipe" can be single or double wall, never insulated...
 
Ahh, single or double wall in the house, don't know. They needed some triple wall last summer before they could finish above the roof and couldn't get it at a home improvement store. I should make time for the stove my next trip, just have limited time. I'll not burn until changes made. Plan to install a damper so will see if single or double.

Contractor help hooked up the stove a year after the house was scheduled to be completed. Install was delayed so long, I believe plans for installation were forgotten, then 2 young minions dashed over there between jobs, hooked it up and I trusted the install. When I was in there for a week in Nov a cold snap hit. I then learned how inadequate reverse heat pumps are in freezing weather. After small breakin burns and thinking of a tame fire, I loaded it with hardwood.

Hearth pad, stove backing, and flue damper are waiting to be picked up my next trip out. Appreciate the safety warnings.

I believe this to be part 2 of the answer I need: Install a damper in the flue/chimney. With only an understanding of a fire while out backpacking, cutting off the air at one end and restricting at the other end surely will tame it.
 
I seriously doubt you need a flue damper. We didn't with our Homestead, in a colder clime with a lot more chimney. One thing to check is that the primary air control slider is traveling it's full design travel. They are very easy to bend on this model, and you may think you have the air full shut, when you don't.
 
So far I see no need at all to add a flue damper. It might actually make the smoke spillage worse.

If this is single-wall flue pipe you need to measure how far the connector is from the wall. If less than 18" it either needs to be replaced with double-wall connector or it needs either pipe heat shields or full, ventilated, NFPA 211 wall shielding. The pipe shields are less work.


http://www.amazon.com/Imperial-Group-BM0133-Adjustable-Shield/dp/B000DZQR3Q

It is unlikely you will find an R=2.5 hearth pad, they are usually special order item.Even type 2 pads are only about R = 1.5. American Panel Hearth Products makes mineral panel pedestals for their pads to raise them up to the Homestead's requirement. Or DIY with 1" of micore and two layers of 1/2" cement board.
 
Last edited:
Status
Not open for further replies.