2014/2015 VC Owners thread.

  • Active since 1995, Hearth.com is THE place on the internet for free information and advice about wood stoves, pellet stoves and other energy saving equipment.

    We strive to provide opinions, articles, discussions and history related to Hearth Products and in a more general sense, energy issues.

    We promote the EFFICIENT, RESPONSIBLE, CLEAN and SAFE use of all fuels, whether renewable or fossil.
Status
Not open for further replies.
when i am home i tend to load every 4 hours but when no one home stove burns slow and steady. Here is pic of my wood cart that
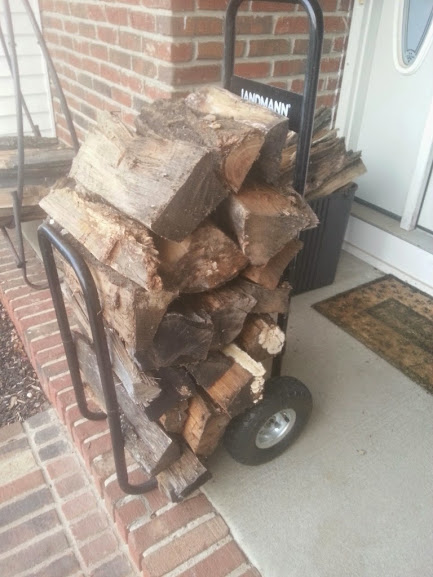
i will burn through in 24 hours if i am home
20141129_075632
 
I always see it as loading three to four splits every five six hours (sooner when it gets super cold). But now that I see that wood cart, it looks pretty much the same, what I burn. That is a decent amount of wood per 24h period. Thanks for the visual.
 
Thanks for the info. It was real helpful. I am using a little more than the cart of wood shown.

My damper is leaking and probably causing the inefficiency. Regasketing a damper on a winter warm is a real pain, and everytime I do it I say I won't do this again, but I guess I'll have to put on the armor and go fight the dragon. Does anyone known of any self adhesive gasket material that might work on damper so I don't have to take stove apart.

Also has anyone adjusted the primary air controls. I don't get a whole lot of control with primary air so I'm conjecturing the unit needs adjustment. If I put three or four beefy splits in the stove when there is a good bed of coals in it, the stove burns like a volcano for 10-15 minutes until the wood gets charred. The chimney is 30 foot straight lined 8" double wall metal so maybe there is just too much draft. I'm concerned I might be over loading it. The front door is pretty tight so I'm guessing the damper seal or primary air is causing this.
 
I reload every 8 hours. Three times a day..morning, afternoon, before bed.

If it is below zero like last year we burn a lot hotter and load a fourth time.

But that is about a days worth of wood for us as well. In your cart.
 
Damper gasket on winter warm. I have seen several posts about installing damper gaskets in a winter warm. It's a pain to install them. Taking the upper fireback off and removing damper frame is the preferred "right" method, but I don't have the will or strength for that anymore. Installing them with no disassembly is also a pain cause the gasket won't stay put and keeps falling out before one can get the damper shut. This is how I solved the problem.

I do the gasket in two phases 1)top and sides and 2)bottom. I bought 2 medium sized potato chip bag clips (1 1/2" wide cheapest ones from Target that came in a four clip set for $4) and hold the gasket in place on the top of each side. Once you get the gasket in the top you can shut the damper and remove the clips. Then wait for the cement to set and then do the bottom by itself. You can't use the clips on bottom because of angles and such but that gasket will more easily stay in place while the door can be shut.

I also recommend Rutland black stove gasket cement. I also cut a piece of plastic garbage bag a little bit bigger than damper door and put it between door and gasket so gasket won't stick to door when I close it. I hope this will last a whole or at least a half of season. Even at half season it's better than going over the falls in a barrel with the upper fireback again.
 
Last edited:
Almost a month in after my complete tear down of the 2550 and I must say, for me, it was worth it. Today I closed off the secondary air with tin foil (as I have in years past) and also stuffed gasket into the epa holes and what a difference for my situation! (My house has crazy draft) Right after rebuild until last night I would cruise 1450-1500 which is too boarderline for me. Today I'm 3 fires in and the control I have is awesome I can dial in the cat/griddle temp depending if I want heat or long burns( cat temps anywhere from 1150-1450 and back down if need be). It may not work for everyone but it's worth a try if you don't have precise control over your stove.
Stay warm!!
 
Kinda of pissed. I re did the gasket on my winter warm large. Burned it all day yesterday without issue, now I'm sitting here watching the Cowboys Eagles game and smell smoke. I have the air cut all the way back, whenever there is a nice secondary, the pressure of the smoke burnings off in the box is now seeping out of the hinge side of the door. Guess it's back to the drawing board. I originally replaced due to a leaky handle side corner.
 
Last edited:
Kinda of pissed. I re did the gasket on my winter warm large. Burned it all day yesterday without issue, now I'm sitting here watching the Cowboys Eagles game and smell smoke. I have the air cut all the way back, whenever there is a nice secondary, the pressure of the smoke burnings off in the box is now seeping out of the hinge side of the door. Guess it's back to the drawing board. I originally replaced due to a leaky handle side corner.

Give it a bit more air. If it is back puffing that is.
 
Ya I started reading some threads on here and that's the general consensus. Anything I can do to stop it? I do not want this to be happening if I'm not in front of the stove.
 
How long have you been burning with the winter warm again?

A few possibilities. The back puffing occurs from a decrease in draft and an increase in combustible gas in the firebox. gas builds up and builds up, and then eventually enough oxygen is present and you have an explosion of the gas and smoke gets burped into the room.

Possibilities:
1) warm outside temperatures (I am more likely to get backpuffing when it is high 30's low 40's as the chimney draft is just not as strong)
2) wet wood resulting in lower chimney temperatures resulting in poor draft.
3) draft obstruction (creosote build up, blocked air intakes, some type of failure within the stove)
4) closing the stove down too quickly before a nice coal bed is formed or the wood is well caught tends to increase smoke production and stifle oxygen supply
5) closing the stove down too much. Sometimes if you close it down too much you just aren't giving enough oxygen. While it would be nice to always be able to run the stove closed 100% this just isn't realistic sometimes, especially if some of the above conditions are present.

If your gasket was leaky previously and now it is tighter it is possible you had more oxygen entering the box unregulated previously preventing snuffing the oxygen supply enough to enable backpuffing. So it is possible to fix one problem but create another. If this is actually going on however I don't know.

How to prevent this? Slowly close the stove down over 10-15 minutes when reloading. And don't let the flame go out. I always want to see a little bit of flame dancing in the firebox even if it goes out for a few seconds and then wooshes back in. If you see the flame in the box go out completely and for 10-15-20 seconds or more and then suddenly have an significant wood gas combustion thats when the smoke is belched out. So basically always ensuring there is visible flame in the box prevents this.

I usually will close the stove all the way down over 15 minutes but then slightly open the air control from all the way closed until I can hear a gentle air rushing sound in the back of the stove because then I know an adequate amount of oxygen is entering and I always want to see a small flame somewhere in the firebox.

When it finally gets really cold 20 degrees and lower though the chance of my setup back-puffing is significantly lowered.
 
  • Like
Reactions: Reckless
Figured I would check in. Last March I bought this used Defiant 1910 in very rough shape. Lots of overfires had led to the melting/deforming of the upper and lower firebacks, refractory, catalyst and the catalyst baffling as well. All was replaced and the stove resealed. Still has some leaks, but it runs very nicely once its warmed up. I would like to say thanks to everyone on the site who published photos of their defiant rebuilds, they were very very helpful.

IMG_0955.JPG
 
No horror stories with the one year old montpelier. I was alittle shocked with the heat output last night, couldn't get the temps up to my normal range. i think i need a new system to keep the wood dry. Two years seasoned oak but i know it got wet with all the rain we've had. Tarps suck.
 
Talking about hot running VC stoves - my Encore2040 2n1 would run hotter than I liked, even after a detailed inspection and fix-up of a few minor air leaks. I was seeing stove top over 650 with a full load of black oak - and this with the primary air turned full down. In my opinion, the stove should be more controllable than that. Simple observation: the fire was getting too much O2.

So I blocked off 1/2 of the unregulated secondary air ports that directly feed the fire. There are 8 small holes across the bottom of the ceramic fireback, oriented horizontally. I stuck #10 machine screws in 4 of those holes, thus restricting secondary air to the fire (these screws aren't threaded in - they just nicely fit the bore diameter of the holes).

Result: a MUCH cooler running stove, plus the glass tends to stay cleaner longer since more primary air now must be used to keep the combustion temps up.

Encore2040%2BAirMod.jpg
 
Last edited:
I have the same stove and also notice sometimes it isn't very controllable. I'm fairly new to stoves especially EPA stoves so this might be a stupid question.
The holes that you blocked are they pulling air into the stove from the 2 secondary air holes in the back of the stove? Or do they pull air out of the stove thru the CAT. Just trying to better understand how the stove works.

Thanks
 
Into the stove
 
I have the same stove and also notice sometimes it isn't very controllable. I'm fairly new to stoves especially EPA stoves so this might be a stupid question.
The holes that you blocked are they pulling air into the stove from the 2 secondary air holes in the back of the stove? Or do they pull air out of the stove thru the CAT. Just trying to better understand how the stove works.

Thanks


As Diabel alluded to, the holes I blocked are admitting air into the stove from the secondary air manifold.

A bit more explanation:

The 2040 Encore has two holes on the lower back side of the stove: The lower rectangular hole is fitted with a controllable door and can be opened or closed as desired to admit air into the fire box thru the airwash manifold. This opening is for PRIMARY combustion air, which gets sucked through the opening in the back (assuming the door isn't fully closed), then travels through left and right side air passages and up to the air wash manifold that sits directly above the glass door panels. This Primary air then flows down over the glass, which helps to keep it clean, and is considered the "primary" air source to feed the fire.

But there's another hole in the back of the stove - also rectangular - and about the same size as the Primary air hole. This other hole isn't equipped with any kind of door, its just there and stays "wide open". This is the SECONDARY air inlet and it leads to what I'll call the "Secondary Air Manifold" which is simply a channel that routes this air supply to the CAT and to those holes I pictured in the post above.

Therefore, in the 2040 Encore, its this Secondary air feed that we cannot control. It supplies the CAT with LOTS of fresh air (fed directly into the CAT combustion chamber so it can run HOT) but it also feeds fresh air through these 8 holes into the main air box of the stove. Its variable only to the extent the chimney drafts air into the stove. So now you see how the Encore has an ample supply of fresh O2 that has absolutely no control feeding the fire box.

I stuck the screws in there to reduce the secondary air feed via those little holes - which will of course reduce the total O2 that gains admittance into the fire box. This is guaranteed to also directly affect the combustion temps of the fire: less O2 = less heat and a slower burn.

Hope this makes some sense.... try it out. You may not need or want to restrict the air as much as I did (I live in Oklahoma so don't need the stove running so hot) but its a very cheap and very easy way to "trim" the O2 levels in the fire box to your liking. From this "fixed" setting you can then throttle the fire using the Primary air control as you want.

Cheers....
 
Yup, I am to the point!
Thank you for the detailed explanation Bill.
 
I don't mean to high jack this thread....

Bill, you seem to be on top of these things,

No questions are stupid correct!!

Do different thermo couplers have different heat resistance?
Reason I ask, I purchased a flue probe on sale for 8.99
Pluged it into the cat probe hole on my VC and after a week it pretty much melted, charccoaled and burnt off. Is it because just that.... Meant for a flue only?
 
Diabel - No problem ... and questions are good things.

The thermocouple you ordered apparently wasn't designed for the high heat due to exposure to CAT combustion temps.

Thermocouples work by generating very small voltages (micro volts) when heated. They do not work on resistance.

A "thermistor" works on resistance change w/temp change but cannot handle high heat.

I think all you need is a higher heat range thermocouple. And make sure it's the correct "type" such as Type-K. The "type" matters b/c it will determine the voltage range of the device.

- Bill
 
That is what I thought. I will just order a new one meant for higher temps
Thanks
 
Will this work Bill?
 

Attachments

  • image.jpg
    image.jpg
    14.7 KB · Views: 263
Diabel - no, I don't think that will do.

I found the exact same image you've posted on eBay

This is a K-type probe, but its only good up to 1250 Farenheit. That's not a high enough heat range to withstand CAT combustion temps which can exceed 1700F.

Instead, you need to look for probes that can operate at temps of up to 2000F. That will assure the probe can take a short overtemp of the CAT, and in normal operation won't burn up.

Take a look at this


This probe can handle up to 1250C (2282F) so its definitely not going to burn up or melt in your stove. I've been using this probe for a few months now without issue. The only complication is the thread boss is kinda large and it appears to be metric pipe thread. I was going to screw it into a home made mount plate, but just stuck it through the CAT probe hole in the back of my stove and its been happily there ever since. I use a couple small steel office clamps to hold things in place.

What digital temp system do you have?
 
Thanks
I thought the one I showed was good up to 1250*C
I could be wrong
I still have to buy some sort of reader display
Any ideas!
 
Status
Not open for further replies.