Whitfield WP4 Quest

  • Active since 1995, Hearth.com is THE place on the internet for free information and advice about wood stoves, pellet stoves and other energy saving equipment.

    We strive to provide opinions, articles, discussions and history related to Hearth Products and in a more general sense, energy issues.

    We promote the EFFICIENT, RESPONSIBLE, CLEAN and SAFE use of all fuels, whether renewable or fossil.

jpuff

New Member
Feb 9, 2014
4
United States
Need help. My pellet stove is acting up. The pellets are coming out to fast or the damper isn't working.
No matter what I do it keeps backing up. I have the pellet feed is set all the way down and the damper is turned all the way up. Thought it was the pellets but I've changed pellets a lot and the samething keeps happening. Can some one help me out.
Need more info. Quality of flame? Last time THOROUGHLY cleaned? And describe how you cleaned it, please. Sounds like poor flame / burn, and that usually means dirty stove.
 
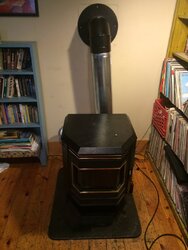
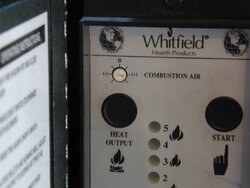
When was the last time the stove burned correctly and when is the last time you cleaned the stove and vent pipe. Does the damper knob have an affect on the flame? Sounds like it's an air problem. I have a Quest plus and if I recall, my damper has a rod and yours has a knob but both do the same thing and the stoves are very similar. You can see the damper control knob on the right of my stove.
100_0617.JPG

If you have already done these let me know but go through some basic checks.

First, Check for air leaks around your door, and glass.

Verify that both of the ash slide covers are shut on the left and right floor of the firebox.

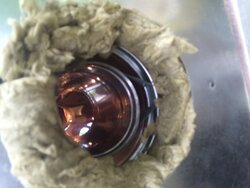
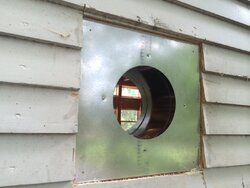
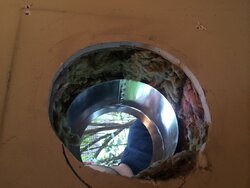
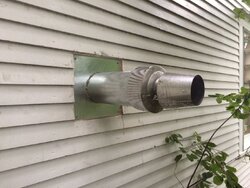
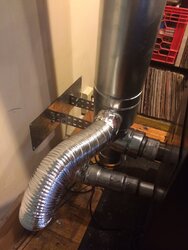
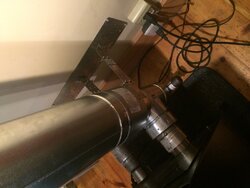
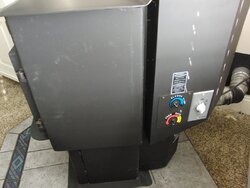
Make sure your vent pipe is clean from the exhaust motor out. Depending on your exhaust configuration, you will want make sure the exhaust blower motor housing and impeller is clean as well. Check to verify that your exhaust motor is functioning and coming up to speed. (I like to bench test motor as it sits in the housing to verify it comes up to speed and the impeller isn't bent and vibrating)

If all is good there, you may have a blockage between your exhaust motor and the fire box. you will need to pull the blower motor and either blow the stove out with compressed air or use a shop vac with a small hose to get around the corners and difficult to reach areas. Take your stove outside or in the garage when you do this. The exhaust vents in the fire box on this stove are in the upper right and left corners beside the heat tubes. You will have to remove the deflector plate to get to them and getting the ash can be challenging. (I like to put the shop vac hose into the exhaust housing and with the shop vac on, hit the two exhaust vents with compressed air. does a nice job)

Not positive the configuration of the damper but make sure it is functioning when the knob is turned. If it is not, this may be your problem and more than likely it is stuck in a near closed position.

Check the square combustion air tube below the burn pot to make sure its not blocked and the burn pot is seating correctly when it is in place.

After that, you may be looking at a control panel issue however I think you're going to find it is an air problem.

Just a good cleaning can effect your stoves performance greatly and you really have to keep up with them especially when they are in service. I really like my Quest Plus. I modified the burn pot slightly and it runs flawlessly and It's a very quiet stove.


Let me know how you make out.

Bob
 
Here is where the exhaust ports are located. Take off the deflector plate and you will see them.

100_0614.JPG
 
  • Like
Reactions: Stovensen
That stove has a cable to control the damper. Hard as hell to adjust. There may be an auger adjustment on the control board, if so turn it all the way to the left. The flame should be brisk, not lazy. You may have to remove control board to get at the damper cable and yes it needs a good cleaning.
 
Hello jpuff, and welcome to the forum. If you need to inspect and adjust the damper control mechanism, the service manual may be helpful. I've attached it below this post. If we study an illustration from the service manual it seems very likely that what has happened is what wwert suggests... namely that the damper is stuck in the closed position. This could really starve the airflow in stove.
Damper arrangement in exhaust.jpg
 

Attachments

  • QUEST Technical Manual w-exp. view.pdf
    967.7 KB · Views: 722
Welcome jpuff, This stove can never have the damper closed all the way, even with the cable disconnected. I guess they want to keep you from hurting yourself. If the exhaust is plugged, it's another story. Check the hex screw that secures the pellet feed knob. Ask me why I always check this kind of simple stuff first. :cool:
 
Thanks everyone. For the info. We'll I'm not sure what I did lat year to get it going. But now it's doing it again. I have the damper all the way high and pellet feed all the way down. And still not burning right. I might have to take it apart and clean it again. Or blow some air thru it all.
 
Hello jpuff, and welcome to the forum. If you need to inspect and adjust the damper control mechanism, the service manual may be helpful. I've attached it below this post. If we study an illustration from the service manual it seems very likely that what has happened is what wwert suggests... namely that the damper is stuck in the closed position. This could really starve the airflow in stove.
View attachment 127130


Thanks but I can't open the file. Id l k e to get it if you could send it t me. I don't have any paper work on the stove.
 
Thanks but I can't open the file. Id l k e to get it if you could send it t me. I don't have any paper work on the stove.

Hi jpuff,
Sorry to hear that your Quest stove is acting up here in the middle of the winter, when you need it the most.
As for my link to the svc manual... maybe your firewall is set too protective?? I just checked the link to the svc manual that I posted last year, and it still works fine here. Anyway, if you send me your e-mailaddress through the Conversation ( Inbox ) option on top of the web page, I'll send you both the pdf of the svc manual and the owners manual to you in an e-mail.

Did you know that our Quest stoves are some of the most difficult of ALL pellet stoves to keep clean in the "exhaust manifold"? A true nightmare to clean:( Actually forum member Bob. P gives some very good info on how to clean the hard to get to area in his post further up in this thread. Please study his post an extra time... Remember: 80% of all problems with a pellet stove is caused by a clogged up exhaust!!
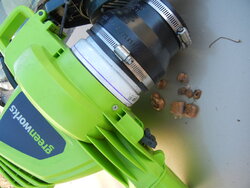
Good luck and take care. I'm waiting on your message in my Inbox.
 
Last edited:
If I had to guess the exhaust passages in the stove are plugged. You have two methods to clean them. The factory wants you to remove the firebrick and drill two large holes into the exhaust passages. Vacuum out the exhaust passages then seal the holes. Yes that is what the factory told me.

Instead remove the firebrick and hit the area behind the brick with a rubber mallet. Next open up the left side of the stove as you look at it. Remove the rubber hose from the vacuum switch. Go outside and perform the leaf blower trick. Reinstall the rubber hose and you should be good.

The exhaust passages are very hard to clean since there is no direct way to access them. I had this same problem with my stove and once I used the leaf blower the problem went away. Search for quest on this site you will find several posts about this problem and all were fixed the same way.

Rick......
Cool thanks. But what's the lead blow trick. I'm sure it's a dumb question. But I have to ask.
 
Leaf blower trick. Some great youtube videos. Seems to be used or mentioned everyday here.
 

Attachments

  • DSCN0133.JPG
    DSCN0133.JPG
    135.1 KB · Views: 542
Lets get some more specifics on the problem. did you check the ash slide covers (see thread above) under the door on each side and make sure they are shut. A little open and the stove sucks air from the ash pan area and your flame is super lazy. Is your combustion blower coming up to speed and if you pull of the vent pipe outside with the stove running on high(5 lights on the heat output ) can you feel air blowing? It should feel like you are blowing moderate to hard from your mouth to your hand....(don't know how to explain it better)..make sure the damper is open. Lets start there. If you feel little to no air, you have a clog, damper is not opening, your exhaust motor isn't spinning up or an impeller problem. (kind of doubt it is a circuit board issue) Next, either use the leaf blower trick or what I will do is put a good shop vac on the end of the exhaust port and turn it on. you should be able to hear it sucking inside the burn chamber and if you light a piece of paper towel and blow it out, you should see the smoke get sucked hard through the ports on each side of the heat exchanger. if not than its a clog or your damper is shut and probably clogged around it. I'm not familiar with the cable damper but I believe you have to pull the blower motor as well to access it. Lets hope it isn't that (although the odds are...) If the shop vac thing doesn't create a draft all the way to the burn chamber, I would recommend taking the stove outside and hit those areas shown by the arrows above with compressed air or a small rubber hose inserted into each port and then hit it with air through the tube to see if it pushes anything. if not, sounds like a damper. If you're still having problems, give me a call. I haven't been on the forum in a while but I have 2 of these stoves and they both work flawlessly and the best part about these are they are really quiet and no scraping. Let me know how you make out

Bob
 
jpuff, is your Quest stove an insert vented through a masonry chimney? If so, the leaf blower trick is a lot more difficult to do, since you'll have to walk on your slippery roof to attach the leaf blower to the cap. Take care with this!!
And another thing:
Now that you have the service manual you can verify if the pellet feed rate of your auger motor matches the feed rate chart on page 10 in the manual.
Through the years I remember several Quest stoves with worn pellet feed control... the feed control knob loses its grip on the potentiometer, so that nothing really happens, when you turn the knob. This could very well be the case in your stove, so please take your time to check if the feed rate changes, when you turn the knob.
 
Sounds like a good check with the potentiometer. Hows life in Denmark? Both of my Quests have the push pull damper on them, haven't seen the one with the cable...do you have to pull the exhaust motor to access the damper or does the stove have an access port of some kind?
I think they had trouble coming up with a good reliable way to damper these off. both of my stoves are identical with the exception of one area....The damper. one has a wide damper with a detent to prevent it from completely closing off the opening and the other stove has a thinner slide damper that you can shut all the way however it leaves a small opening about 1.5 cm on the top and bottom of the damper when it is completely shut. The thin damper works flawlessly however the thick damper tends to get tight through the year where i have to move it in and out a dozen times to loosen it up. I know they say to set it and let it and it will burn fine on all speeds but that is not the case for either of my stoves. Doesn't bother me any and I like having the ability to control the burn.
 
Hows life in Denmark?

So far, this winter has been one of the warmest for many years around here, but very windy and rainy. And finally I found some super quality pellets: Low ash, no fines and very hot. The stove is roasting the house these days.
On the other hand, during the very cold winters 2008-9 and 2009-10, I had some crappy pellets full of sawdust that would shut down the stove leaving a cold house time after time, so you could say that the pellet quality here is "out of phase" with the actual needs:confused:
 
Last edited:
I hear you. Warm is good if you could get a pass on the wind and rain...saves you money. I've been lucky with pellets. I have a local hardware store that brings in Hamers for $258 / ton. I have had great success with those although I have a friend of mine who just bought another brand from a local harman dealer that claims to be at .25 % ash... might swap him a half a ton and see how they do just to change things up. Tried some stove chow last year, it did okay but a little more ash.
I have not had any sawdust issues but I can understand how you could. I will make this statement when it comes to the Whitfields.
I have two Quest stoves and they are Identical (with the exception of the damper as I mentioned above) I have torn both of these stoves all the way down and with regard to the quality and craftsmanship and to some degree the tolerences on them. I think a lot depended on the skills and care of who was building them at the time. My one Quest (the one pictured in my avatar and above) was built by a or a group of craftsman.....the welds are nice and uniform, all the steel is cut edge to edge and so on. The other Quest looked like they had a beginner learning to weld, the metal wasn't as clean, straight and even and so forth. With regard to the sawdust issue, your auger could be sitting a little high in the tube (back to the quality thing) which allow the fines to pass freely under the twist and keep falling back from vibration and gravity until it had trouble getting any pellets up. (just a thought)

Like I said though, I really like the Quest. It does put off a really nice amount of heat based on the pellets burned and I think that has to do with the location of the exhaust ports. The only downfall that I see with this stove is that I have to clean it after 2 or 3 bags from the ash build up in it. I have a couple Harman P 38's and they are the ticket for heat output and maintenence (they build a nice stove) and I don't have to do anything to that stove until around a half a ton and that is by choice. Now I do scrape the pot every day or so while its running to keep any build up on the sides and bottom from forming but other than that, the window stays clean, when I open the door to scrape no ash falls out, and I like watching it burn, especially on the higher settings but..........It's not as quiet as my Whit.!

Well It's 0730 on the east coast here so I better get moving. Good talking with you and hope the rain and wind slow down. As for the temperature, I like the warm winters but like the cold and snow every now and again. One more quick note, I spent a couple years in the Military just below you in Germany back in the mid 80's. A small town called Handorf. Just up from Muenster. Never made it to Denmark but did venture to Amsterdam more than a couple times....Nice people over there.

Good Luck to you,
Bob
 
Sure thing. Really good success and adjustability. I have the stoves running but here is a quick picture. This is the newer burn pot with the grate style bottom and the flip flame guide on the front of it. if you look on the sides of the pot, I have a piece of metal shaped like a wedge, spot welded so that it covers the first opening on the bottom of the grate and rests on the 1st rod on each side. I used a 1/8th piece of steel . make sure it sits pretty flush to the sides, two near the bottom and one toward the front of the pot. The intent wasn't to funnel the air more into the center, it was to consolidate the pellets to a smaller area. I tested it with bringing it in two rods on each side but the air flow was a little too high when it was on 4 or 5 so I kept it at 1 rod in. Works nice. I just took this picture and you can see the nice combustion I can get with it and it has a nice low burn on 1 and really kicks butt on 5 if i need it there. I played with my potentiometers to dial it in with the combustion and pellet feed here is where I have them set for this one but I think each one is going to be a little different. (play with it a little) One of the things that I did on the other Quest was I closed off the top portion of my slide damper when I had it apart (don't have any pics of that...should have taken them) as I mentioned above, I had about 5/8 inch x 1 1/2 inch gap at the top and bottom of where the damper slid across the opening (from the factory that way) so I could only adjust the airflow down to a certain point and even though the exhaust blower speed varies at different heat settings, there were times when I would have the damper shut all the way and the combustion blower would bounce the smaller pellets out of the pot and when I would drop the potentiometer down, I wasn't getting enough air pulling through at the lower settings. What I did was weld the top section of the opening shut to allow me to damper the stove down really far which gave me more adjustability. It works really well for me. I know the theory on these and how they were set up to burn without messing with them too much but I live in the real world where air flow gets restricted from ash, pellet mixes change, Impellers start to get dirty and so on so I do like having the ability to adjust it. I just installed my other Quest in my brother in laws house for him (his electric was killing him) but the advice i gave to him is to keep it clean, understand that there is a learning curve with each stove and know your flame. Sounds pretty simple. How about it.

I just took one of my Harman P-38's with manual light and switched it over to auto light for under $100 and that includes the igniter. (shouldn't let that on get out) It was simple. Crank timer wired into the power cord feeding my igniter. and it looks good. (last picture)

I like messing with these so it's not like it's work to me. I wouldn't buy a new stove knowing what people sell virtually new but used stoves for. but thats me. Good luck with your Quest. they are great stoves. I'll be traveling through your area next month for a trip up to Maine. One of my favorite places to go.

Bob


CIMG2104.JPG
 

Attachments

  • CIMG2110.JPG
    CIMG2110.JPG
    144.7 KB · Views: 543
  • CIMG2109.JPG
    CIMG2109.JPG
    150.2 KB · Views: 475
  • CIMG2110.JPG
    CIMG2110.JPG
    188.2 KB · Views: 448
Bob P. Thanks for the description.

I'm curious. What does the flame guide on the burn pot do? My Quest is a WP4 older model. The burn pot has a flat front, parallel to the stove door (no adjustment) and an oval feed chute (not square like the Plus).

I agree that a downside to the stove is ash cleaning. I push the ash into the slide covers every 2-3 bags and empty the ash pan every 12 or so.
I find it more annoying that the door glass fogs up in 5-8 hours depending on the quality of the pellets.
Do you know any fixes/mods for that?

Otherwise good heat and quiet. I've had this stove since new and have only replaced 2 ignitors and all the gaskets once (fall 2013). Unless the firebox rots out(highly unlikely), there's nothing on this stove that can't be replaced relatively cheaply. It could run forever!

Cheers.
stellep
 
I agree, highly unlikely. The only major cost is the exhaust blower if it goes. I put a brand new one in my other Quest and had to fabricate an exhaust housing that was rotted away. Somewhere around $200. I replace the bearings in every other motor if it starts to go. (motors don't normally go, its the bearings so I keep a half a dozen or so on hand for when it happens.) $5 instead of $100? I'll take it.

You have a nice model with the oval chute. (quieter when the pellets fall) the big square chute makes kind of a cow bell sound as they fall) and Ignitors fail.

Glass fogging up..here is a picture of what the pot looks like with the flame guide up while it is burning. on this pot, it is a flap to prevent the flames from going toward the glass. If I leave the flap open, the glass will ash up quickly like yours probably does but when i flip the guide closed like you see in the picture, it makes a big difference in how long the glass stays clean and it guides the flames to the heat exchanger really nice. This pot has the flap on it. My other stove I cut an inch piece the length of the pot, bent the edges down and welded it to the front at the same angle. (thats the nice thing about having two identical stoves, I was able to use the one with the flap as a template) I have pictures of it somewhere but not on this computer.

I know that most people don't have a welder and means of cutting and bending metal which makes a modification like I'm telling you difficult. However they do sell the same burn pot with the flame guide/flap on it. It is worth getting it or if you have a local welder, see if he can weld a piece of 1" bar to the front of it. I will try to get you an angle on that piece (I don't thing it has to be exact) Might be worth getting the new pot if yours is starting to wear.

I gotta run but I will work on getting you some pics of the modified pot and some measurements good hearing from you

Bob

CIMG2120.JPG CIMG2121.JPG
 
Hi Bob,

My burn pot front is a steel plate that sticks up about 2 in; from the base. Sorta like if your flame guide was vertical. Seems like it should almost have the same function, maybe not as efficient. I'm thinking that the guide might also aim the fire at the door edge of the heat exchanger for more heat. My flame burns straight up or to the rear, ignoring that area. Anyway.

FYI. I've seen the exhaust fan complete with housing on the net.

Thanks for the input.
Rock on.

stellep
 
With regard to the sawdust issue, your auger could be sitting a little high in the tube (back to the quality thing) which allow the fines to pass freely under the twist and keep falling back from vibration and gravity until it had trouble getting any pellets up. (just a thought)

Good point there Bob P. You know, the previous owner had run the stove with a totally worn out nylatron bushing, so that the mounting hole in the back plate was made oval by the grinding auger. My auger could very well be working in a too high position, like you suggest.
I could buy a new back plate, but I have some experience in welding ( I have a CO2 welder ), so adding some material to lower the working position of the auger should be possible. These days I have no sawdust issues mainly due to the high quality of the pellets.

Also, the mod you have made to the burn pot by welding the two wedge shaped plates is something I'll try on my burn pot... especially on the lowest settings this will focus the burning action around the center, giving a more constant flame front.

Thanks for sharing the useful tips, Bob P.

Now, let's hope that the OP jpuff soon wil return with some news on his Quest stove, so we hopefully can add another happy Quest owner to the forum:)

Cheers
Bo
 
Hello
One great improvement is installing Selkirk DT, this warms the burn air and adds 10% to the efficiency. By warming and drying the burn air you get a lot less caked ash in the burnpot! It is like a Quest on Steroids! See my pics below.
Also I used 100% fire proof Roxul insulation to boost the efficiency another 5% ! ! !

Also in the last pic, the handy vacuum cleanout makes vent cleaning Easy Peasy! ! !
 

Attachments

  • image.jpg
    image.jpg
    145.5 KB · Views: 486
  • image.jpg
    image.jpg
    161.9 KB · Views: 385
  • image.jpg
    image.jpg
    149.1 KB · Views: 426
  • image.jpg
    image.jpg
    203.2 KB · Views: 424
  • image.jpg
    image.jpg
    176.6 KB · Views: 402
  • image.jpg
    image.jpg
    178.5 KB · Views: 419
  • image.jpg
    image.jpg
    147.7 KB · Views: 372
Last edited: