Reviving an old Englander Pellet Stove, first time owner

  • Active since 1995, Hearth.com is THE place on the internet for free information and advice about wood stoves, pellet stoves and other energy saving equipment.

    We strive to provide opinions, articles, discussions and history related to Hearth Products and in a more general sense, energy issues.

    We promote the EFFICIENT, RESPONSIBLE, CLEAN and SAFE use of all fuels, whether renewable or fossil.

Jstevens101

New Member
Jan 18, 2015
2
Upstate New York
Hello fellow members. I am brand new to this forum, and new to owning an old pellet stove.

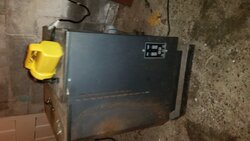
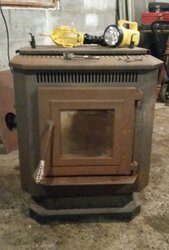
A couple weeks ago after helping a friend move into a new house, a spotted an old pellet stove in the corner of his old garage, I asked about it, and he said if I can get it out a there for him that I could have it. So, it has officially found a new home after years in a garage. It is an old piece of equipment, but assured me it runs. It isn't in the greatest cosmetic condition, and it's inards look about as expected for its age. I am unsure of the manufacturer name of this stove, but does seem very similar to the Englander 55sph10. Any help identifing this stove is greatly appreciated

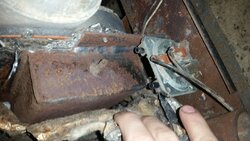
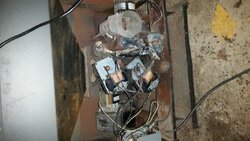
I have a small 1.5 stall garage that I would like to install this stove into. After a good cleaning and vacuuming, wE put power to the Stove and it powered up, auger turns, blower works, and sounds decent. However I did notice there was a short vacuum hose that was cracked and plugged solid with soot, and there is what looks like another nipple for another vacuum hose, which is no longer there.

Where does this second hose connect to the stove? And is there a specific type of hose these must be replaced with?

I am a first time stove owner so any tips for things to check prior to installing/running would be greatly appreciated! :) Here are some picture of the stove, please keep in mind, it's not the prittiest thing you've seen, but a was a free gift :) Thanks guys and gals
 

Attachments

  • 20150118_224734.jpg
    20150118_224734.jpg
    111.6 KB · Views: 531
  • 20150118_230201.jpg
    20150118_230201.jpg
    176.3 KB · Views: 595
  • 2015-01-18 23.32.42.jpg
    2015-01-18 23.32.42.jpg
    176.3 KB · Views: 830
  • 20150118_230227.jpg
    20150118_230227.jpg
    159.9 KB · Views: 481
I think you are correct on it being an Englander. Go online and down load a manual for it on Englanders site. That same stove will have a few different names possibly but they are the same depending if it is an ESW, Timber Ridge, or Summers Heat 10.
That is where I would start and there are many people here that have that same model. It can be prettied back up with some elbow grease and high heat paint found at a local hardware store.

I can not offer any advice on running or fixing it but many here can. Get it all good and very cleaned up first on the inside and get it operational and then worry about the pretty up. Parts are easily found and gotten so that is a plus and you paid the right price of FREE. Search the threads here in the search box in the upper right corner and you may find info on the vacuum there. Have fun with that little project.

Right now getting it running right is the first step and then a wire brush, sanding stuff, and high heat paint will be your new friend. You need to get it running and trouble shoot problems that need to be fixed before anything else to see if it is a worth while project.
 
KEY POINT! Also start a new thread or re-title this one with something like "Got a free Englander & need some pointers" OR "Need help getting a moth balled Englander running"

List your stove type in the thread title so it will catch attention of others with your stove who can help you better. Good Luck!
 
  • Like
Reactions: Owen1508
Thank ya sir, very much appreciated. Searching around for some information on the vacuum hose set up now. I have read a few threads on bringing it back to its original beauty, but as you said, that will be summer project once I get her running correctly.
 
Please keep in mind it may not be legal to run the stove in a garage
 
Please keep in mind it may not be legal to run the stove in a garage
X2. I install stoves in up state NY and some code enforcements allow it and some don't because of gas fumes. Check with your local
code enforcement. They may require you to put it on a pedestal hearth.
 
That's a 25-PDVC and is going to need a major overhaul before it's fired up. Check for signs of rust-out (holes due to rust) in the firebox and the exhaust path, also check the exchanger pathways for rust-out area's, you don't want hot embers being blown into the house / area your heating.

If in doubt with any serviceable part, replace them, if in doubt of shell condition of the stove do not fire up the stove until it has been fixed (welded) in that regard.

Wash the stove down, check it over, do this at least three times (3), remove all electrical parts beforehand, you need to wash / clean off all grease / oils. Sand down any rust spots / areas, then repaint the stove with high temp matt paint (black or any colour of your choice).

The tubes, they connect to the safety switches (vacuum switches x 2), one goes to the fire box on the left as you look in the back of the stove (behind the room blower), this tube then connects to the vac switch that's mounted above the room blower. The other tube connects to the top of the exhaust fan housing and just above that there is the other vac switch.

These tubes are made of a rubber type material that's rated to be heat resistant, but dries out and cracks over time.

Depending on the year of that stove, it may or may not have the auto ignite feature.

The stoves rated BTU is 22,400.

It will heat 1000 - 1500sqft, but will struggle when the temperature outside dips below 20F, it depends on how well insulated the area that your trying to heat is.
 
UPDATE: Looking at the pictures, this is an older stove, so the vac switches will be located elsewhere.
 
Not 100% certain, but generally in HVAC vacuum switches often have a free air port to allow the inner diaphragm to move. Or its connected across a point of difference, such as the inlet of a combustion blower and the exhaust to prove flow. ESW website is pretty helpful, check under hopper lid for a serial number
 
I'm pretty sure I have the same stove (looking at your photos), and acquired under similar circumstances. Mine is an Englander 25 PVDC as CladMaster said; produced in 2000 (info was printed on the inside of the hopper lid).

Mine only has one pressure switch, like yours, and the second hose port is free, as MadMax 31 said.

I'm planning on putting mine in the basement, when I get everything figured out. I was able to test all the motors, which are working. Exhaust blower is pretty noisy but runs steady. I was then able to rig up a temporary exhaust with foil tape and rigid and flexible dryer venting, just to see if it could hold a fire. I had it running for about 45 minutes, so I figure that was long enough to go ahead and get it set up permanently.

The only thing holding me back is I can't figure out that darn vacuum/pressure switch (my stove has only one switch, actually, I think it is a technically a pressure differential switch. No matter what I do, the exhaust blower runs: with the vacuum/pressure switch hose disconnected, wires jumped, both wires completely disconnected, etc. Looking at the circuit board where the pressure switch wires connect to it, I noticed there was a small jumper connecting the two wires from the vacuum/pressure switch. I pulled this jumper off, and now the exhaust blower will shut down if I disconnect the pressure switch wires or if I create a vacuum with the pressure switch hose when it is connected to the right side port (when looking at the PS from the back of the stove). I'm just not sure if that is the way the switch is supposed to work. Looking at your photos, I see that the wires connect to the front most and rear most studs, but I think mine were originally on the two rearmost studs. Do you know if your photos are how it was originally configured, or have you played around/moved those wires?
 
There should be two vac switches. They moved them to the side at some stage, not sure when.

Mike @ ESW should be able to provide the info of the old location of the said switches once he see's this thread.

UPDATE: Found what I was looking for.....

vacuumswitch.jpg


Above ...... old location of vac switches, the new location is on the sides, one above the room blower, and the other above the exhaust fan.

In the above picture I think that the tubes are connected the incorrect way, there should only be one tube going to each vac switch.
 
Last edited:
Thanks, CladMaster, for your reply (if you were replying to me), but my stove is similar to the second picture in Jstevens101's first post (https://www.hearth.com/talk/attachments/20150118_230201-jpg.151166/). There is only one pressure differential switch, and it is mounted between the ex-blower housing and the auger motor stack. From it (the pressure differential switch, or PDS) there are two ports, the only one which seems to make a difference is the port on the right, if looking from the back of the stove. If I plug this port into the nipple on the ex-blower housing, the stove runs. If I disconnect the tube, the stove runs. If I disconnect one of the wires, the stove does not run. If I jump the connections, the stove runs. If I apply a vacuum to the tube connected to the PDS, it does not run.

Now, I know this is an older (15 yrs) stove, and its an entry level stove, but I only plan on using it in the basement occasionally (3-4 time per week, and only while someone is present) so I'm thinking I will probably just vent it and bypass the pressure switch, as it seems to be working without this safety feature. Since someone will always be around, I'm not too worried.
 
I got a free Englander stove a few months ago myself. About the same shape. Started taking it apart little by little as I get the time. My only problem right now is the exhaust fan and housing are completely rusted and I can’t get the bolts off. So I need to find a way to get them out to remove the fan. If anyone has any pointers it would be much appreciated. My plan is to replace everything that needs replaced or that I think needs replaced and then paint it once it’s running good. Then put it in my finished basement. It will be a nice addition to heat my house then maybe my Harman won’t run so much haha.
 
It may take a while but put a lil pbblaster on each nut and use a socket and ratchet to try and turn them a lil at a time. If you can find one of the wire toothbrush and hit the threads will help. Loosen then tighten add more pb, loosen then tighten add more pb etc.etc. Patients will win
 
Last edited:
The PB Blaster should do the job, but if it doesn't, I used to get good results with a product called Kroil.