Englander IP burn pot degrading

  • Active since 1995, Hearth.com is THE place on the internet for free information and advice about wood stoves, pellet stoves and other energy saving equipment.

    We strive to provide opinions, articles, discussions and history related to Hearth Products and in a more general sense, energy issues.

    We promote the EFFICIENT, RESPONSIBLE, CLEAN and SAFE use of all fuels, whether renewable or fossil.
Status
Not open for further replies.

mchasal

Burning Hunk
Jul 10, 2008
225
Hudson Valley, NY
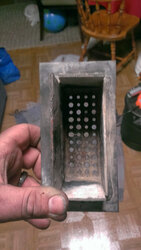
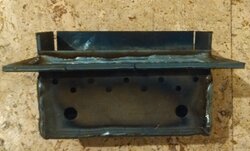
On the 2nd year with my Englander IP and my last cleaning revealed an unhappy burn pot. Hopefully the pictures show what the problem is, got some perforation between some of the holes in the bottom and some warping. I've noticed the warping for a while, but the holes are newly observed.

Obviously I need to order a new one, but I'm wondering if there's a problem here. I don't think it's normal to go through a burn pot in 1.5 heating seasons.
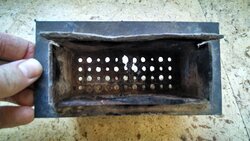
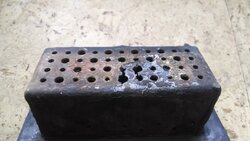
2015-01-10 09.31.33.jpg 2015-01-10 09.31.10.jpg

I've been seeing some increased buildup in the pot with this year's batch of pellets and I have a suspicion that that has caused the bottom of the pot to "bake" under a thick layer of ash that may be the cause, but hoping to tap some of the insight here (hey @stoveguy2esw :) ) if that's a reasonable conclusion. It's been pretty cold and I haven't turned the oil on, so the stove has been working pretty hard.

I've ramped up my cleaning a bit to keep the burn pot buildup under control, so I'm hopeful that will address the issue in the short term.

Thanks in advance
 
Something must be in the pellets these days - I just found the same issue on my last clean out with regards to the perforations on the bottom. The pot on my PAH looks almost exactly the same as that one you have. My PAH is a refurbished stove I bought from AMFM energy. It was originally manufactured in 2011, I just bought it factory refurbished this November. I've only put about 1.5 tons through mine so far. I do run it wide open 18-24hrs/day, but I also make sure it's clean every day, including a removal and scraping of the burn pot. It looked like a new burn-pot, so I don't think I ended up with an old one or something, although I don't know exactly what refurbished means, so I guess anything is possible. As my stove is in warranty I'm going to be giving Englander a call for a replacement - it's not bad now but that's just going to continue to open up over time now that it's started.

PAH Burn Pot failure.jpg
 
Sorry to hear you're having the same issue (but glad I'm not alone) Please post back what you hear from ESW. Curious if it's a known issue or anything and if the newer pots are any different. Are you getting burn pot buildup as well?
 
Sorry to hear you're having the same issue (but glad I'm not alone) Please post back what you hear from ESW. Curious if it's a known issue or anything and if the newer pots are any different. Are you getting burn pot buildup as well?

Typically I do not get any significant build-up. To me, that's a tuning/air-flow issue. The last two weeks I had begun to get a slow buildup over a 24hr period, the stove would start out good, but then swing rich after a few hours of running and no amount of tuning could bring it back stoich. I had one incident where I loaded up pretty bad and black smoked the door/inside quite a bit. I cleaned the stove out and the vent pipe. It still ran funny after that, so yesterday I did a full plates off cleaning and used a soft hammer against the wall of the heat exchanger. I was able to get a very large volume of ash/soot out of the heat exchanger, and now the stove is running top notch again.

I'll let you know what I learn from Englander, I'm going to try giving them a call in a little while. It's been on my to-do list for a few months now as this stove has had a rattle-y convection blower since day one, and now with the burnpot issues it's time to handle that stuff while it's under warranty.
 
I had the same thing on my EP, bought a new pot this year. Old one had a few cracks between the holes but I welded them up and reinstalled the pot last week. My stove will be only 3 years old this month and I typically dont get too much build-up in it unless I'm running it full tilt.
 
Cheap azzed burn pot?
 
Just an update - I submitted a warranty claim via Englander's website. I received an e-mail last night from their technical support indicating they were shipping out a new burn-pot and convection blower. That was quick work on their part, so I can't complain. I didn't gain any insight into why this happened to the burn-pot so soon - hopefully Mike will get in on this conversation and shed some light on what might have caused this.
 
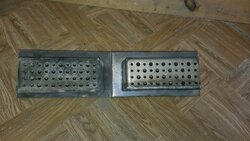
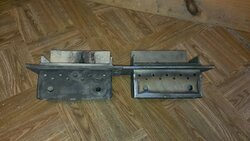
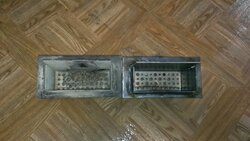
Here is another update with some interesting findings. I received my new burn pot and convection blower Thursday morning. I gotta say, that's good service, warranty claim on Monday night, new parts Thursday morning. I decided that I'd do some comparison on the original burn pot to the replacement pot, and then see what performance differences I noticed. I've attached a couple of pictures and I'll share what I see here. Overall they are very similar, holes are punched in the same pattern, same number of holes. The old pot is just slightly deeper overall. The holes on the new pot are just slightly larger (1/16"-1/32") at every hole. I'm not sure how to account for this, other than maybe my original pot was punched out when the punch was very worn, and this new pot had a fresh punch that yielded larger holes. 1/16" doesn't seem like a lot, but times something like 60 holes and that's not insignificant.

Once I light the stove up with the new pot I learned this new pot definitely runs leaner than the old pot. Previously on the highest heat setting, with the Low Base Air maxxed out at 9 I could run the Low Fuel Feed trim at a 3-4 and maintain a clean burn. With this new pot I can run the Low Fuel Feed trimmed up to 5-7 with a clean burn. I didn't leave it on 7 because I was heading out of the house for a few hours and couldn't watch it, but it's been running on 5 now for about 12 hours and shows no signs of building up at all. Glass is still clean (well, no black soot, only ash) and I'm still getting lean surges (where the fire burns down below the top of the pot) so it looks like it'll tolerate trimming to 5 well, I'll probably try 6 tomorrow and see if it'll take that.

I also noticed that my old burn pot must have been bleeding a little air around the edges of the pot - it would always push the ash away from those edges. It was just a tiny bit, but I always wondered if just a little air was escaping there. With this new pot I get none of that, ash lays right over that edge of the burn pot to the cradle without any pushing away. So, all in all it looks like this new pot definitely performs better than the old one, which is exciting to say the least. I'll probably clean up the old pot and see if I can do some small touch ups to the holes and get it breathing how it should. It would be nice to have one I can have soaking while the other is running, for easy clean ups.

New vs Old 25-PAH burn pot 1.jpg New vs Old 25-PAH burn pot 2.jpg New vs Old 25-PAH burn pot 3.jpg
 
  • Like
Reactions: mchasal
I also noticed that my old burn pot must have been bleeding a little air around the edges of the pot - it would always push the ash away from those edges. It was just a tiny bit, but I always wondered if just a little air was escaping there. With this new pot I get none of that, ash lays right over that edge of the burn pot to the cradle without any pushing away. So, all in all it looks like this new pot definitely performs better than the old one, which is exciting to say the least. I'll probably clean up the old pot and see if I can do some small touch ups to the holes and get it breathing how it should. It would be nice to have one I can have soaking while the other is running, for easy clean ups.

View attachment 150931 View attachment 150932 View attachment 150933

That could of been the cause IMHO
 
For any still following along, I've got the new pot on order, but I think I discovered the root cause. The tail of the window gasket had come loose at some point and was hanging free enclosed in the door frame (meaning not visibly). That left about 20% of the glass edge unsealed which is obviously a problem. Some of the issues that I may have attributed to the pellets seem to be the result of this air leakage, which is probably not a big surprise. I've replaced the window and the door gaskets and now see a much sharper flame with more active ash ejection and no excessive buildup in the burn pot.

I was a bit too quick to attribute the changes in the flame to the fuel source, so I'll have to remember to be more diligent about that in the future.

Thanks for all the input.
 
  • Like
Reactions: Owen1508
Glad to hear that you've found the root of the issue and that it's cleared up your problems. Do us here a favor and report back if you find any significant differences between your old burn pot and your new one. I'm still blow away at the difference I've experienced with my new burn pot. I believe the combination of better sealing around the pot and just slightly enlarged holes has provided me with a much cleaner burn. On my old burn pot, I can run for about 24hrs on the max heat level setting with the LFF trimmed to 3 before I start to get build-up and a degrading burn that requires attention. With the new pot, I can run for 48hrs+ (I stopped my test there and did my standard clean-up) with the LFF trimmed to 6 and I still had a clean burn, althought I think I was right about to the point where it was going to start to turn dirty. I can probably trim the fuel up to 7 and go 24hrs, that'll be my next test. It's important to me to get that stove as hot as I can, as it's servicing my whole home essentially. The difference in the stock trim setting to a setting of 6 is nearly 40*F output, as measured by a magnetic "stove temp" thermometer at the exit of the heat exchanger. In real world terms, it's the difference between being able to sustain the house at 15*F ambient outside vs 25*F outside.
 
  • Like
Reactions: mchasal
How thick is that steel? It must be border line too thin. My Whit has the original burn grate from 1990.
 
Here's a picture of my parent's dirty burnpot out of their IP. It has started to split in the front.
1add2e8e394cd541c6d729e1b9742d04.jpg

Geez! Do you know what year that stove is? I'm just wondering if there was a bad batch of metal along the way. My original burn pot with the metal failure was circa 2011. We'll see how my 2014 pot holds up.
 
Mine has gotten thin in the same spot, it seems to be where the main body of the flame hits that guard, or maybe pellets hit it as they drop and that adds up over time?
Maybe it is borderline thickness, not sure. I would assume ESW has figured that out, but I do realize this is not a Cadillac stove, so there may have been some compromises made for cost. I'll put the calipers on the new pot when it arrives and see if there's anything to glean there.
 
Geez! Do you know what year that stove is? I'm just wondering if there was a bad batch of metal along the way. My original burn pot with the metal failure was circa 2011. We'll see how my 2014 pot holds up.
Manufactured August 2013 I think and installed in November 2013 if I remember correctly.
 
Well, got the new pot today, and it's different. The skirt on the front does not extend up past the sides. That's different than what I have now, and what everyone here has posted, included the recent warranty replacement by @acammer. Not sure what to make of that.

2015-01-23 19.23.33.jpg

I measured the steel thickness with calipers and I get about 0.117" for the pot body, which looks to be 11 gauge. The pot flange is 0.172", which is around 7 gauge.
The holes in the bottom do look a bit bigger. The larger are 0.248" and the smaller are .172"

Haven't shut down to swap it out yet, but will update with info from the old pot when I do.
 
Interesting. I see on their website that the do have two versions - on that matches the one I received, and one that looks like what you have. I"m not sure what the difference there is, I'm guess it has something to do with directing the flame up and away from the glass, but that's speculation. Definitely let us know how she burns with the new pot. I'm still overjoyed with the performance I have now - I've been able to increase my output significantly, and I can go two days between cleanups, probably longer but I like to keep it tip top. I'm going to weld up the old pot and do some tinkering with airflow next season once this stove goes out of warranty. If I could get both pots to perform the same it would make clean-ups a snap.
 
For those that were interested in this thread before - my second (new/replacement) burn pot has also failed. That makes 2 in 4 months, the second one lasting only 30 days. Here is a LINK to the new thread.
 
I commented on your new thread. You are giving the fuel bed too much oxygen,,,
 
Status
Not open for further replies.