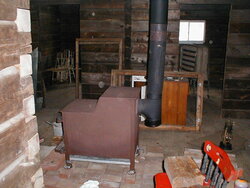
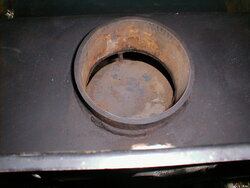
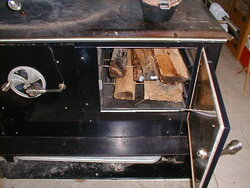
I'm redoing the pipe from the stove to the snout inside the thimble. Doing this to increase my distance from the masonry wall. I read that the male end should go into the stove back. This to allow and liquid to drain back into the appliance. I can't seem to get the 6" pipe to go into the stove to allow this process. I can get the pipe to go over the stove back exhaust port. Am I missing something? I'm trying to use Ventis black 22 gauge welded seem pipe.
mama bear stove pipe conneciton
- Thread starter pontiacgta2002
- Start date
-
Active since 1995, Hearth.com is THE place on the internet for free information and advice about wood stoves, pellet stoves and other energy saving equipment.
We strive to provide opinions, articles, discussions and history related to Hearth Products and in a more general sense, energy issues.
We promote the EFFICIENT, RESPONSIBLE, CLEAN and SAFE use of all fuels, whether renewable or fossil.
You are using an out of date browser. It may not display this or other websites correctly.
You should upgrade or use an alternative browser.
You should upgrade or use an alternative browser.
- Status
- Not open for further replies.
Older stoves used 6 inch OD pipe for the outlet, newer stoves use 6 inch ID. So yours will measure the wall thickness smaller than 6 inch. If you have a hand pipe crimper, overcrimp the end smaller to fit. It's not a big deal to slip it over the stove connector since it would only drip any condensate formed in your pipe back down. The chimney flue is the area that would drop below 250* causing condensing of water vapor. So it becomes more critical in a flue that would drain all the way down from the top and leak out. You're going to stay well above that temp in your pipe leading back to the stove.
Here's a case where the flue could drain back to the stove, so I use a T preventing any fluid from leaking out an el at the stove connection.
 Makes a much better, stronger fit than inside.
Here's a case where the flue could drain back to the stove, so I use a T preventing any fluid from leaking out an el at the stove connection.
 Makes a much better, stronger fit than inside.
Last edited:
johnstra
Feeling the Heat
Coaly - is that single or double-wall T? I bought a DuraVent single wall T and it does not fit over the collar of my Grampa Bear.
Single wall. Fits just snug on the 6 inch older thin walled flue. Material for the older first ones was specified 6 inch OD X 12 Ga. steel 5 inches long.
The newer stoves are thicker.
I've measured lots of the materials the flue (pipe outlet) was made of. Drawings for the 8 inch Fireplace Series specify .125 thickness X 8 inch OD X 3 1/2 inches long. The outer dimension specifies 7.990 + - .020 inch.
Of course steel suppliers vary, and if a supplier didn't have what you needed, they may substitute a thicker more expensive material to keep production moving. So one trick was to keep some from an order that may be oversize in case a hole cut in the steel plate was out of round or a little large. The hole could be trued up larger to use a larger diameter pipe saving the time to replace entire back or top plate. I have one with 1/4" thick well casing !

Okay my next issue has arisen. I had a piece of pipe made to go from a female 6" down to a male 5 11/16”. Pipe fits well into the stove now with a male end. The issue now is getting the snout into the 6" female Ventis pipe. I have crimped the snout and the Ventis pipe starts to go over and then stops about 1/2" into the Ventis pipe. The pre-drilled hole in the female end of the pipe doesn’t even make it past the crimps. I have read on an old post from 2011 someone with a similar issue but never posted his fix. One person recommended cutting a slit in the snout 1.5" deep to allow the male crimped ends to squeeze in further to allow the female end to go over it more. Is that a good idea? The snout is 14" back in the masonry wall and removing the tee is not possible as its secured in place with a granular cement insulation product. Open to ideas.......
I see no harm in slitting it if hand crimpers don't allow you to over crimp the male end enough. Pry outward to bend the crimped end out to keep it more perpendicular with the pipe wall. Otherwise it will get tapered as you make it smaller.
Thanks coaly. It amazes me the difficulty I always encounter when trying to do things the correct way. You think I should make the slit at the 3 or 9 o’clock position or 11 and 1? I thing 6 or 12 would not be good idea.
Last edited:
I don't think it matters. If it was a flue pipe all the way from the top, leading fluid back to the stove, anywhere but the bottom. But in the case of a T, any drip is going to go down the T and not sideways into your pipe anyway. I'm more familiar with Dura-Vent that makes an adapter to go from single wall pipe into the ceiling support box or T. They snap in, and don't come out easily without a lot of wiggling. It doesn't sound like you could get sideways movement to get it back out, with it in that far.
Okay got the stove hooked back up and running. Had to turn the pipes female towards the stove. Replaced the snout since i tore up the old one trying to make it work. Replacing the snout wasn't as bad as i thought it was going to be, wasn't easy either though. May do a male male adapter at the snout to stove pipe connection to get the male end into the stove will see.
I installed the baffle as Coaly mentioned in another post. Just curious what people are running at. I can get 4 splits in and run 600 stove top with 1 turn on each air inlet. It also only needs small adjustments to increase or decrease stove temp. I'm still getting a good amount of smoke in the box and out the chimney pipe. Should i be concerned about a good amount of smoke running at 600 degrees? Wood is seasoned oak.
I installed the baffle as Coaly mentioned in another post. Just curious what people are running at. I can get 4 splits in and run 600 stove top with 1 turn on each air inlet. It also only needs small adjustments to increase or decrease stove temp. I'm still getting a good amount of smoke in the box and out the chimney pipe. Should i be concerned about a good amount of smoke running at 600 degrees? Wood is seasoned oak.
I run one turn open normally with the brown Mama Bear pictured above in my cabin. Little more or less depending on heat required. How much you have to open intakes depends on chimney. Closing pipe damper too much will cause smoke as well. I have an insulated Dura-Vent 6 inch and smoke clears up as it comes up to temp. Once past mid burn when you have more glowing logs and coals than out gassing wood, you should be able to close the damper farther and be smokeless.
You may see a certain amount of water vapor that looks like white smoke too. Especially with colder temps. That usually dissipates in the air not far from the chimney unlike smoke.
When you say seasoned, how long ago was it split, and does it have wagon wheel cracks in the ends?
You may see a certain amount of water vapor that looks like white smoke too. Especially with colder temps. That usually dissipates in the air not far from the chimney unlike smoke.
When you say seasoned, how long ago was it split, and does it have wagon wheel cracks in the ends?
Not sure when the wood was split. It does have cracks and almost all of it has no bark, however, it's not gray. Get my moisture meter delivered one day this week. Then i will test it and see how dry it is. There is moisture in it and will stop sizzling after about 20 minutes.
Is there any issues with laying some pieces of fire brick on top of the baffle? I will make sure not to block the 6" vent, since i have the baffle laying on the little shelf under the vent. This should help keep more heat in the burning area.
Is there any issues with laying some pieces of fire brick on top of the baffle? I will make sure not to block the 6" vent, since i have the baffle laying on the little shelf under the vent. This should help keep more heat in the burning area.
Key word sizzling. No way is it dry enough. Seasoning time starts when split. It needs to be undercover with air circulation all summer to be ready. You can shorten seasoning time by stacking criss-cross fashion to allow more air through and keep it in the sun - top covered only. Keep it off the ground on pallets or lengthwise runners.
Gray color is just from sunlight, not an indication of moisture. Split wood seasoning undercover won't gray. If you can find some dead wood ready to burn, stand yours on end around the stove to force dry it for a couple days to about a week. Any sizzle is the sign of moisture present and it will quench the combustion zone. Cooler combustion temps = incomplete combustion. That is your smoke. The baffle and brick raises temperature. Higher moisture in wood is easier to get rid of, since the lower the moisture level, the more BTU it takes to remove it. It has to do with wood being hygroscopic, meaning it bonds with water requiring extra BTU to break the bond. So you can remove a high percentage of it fast with heat and air circulation between pieces around the stove.
The only problem with bricks on the baffle is the extra weight on the shelf it rests on. If it gets to near glowing it will bend down. If the baffle fits back against the rear wall it's strong enough, but it can't be supported on the edge and carry extra weight.
Mark in VA
New Member
If you decide to re-do the pipe with the male ends down and you're looking for a double female adapter, either of these will work well. I've used both, and personally prefer the one from Woodman's, as it fits very snug over the stove collar and also accepted the male end of the 90* elbow a little better than the Duravent version did. It makes a very solid connection.
http://www.woodmanspartsplus.com/751129/products/Fisher-Stove-Adapter.html
http://www.woodheat.com/media/catal...ab33525d08d6e5fb8d27136e95/1/6/1672-small.jpg
Mark in VA
http://www.woodmanspartsplus.com/751129/products/Fisher-Stove-Adapter.html
http://www.woodheat.com/media/catal...ab33525d08d6e5fb8d27136e95/1/6/1672-small.jpg
Mark in VA
Thanks Coaly for the advice on drying out the wood a little quicker. I bought it mid fall this year, the guy said it has been dead standing for to years and freshly cut and split. From what you said and other reading this evening need to get it dried out more. I have it sitting in the garage in a round ring. I'll bring in some and place around the stove to heat up. It will at least help but wont be the best. Looking at getting dry seasoned wood and will place the meter on it before having it dumped. If it's above 20% I'll ask for it at a lower cost. Any issue with me sealing up the gaps on the side and around the little shelf with furnace cement to seal it off around the baffle better? Again thanks for helping me learn the proper way of running this stove.
Leakage around baffle is fine. Matter of fact it's good to have some since you can end up with stagnet movement in the corners. You want the hot gasses touching the firebox corners increasing their contact with every square inch of firebox they can before exiting.
When you check with a meter, split and check on fresh split face, not the ends.
If it was standing dead, that dries fast. I split and burn after a month criss cross stacking. That's all I burn unless I get storm damaged trees. I always bring in a days worth and keep it around the back of stove. If a storm blows moisture into the stack, I cheat with a few in the open oven.
 That oven runs 300 to 350 with door closed while heating the house without turning the oven on. So it's dry by the time it's needed. Heating with a big cook stove has so many advantages.
When you check with a meter, split and check on fresh split face, not the ends.
If it was standing dead, that dries fast. I split and burn after a month criss cross stacking. That's all I burn unless I get storm damaged trees. I always bring in a days worth and keep it around the back of stove. If a storm blows moisture into the stack, I cheat with a few in the open oven.
 That oven runs 300 to 350 with door closed while heating the house without turning the oven on. So it's dry by the time it's needed. Heating with a big cook stove has so many advantages.
Very cool, so with the drier wood should be able to close the air inlets more and maintain a longer hotter burn.
Yes, you are using the BTU available in the wood to remove the moisture, reducing the usable heat.
Moisture inside the wood does many detrimental things;
Moisture that is evaporated consumes heat so temperature rise is slower. Moist wood is a better conductor of heat than dry wood, so a larger amount of energy conducted on the surface spreads to the interior, slowing charcoal process on surface. Water vapor passing through the charcoal layer reacts with charcoal producing carbon monoxide and hydrogen. This reaction uses more heat energy. Water vapor that does leave the wood, dilutes combustible gasses making them difficult to burn.
- Status
- Not open for further replies.
Similar threads
- Replies
- 12
- Views
- 2K
- Replies
- 20
- Views
- 733
- Replies
- 17
- Views
- 866
- Replies
- 12
- Views
- 2K

