Just the mantel, please.

  • Active since 1995, Hearth.com is THE place on the internet for free information and advice about wood stoves, pellet stoves and other energy saving equipment.

    We strive to provide opinions, articles, discussions and history related to Hearth Products and in a more general sense, energy issues.

    We promote the EFFICIENT, RESPONSIBLE, CLEAN and SAFE use of all fuels, whether renewable or fossil.
Status
Not open for further replies.

purduephotog

Member
Jan 28, 2015
6
Rochester NY
Freedom bay. Bought after reading reviews here.

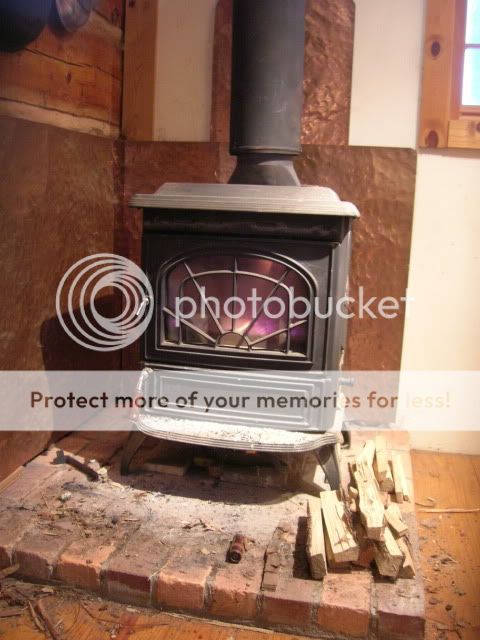
I showed up at my inspector to ask question and it turns out that the original installer never pulled a permit. Needless to say, I've been scrambling to ensure everything is to code.

That, however, is not why I'm asking this question. As you can see there are four square holes in the surround that I would like to patch, hopefully with something a little more interesting or less permanent than mortar and brick.

This was a heatilator insert and I stuffed them with rock wool. Part of the inspectors review will be to make sure I have the proper clearances.

Are there any covers y'all have used? I can set something with silicone or mortar but I'd prefer it be removable.

Any idea is welcome.

(Hi, BTW, I'm new)
 
IMG_20150128_165004.jpg
Fireplace insert in question
 
Can't see because there's no photo==c

PS - must have posted the photo the same time I wrote my response;lol
 
tiles could be affixed there or metal or any non combustible material You could mortar them silicone them or fabricate clips or use masonry anchors or any number of options what look are you hoping to achieve?
 
Welcome to the forum. I can't see in your photo what the floor is made of in front of your hearth. In most instances you need at least 16" of non-combustible material in front of the stove/insert. Your brick hearth extension looks to only about 12" from the stove door. Might want to get that checked before your inspection. Good Luck.
 
I also have a lopi, it is just a freedom but basically the same stove. That mantle does look a bit low. Have you downloaded the owners manual? That will solve a lot of your questions on the install clearances. I had to modify my mantle so there was no overhang before my installer put it in. I too plan on redoing my entire fireplace with new brick this summer, and I will be raising my mantle to a safe level.
 
That looks very similar to my set-up. We had an inspection done when we bought the house and we had the seller add tiles to the floor to meet the 16 inch requirements. Also the bottom of my mantel is too low, though somehow was missed by inspector. I need 32 inches of clearance without a heat shield. With one its 19 inches. I've got 22 and have been keeping a close eye on it until I either buy a shield or alter the mantel. The owners manual is very easy to find online and has all this info.
 
Sorry all I removed the extension on the floor for cleaning. It's smooth 12" of tile on hardi board... Weighs a ... Well I found some vertebrae in the ceiling after moving it.

E what I'd love is some sort of silicone gasket that I can push a compass rose into and twist to lock into place. That would let it be serviceable but not leak air.

Sounds like custom all the way which is pretty much what I expected. I can chisel out the old mortar to get a good solid base to match.
 
There really is no reason you would need to get in there i would just brick them up personally. But regardless you can just seal behind what ever covers you use with foil tape of silicone in some sheet metal they you can use what ever cover you want with out the need to seal it. It seems like you are over thinking it
 
You know how these old hardware stores had ceilings of tin? Back in 1915 they had decorative tin squares for the ceiling.
You could get something like that in bronze or brass.
 
  • Like
Reactions: MN nice n warm
My insert required that the old heatilator vents remain open.
 
Another trick you could use is to make copper plates. Get a sheet of copper, cut squares to fit the holes. You could hammer the copper, this really looks good.
Lay the copper square on a big thick board, and hammer every square inch of it with a ball peen hammer.


MtMitchellSnowGFI018.jpg


Here is a hammered copper heat shield for my little Waterford stove. Copper is easy to work with.
I really like that Copper idea.

Turns out the wife is pregnant so this has taken a back seat. Unfortunately I spend 1 to 2 week a month on the road for the AF... Time crunch.

And you are right I am totally over thinking it. I'm like that.
 
You know how these old hardware stores had ceilings of tin? Back in 1915 they had decorative tin squares for the ceiling.
You could get something like that in bronze or brass.

Lowes in my area has a good assortment of these. Maybe coming back in style or were just that far behind here;)Some pricey, some not so much but you wouldn't need much of it anyway.
 
Turns out the wife is pregnant

Turns out! LOL. Has a way of changing the priority list of certain projects. On one hand a low dollar and fast but effective fix seems more likely now than skipping off to a big project like building a crib.
 
Kids always move to the top of the priority list ;lol Congrats. Whatever fix you choose, better get a move on now before the fun begins.
 
Status
Not open for further replies.