Out with the old, in with the new!

  • Active since 1995, Hearth.com is THE place on the internet for free information and advice about wood stoves, pellet stoves and other energy saving equipment.

    We strive to provide opinions, articles, discussions and history related to Hearth Products and in a more general sense, energy issues.

    We promote the EFFICIENT, RESPONSIBLE, CLEAN and SAFE use of all fuels, whether renewable or fossil.
Status
Not open for further replies.

Studdlygoof

Member
Jan 26, 2014
136
Elkton MD
Had a small 4'x4' trailer I used to haul my wood around the yard with my john deere 318. The kid and I were bringing a load of 5' log rounds back to my wood pile last weekend and as I crossed a small dry creek on my property I heard one of those loud "not so good" pops from the trailer. After unloading the trailer I found that the pop was my leaf spring bracket ripping away from the frame. I definitely had overloaded the trailer a bit; however, the real culprit of the mechanical was the fact that the entire frame had rusted away to practically nothing. After finding three more supports broken I decided it wasn't worth salvaging and made a call to the local weld shop and bought some tube steel to fab up a new trailer.

While I was a little upset to see the old trailer go, there were a few modifications that I wanted to incorporate into a new trailer so it wasn't a total loss. My old trailer had flimsy sheet metal sides to it that would bluge when loaded with full loads. The sides were also welded in place so larger loads would not be centered over the axle and would hang out of the back. Several times I had a little too much weight cantilevered off the end of the trailer that I actually popped the hitch off the ball of the tractor. Now I know some people are probably shaking their heads at the things I put that trailer through, but now you'll understand why I incorporated some new ideas into the new trailer.

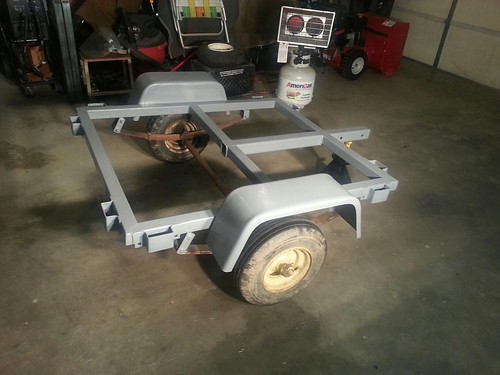
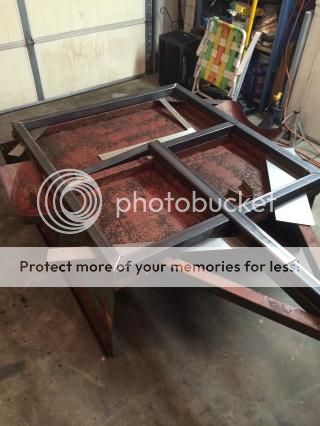
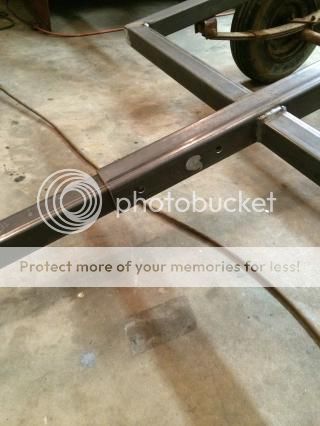
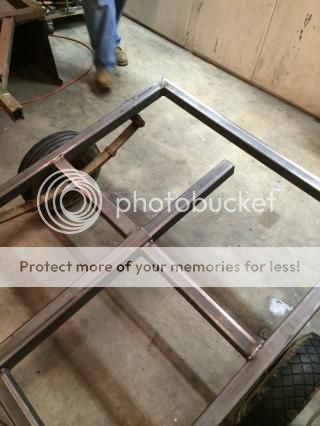
I was thinking about building a tandem axle trailer like my neighbor uses to haul firewood to help balance out some of my longer loads. When cutting wood I like to leave my log lengths as long as possible and then bring them home to finish cutting up when time permits. The thing I don't like about tandems though is that when making sharp turns it tends to turf up your grass. I remember one time seeing a boat trailer at a boat launch that had a slip hitch that allowed the user to shorten up the length of the tongue of the trailer when not towing a boat, but pull it out when needed. This same concept would help me when trailering my logs to the back in a smaller trailer. By pulling out the tongue, I would move my wheel base back, centering it up on the load and cutting down of the cantilever action applied to the hitch. I used 2" square tubing 1/8th inch thick for the frame of the new trailer, but in the center of the trailer I used a piece of 2 1/2" square tubing as a receiver for the tongue of the trailer. By drilling holes in 1 foot incriments I am able to move the axle of the trailer an additional 3 feet by removing 5/8" hitch pins.


I also added stake body pockets to all 4 sides of the trailer to allow me to use any configuration of siding that I wanted. I also have plans to make poles that would insert in the pockets just for hauling logs. The fenders were purchased from a local hardware store but lacked the sheet metal backing that most larger trailer fenders had so I cut sheet metal blanks and spot welded them on the inside to help keep water kicking up inside the trailer

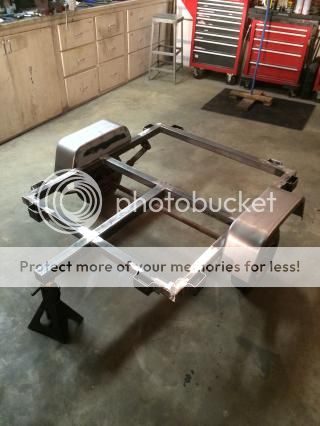
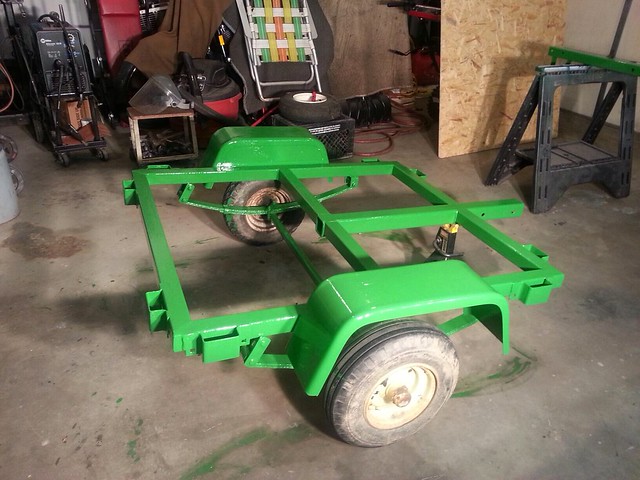
I'm currently in the process of priming and painting the frame now. Then 5/4 wood decking on the frame and siding.

This trailer is defiantly way over engineered, but for the amount that I spent on it I couldn't have purchased one of those cheap angle iron carts they sell at the Big Chain stores that are "as is" as far as options. I have plans on possible incorporating some sort of dump body and removable boom hoist that will help me haul rocks and other cumbersome objects around the yard. Will post more pictures as I come around to getting more done as time allows. Any suggestions / comments would be appreciated.
 
Lookin good, you could make some bucks at selling prints to DIY that thing.
 
I want to learn how to weld. I'm jealous of your fabrication skills, and have nothing constructive to add other than that frame looks a good deal beefier than that axle. What's the rating of those leaf springs?
 
The only potential problem I can see is that telescoping hitch. What with dirt and grit inevitably building up inside, and sitting there in the rain for a year at a time without getting moved, I can foresee that getting froze up. I would completely slather that with grease before final assembly, and maybe adding a few grease zerks along it so you could pump in more grease.
 
Nice job and being pulled behind your John Deere it should give many years of service.
 
What's the rating of those leaf springs?
I'm guessing that the leafs are around 1000 each. The axle is definately my weakest point in the chain
The only potential problem I can see is that telescoping hitch. What with dirt and grit inevitably building up inside, and sitting there in the rain for a year at a time without getting moved, I can foresee that getting froze up. I would completely slather that with grease before final assembly, and maybe adding a few grease zerks along it so you could pump in more grease.
Anyone who has fought with a frozen hitch in their truck can appreciate this. I had to go to town once with a torch and hydraulic ram to get one out once. While the fit is a bit looser than that of a truck hitch, it would definitely benefit from some grease. I really like the zerk fitting idea. Thanks a lot guys!
 
Looks good brother, I'm a little jealous. +1 on the grease zerks, a few pumps every now and again never hurts. As a heavy equipment operator, one of the first things I learned is "grease is cheaper than parts" and it's true haha! How much you figure you have into it?
 
Make sure you post some after pictures..... Looking forward to seeing them.....
 
Got the primer coat on now. Being that it's 20 something degrees out, it's taking forever for the paint to dry.


Next coat will be a coat of John Deere green. Eventually I plan on replacing the tires and then I figure I'll paint the rims yellow then. They got a couple more miles on them though so for now they'll stay as is
 
Wanted to ask your guys opinion on the decking for this trailer. I decided to go with 5/4 deck boards. The boards I got today from the local HS are still pretty wet as is any board you get from them. My plan was to mount them to my frame with 1/2" carriage bolts; two in each end totaling 4 per board run. After seeing my total was $200 for all my hardware and bolts I about fell over considering I had paid about the same in metal to build the entire trailer! (This solidified my notion of building a log mill one day!) With the boards being as wet as they are I had already planned on decking the boards with the crown of the end grain facing up. Two bolts in the ends would definitely minimize warping, but I was wondering if I cut down on the number of bolts I use to one in each end I could cut my hardware costs in half. I'm just worried by going that route I put a weak point in the wood by drilling a hole in it right in the middle of where it will warp and encourage the ends to split. Do you think I would be alright or just bite the bullet and put two bolts in the end like I had already planned. I'm kinda leaning towards two bolts in each end I think.
 
Go the extra cost and buy marine plywood, outlast any wood your thinking on using

Jeff
 
Go the extra cost and buy marine plywood, outlast any wood your thinking on using

Jeff
Yeah I thought about this route. I plan on using this trailer for hauling rocks and gravel to build a cobble stone path through some wet spots in the yard. While the marine plywood would outlast 5/4 decking in the weathering department, I don't think it would last as long against abrasive wear.
 
I had my marine decking on my trailer for 15 years setting out in the weather full time, hauled a lot of quarry stone and wood, wood only faded from UV with a few fine cracks being the worst

Jeff
 
A few thoughts . . .

As others said . . . marine plywood would have been a good option (I've had marine plywood on my snowmobile trailer and it's subjected to everything the outdoors throws at it -- sun, heat, rain, snow, etc. -- and after many years of loading sleds with studs and carbides, ATVs, fire wood and other assorted items -- it's still looking good.

That said . . . sounds like you've already decided and have the boards . . . one line of thinking -- you've already paid out a bunch of money already to fix this thing up, might as well pony up a little extra money for the peace of mind and go with two bolts . . . the other line of thinking -- it's a small yard trailer and shouldn't have a ton of abuse, one bolt would probably be enough.
 
Thanks for the input fellas. It's always good to learn something new and I have had minimal experience with marine grade plywood. I did decide however to go with the 5/4 board. I already have it on hand and I kinda like the plank look. Started installing the carriage bolts this morning. I went with two bolts in each end, figured why skimp now if I'm not happy later. I'll post pictures when I'm done.
 
  • Like
Reactions: firefighterjake
Wanted to ask your guys opinion on the decking for this trailer. I decided to go with 5/4 deck boards. The boards I got today from the local HS are still pretty wet as is any board you get from them. My plan was to mount them to my frame with 1/2" carriage bolts; two in each end totaling 4 per board run. After seeing my total was $200 for all my hardware and bolts I about fell over considering I had paid about the same in metal to build the entire trailer! (This solidified my notion of building a log mill one day!) With the boards being as wet as they are I had already planned on decking the boards with the crown of the end grain facing up. Two bolts in the ends would definitely minimize warping, but I was wondering if I cut down on the number of bolts I use to one in each end I could cut my hardware costs in half. I'm just worried by going that route I put a weak point in the wood by drilling a hole in it right in the middle of where it will warp and encourage the ends to split. Do you think I would be alright or just bite the bullet and put two bolts in the end like I had already planned. I'm kinda leaning towards two bolts in each end I think.

I'd look for a place that sells bulk bolts ,by the pound.
Nice looking welds ,looks straight & square.
I have the good fortune to have a good source for new steel & anything you could need for trailer fabrication. Even then you can tie up $$$

Cheers
 
Here are some more photos I didn't get a chance to upload earlier. Got the final coat of JD Green to finally dry in this cold weather.


My father-in-law had dropped off some wood and plastic pallets for me to stack wood on the other day. There were some brand new oak ones in the pile who's cross members caught my eye for stakes to fit my stake pockets. After taking the pallets apart I found that the boards were a little to big for the pockets so I pulled out my jointer and started thinning them to fit when Murphy struck. I started noticing a slowing in RPM of the blades and then smoke from the motor. The jointer was my grandfathers and is probably as old as I am so it served its purpose, but left me in a pinch. So it keeping with the title of this thread...Out with the old


...and in with the new!


I plan on finishing up tomorrow so I'll try and get some more pictures up
 
Got a bunch of work done today and now finally have a somewhat usable trailer. Got the deck and three sides completed. All in all I'm pretty happy with it. I think I need to make my side stakes a bit longer to give them a bit more stability. My sides are plenty high enough so all I would need to do is take the bottom board off and rip it down a little so it could drop down in the pocket deeper. I saw some corner brackets for stake body sides that I want to pick up to lock my corners into each other. If I were to make my sides again I think I might cut my stakes on a slight taper to lock them into the pockets better. I'm still happy with it though and look forward to playing around with it a bit.


The best part of it though? I can now get back to hauling firewood next to this little guy!

 
Every now and then when we were supposed to get some bad weather and I was worried my wood rack near the back door would run out I would fill my cart, tarp it and park it by the back door to pull from. The tarp on it was a Wally World special that didn't hold up to harsh conditions. I've been looking online at some nicer tarps to use specifically for this purpose; one that will withstand the weather and has plenty of anchor points. The one I'm thinking about going with is an 18 oz. vinyl coated polyester tarp ( yellow to stick with the JD theme). Anyone have any negative experiences with this style tarp?
 
Every now and then when we were supposed to get some bad weather and I was worried my wood rack near the back door would run out I would fill my cart, tarp it and park it by the back door to pull from. The tarp on it was a Wally World special that didn't hold up to harsh conditions. I've been looking online at some nicer tarps to use specifically for this purpose; one that will withstand the weather and has plenty of anchor points. The one I'm thinking about going with is an 18 oz. vinyl coated polyester tarp ( yellow to stick with the JD theme). Anyone have any negative experiences with this style tarp?


I like canvas you could get a canvas tarp the size you need for about $20 . Just threw out one that lived 10-15 yrs outside & was 25 yrs. old. Got 2 more to replace it .Love canvas .Its silent in the wind

Cheers
 
Last edited:
  • Like
Reactions: Studdlygoof
I like canvas you could get a canvas tarp the size you need for about $20 . Just throughout one that lived 10-15 yrs outside & was 25 yrs. old. Got 2 more to replace it .Love canvas .Its silent in the wind

Cheers
How does canvas do with snow sitting on top of it for prolonged periods? Does it soak through?
Beautiful craftsmanship. Your kid is lucky.
thank you sir! I'm hoping he'll enjoy being out in the woods fetching wood as I do. I'm working on a divetail toolbox for the chainsaws out in the woods that I plan on passing down to him
 
How does canvas do with snow sitting on top of it for prolonged periods? Does it soak through?

thank you sir! I'm hoping he'll enjoy being out in the woods fetching wood as I do. I'm working on a divetail toolbox for the chainsaws out in the woods that I plan on passing down to him

Ya, it may seep a bit but not that much . It's good for other things. You can strap down a load. The gromets won't fail like plastic does. And it looks good on that trailer of yours ; )

Come on its $20 ; )
 
Last edited:
Status
Not open for further replies.