updating cinder block chimney and stove questions

  • Active since 1995, Hearth.com is THE place on the internet for free information and advice about wood stoves, pellet stoves and other energy saving equipment.

    We strive to provide opinions, articles, discussions and history related to Hearth Products and in a more general sense, energy issues.

    We promote the EFFICIENT, RESPONSIBLE, CLEAN and SAFE use of all fuels, whether renewable or fossil.
Status
Not open for further replies.

zebraworks

New Member
Feb 7, 2015
12
oregon
Hello,

I am realizing that I probably should update for safety the wood stove and chimney in our old farmhouse.

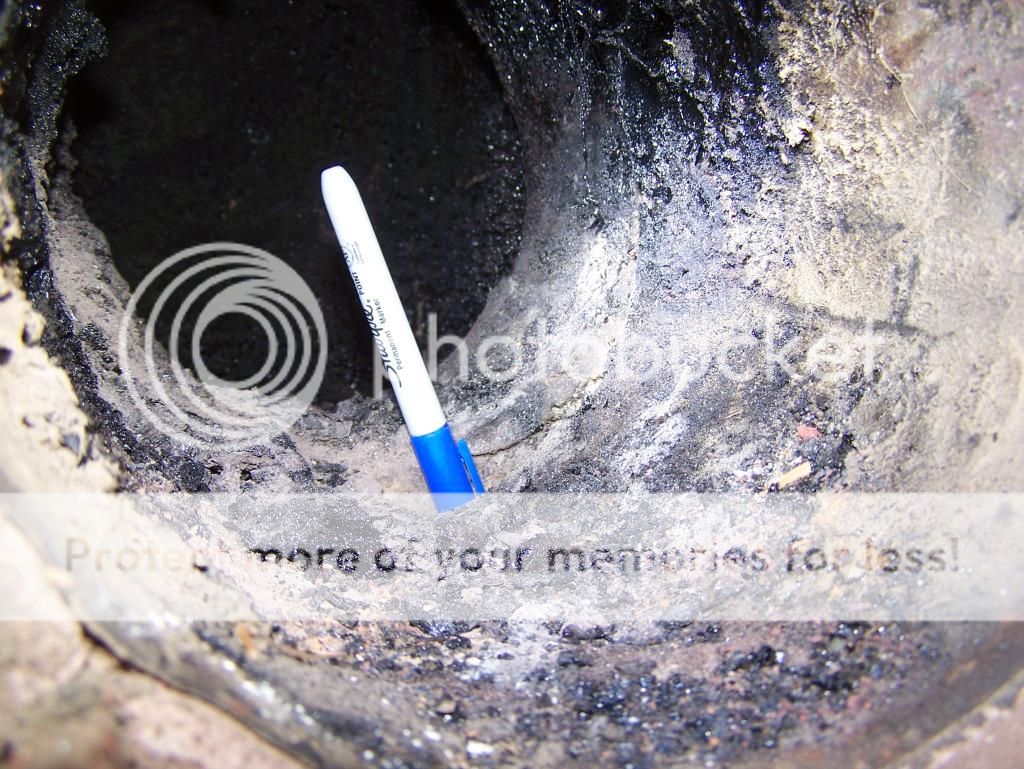
The exterior square Chimney for the single wood stove is 1pc. cinder block design (16.5 x 16.5 x12"H) aprox 30ft tall, mortar jointed together (probably round in the center and I haven't yet gone up on top to look to see if it has a cinder block or clay liner or no liner) I imagine it was new in 1963 and is spaced 1/2" (wish it was 1") from wood lap siding on house and passes through the roof eve in corner of house. there is a metal cleanout door at the bottom which was covered for years by a concrete step I removed. There is no visible cracks in the cinderblock or mortar joints that I see.

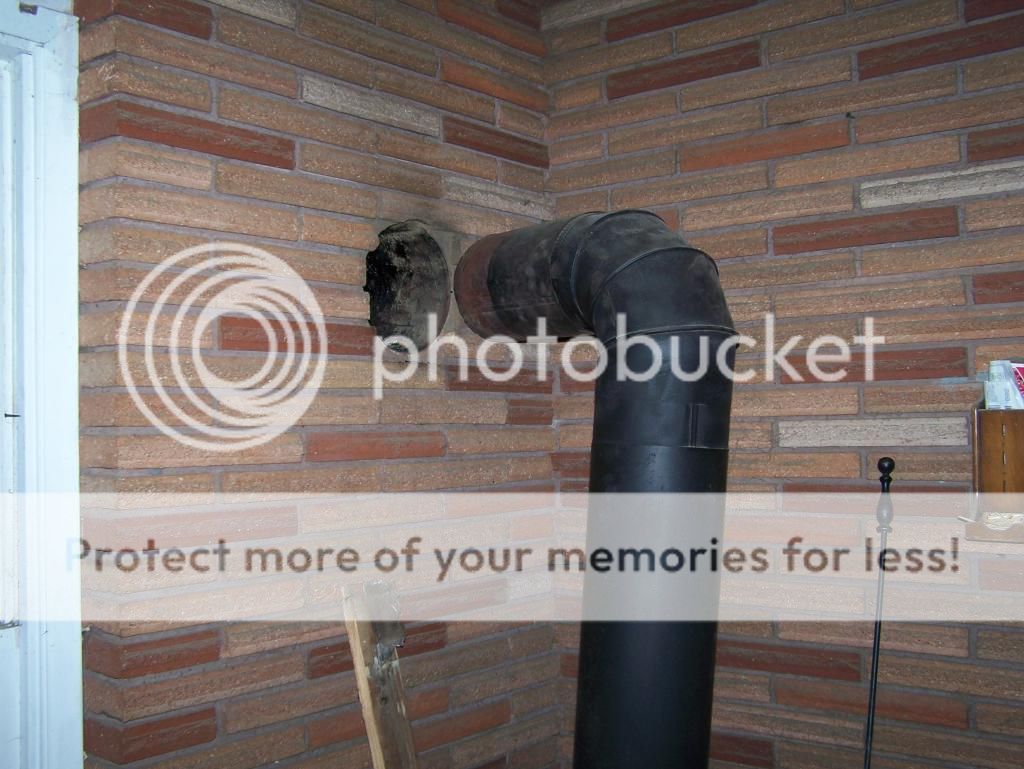
the house is standard 2x4 framing and the wood stove is placed in the corner with a brick wall (floor to ceiling) on each side and brick floor in corner (brick is spaced out from 2x4 with only 1/2" sheetrock and the thickness is 3.75"). Right now the current large size steel front load stove we use is right up against the brick on each rear corner and the 6" stove pipe goes out top and up into a masonry thimble through the brick in the wall (I can't see the spacing there as far as clearance from siding or 2x4 wall studs). current stove runs with damper in pipe and does not burn very long (oak might go 7hr at the very most but normally 3 hr on a load) so stove is very inefficient and could stand to be upgraded anyhow.

I was considering a Hearthstone soapstone front loader new last year for $1500 (hearthstone docs say it needs to be 10" on corner installation from combustible wall...it seems that brick wall without 1" air gap is a 33% reduction in distance from the NFPA clearance? would that reduce the 10" from hearthstone by 33%? so new stove corners could be 7.7" from brick instead of 10". the new stove will be much narrower to almost have the clearance without moving out much from corner.

I was thinking it may be wise to add 6" single wall stainless flue liner (especially if no liner now and since already 50yrs old and not 1" from siding probably even if it had liner?? not sure if they still use pour in vermiculite insulation to pour around liner (if insulation would be necessary) I am not being inspected but Insurance company wanted the stove updated as far as to meet NFPA installation (they zeroed in on stove clearance from brick wall but didn't say anything about the chimney.

anyone have suggestion on economical source of 30+ feet of single wall stainless pipe from internet suppliers?

thanks for any advice on this.
 
Welcome. The liner should be insulated to keep creosote build up down. A 30 ft chimney is going to draw hard. I'm wondering if a 5" liner would help reduce draft a bit in this situation?

$1500 for a new Hearthstone stove sounds low. You want to get a stove that will be large enough for the job. Which Hearthstone stove are you looking at? How large an area will it be heating?

the stove is a 2014 Castleton model that was installed 3 wks in a rental and the guy pulled it from a rental because he was worried tenants would catch house on fire (said he paid $2500, a dealer is selling same model for $1900 NEW farther from me). is 25" wide (width is important especially if I have to have 10" clearance from corner and can't take a 33% reduction in that distance in the owners manual due to having the brick surround??)

thanks for tip on why they insulate liner. yes there is a lot of draw. I will search 5" liner in comparison.
 
Reduced clearances for this stove are somewhat of a grey area. It only refers to NFPA 211 for alcove clearances and then does not specify any reduction. NFPA 211 covers unlisted stoves. A 3.5" thick brick wall does permit a 33% combustible clearance reduction - from 36" or 18". But it does not cover the case where the unprotected wall for a UL tested stove is already below the maximum clearance reduction. The lowest if covers is 66% from 36" or 12". Technically it should cover modern circumstances. These docs are dated, but they are current code. Some stove companies test for the lower clearance and publish the reduction in their clearance charts, but it appears that Hearthstone has not.

To be safe and pass inspection + insurance approval I would stick with the 10" clearance. But note that this clearance is to the drywall behind the brick and not the brick itself. So you have gained a reduction of 33% to the brick anyway.
 
I personally would not install a 5" i would go with 6" and then a damper if draft is excessive. And since you only have 1/2" clearance you need to insulate to meet code and you would want to for performance regardless
 
thanks for letting me know to measure from behind the brick (that is a huge help gaining that 3.75").

I picked up the stove. Now I will be looking into single wall stainless stove pipe and try to figure if I need to modify the current opening/thimble which looks like mortar and just has single wall welded black pipe passing through (I don't think the opening is big enough for 6" triple wall pipe unless I chisel it out.)

I will have to figure if the cinder block chimney has a liner or not and how much space I have and shape of opening. it is a straight shot down so maybe rigid is better than flexible?? then if insulation "wrap" or "pourable"

I guess they use a "snout" and "tee" to connect at bottom. interesting
 
Last edited:
Tell us more about the plan for the liner. It doesn't sound correct. There may be a better way but we need to understand the current setup. What is the current tile liner size in the chimney? Clearances in the wall to the thimble are important. Describe and/or post a picture of the current thimble including the surrounding wall area.
 
Tell us more about the plan for the liner. It doesn't sound correct. There may be a better way but we need to understand the current setup. What is the current tile liner size in the chimney? Clearances in the wall to the thimble are important. Describe and/or post a picture of the current thimble including the surrounding wall area.

yeah I just read some stuff. I have to get the extension ladder and check chimney tomorrow (weather permitting) I can open the clean out door at bottom too (afraid to see what is in there! was blocked for decades by a poured concrete stair I removed recently). My grandfather didn't recall if there was a liner or not. if it didn't have a liner but was just the cinderblocks mortared together I feel fortunate it has gone 55 years without a flue fire catching the roof or siding on fire.

I will also pull out the pipe from the wall and take some photos.

thanks
 
Last edited:
I will have to compare costs, but I could also just tear down this cinder block chimney and just use exterior mounted pipe (the chimney seems structurally fine (plumb and no cracks) but it is only 1/2" from wood siding and is not real "good looking")
 
I will have to compare costs, but I could also just tear down this cinder block chimney and just use exterior mounted pipe (the chimney seems structurally fine (plumb and no cracks) but it is only 1/2" from wood siding and is not real "good looking")
I am sure the liner will be cheaper even after you insulate it and after insulation there is no reason to worry about that 1/2' You don't need any gap with insulation. The biggest thing to check is the wall pass thru there usually is not enough clearance there
 
yeah I just read some stuff. I have to get the extension ladder and check chimney tomorrow (weather permitting) I can open the clean out door at bottom too (afraid to see what is in there! was blocked for decades by a poured concrete stair I removed recently). My grandfather didn't recall if there was a liner or not. if it didn't have a liner but was just the cinderblocks mortared together I feel fortunate it has gone 55 years without a flue fire catching the roof or siding on fire.

I will also pull out the pipe from the wall and take some photos.

thanks

Re the clean out at the bottom:

When I started the install of my Jotul F600 in our old farmhouse I found the clean out was over 8ft. below the T-snout connector. Plus the 7" clay tile prevented using an insulated liner. What I did was extend the liner down to just above the clean out door. Then I sprayed in a can full of that spray insulation to create a seal between the liner and the clay tile. I was then able to pour vermiculite down from the top of the chimney. I don't think I had more than a cup or two of creosote in each of the three years i used the stove there.
 
You may be able to see if there is a liner through the existing thimble. If there is, inspect and measure if if possible. Then we need to know what surrounds this thimble. A picture of the thimble and the area surrounding it will help us see what is there.
 
When I started the install of my Jotul F600 in our old farmhouse I found the clean out was over 8ft. below the T-snout connector. Plus the 7" clay tile prevented using an insulated liner. What I did was extend the liner down to just above the clean out door. Then I sprayed in a can full of that spray insulation to create a seal between the liner and the clay tile. I was then able to pour vermiculite down from the top of the chimney. I don't think I had more than a cup or two of creosote in each of the three years i used the stove there.
Spray foam has no place anywhere inside a chimney do not do this. What we do with a clean out is order another tee and extend the liner down to that tee at the clean out. Then pack around that tee with ceramic wool and mortar over that. Also if it has a 7x7 clay liner in it that clay needs to be removed in order to properly insulate with either wrap or pour in mix.
 
OK, I removed the pipe from the thimble area. WOW I am glad I am doing this. feel fortunate that house never caught fire. there was no solid pipe going all the way into the chimney.

I don't see a clay liner in the chimney (1/4" creosote on inside and on thimble area) the inside of chimney is 9"x9" square and chimney wall is 4.5" thick. (not sure but could be hollow area in that 4.5" depending on design of the cinder block, but in the thimble area it is solid or was filled in (except between the chimney and a block in the wall which has a 1/2" gap described below).

the thimble seems to be made by framing in a cinderblock or hand packed mortar (not sure) which is 17" square (same width as chimney) with a round hole 8" diameter in the center which has a 20 gauge seamless 8" pipe as liner (however the pipe ends at the edge of the cinderblock/mortared square which is flush with wood siding) and there is actually a gap of 1/2" between this and the Chimey (same 1/2" gap from siding all the way up the house). the holes are actually not aligned perfectly. This gap between wall and chimney is packed with creosote/ash but I could sink a 16d nail into it so it is open and not filled solid with mortar (there is quite a bit of draw as the chimeny is 23 feet higher than this thimble opening but wood siding and the wood probably framing in the block/mortar is on all sides of the cinderblock/mortar 17" squrare which is only 4.5" away from the opening where the gases/smoke flow. (I imagine that is not good at all)

I figure maybe I need to get 6" double or triple?? wall pipe as new thimble to pass through this existing cement hole and into the chimney? hopefully the T can be lowered on the new stainless single wall liner )

are the "snount" and "tee" connections made with insulated pipe? do they "twist" screw together or do they have a bolt from inside which is insulated??

6" pipe centered in 9"x9" flue is probably doable but I don't know about a T (especially insulated)
 
I stuck a sharpie in the gap which is between the 4.5" chimney wall and the 8" 20ga liner for hole.

100_5557_zpsmeycyz5q.jpg
 
That chimney is in need of a professional cleaning. It looks pretty gunked up. Lord knows what it looks like topside. I think you are correct to assume that there is little done right here and that the brick wall may be covering up more sins. There's no way we can assess wall framing clearances behind the brick. For sure a full insulated liner is going to be need here.
 
Last edited:
I figure maybe I need to get 6" double or triple?? wall pipe as new thimble to pass through this existing cement hole and into the chimney? hopefully the T can be lowered on the new stainless single wall liner )
You need an insulated liner and an insulated wall pass thru there are many companies that make pass thrus or thimbles and then your snout runs through that insulated sleeve.
 
am thinking the cinder block or cement block is framed in and held up with 2x4 as if it were a window (I show other detail here)

That is A very typical install and it is better than most i see but still not right. To do it right you are going to need to open that wall up and install a wall pass thru I dont se how there could m=be enough clearance to combustibles there.
 
You need an insulated liner and an insulated wall pass thru there are many companies that make pass thrus or thimbles and then your snout runs through that insulated sleeve.

OK, thanks...so 2pc (insulated sleeve and then snout through that? I was thinking it would be one piece. I will try to consult the parts dealer...hope I don't have to chisel hole much larger as it may cause to problem with chimney structurally.

I have to fix rotten sill below as that is why the chimney hole and wall hole don't line up (the house has settled nearly a inch (lot of weight in that corner too).
 
OK, thanks...so 2pc (insulated sleeve and then snout through that? I was thinking it would be one piece. I will try to consult the parts dealer...hope I don't have to chisel hole much larger as it may cause to problem with chimney structurally.
I have to fix rotten sill below as that is why the chimney hole and wall hole don't line up (the house has settled nearly a inch (lot of weight in that corner too).
Like i said there are allot of different ones available and you will not have to touch the hole in the chimney just make the hloe through the wall allot larger then mount the unit to the outside of the chimney
 
I don't want to cut a huge square hole in the brick wall if I can help it. but maybe that is the only option. thanks I will have to make some calls
 
Thanks for help with this. I just completed the job yesterday and am up and running. I widened the hole through brick and cement thimble for insulated pipe so I could pass the snout through. was able to connect the pipe and insulate it and then lowered down the chimney and connected it all up fine. the snout goes into the T but I didn't extend the pipe down from the T all the way to the bottom (maybe another 10 feet) the guy said if I capped the T I would just have to periodically vacuum it out? hopefully that wasn't a bad thing, it is stable with the pipe all connected to stove.

getting use to the new hearthstone stove may take some time
 
Status
Not open for further replies.