Critique my wood shed design?

  • Active since 1995, Hearth.com is THE place on the internet for free information and advice about wood stoves, pellet stoves and other energy saving equipment.

    We strive to provide opinions, articles, discussions and history related to Hearth Products and in a more general sense, energy issues.

    We promote the EFFICIENT, RESPONSIBLE, CLEAN and SAFE use of all fuels, whether renewable or fossil.
Status
Not open for further replies.

OHutton

Member
Nov 20, 2014
79
Chico, CA
www.ohutton.com
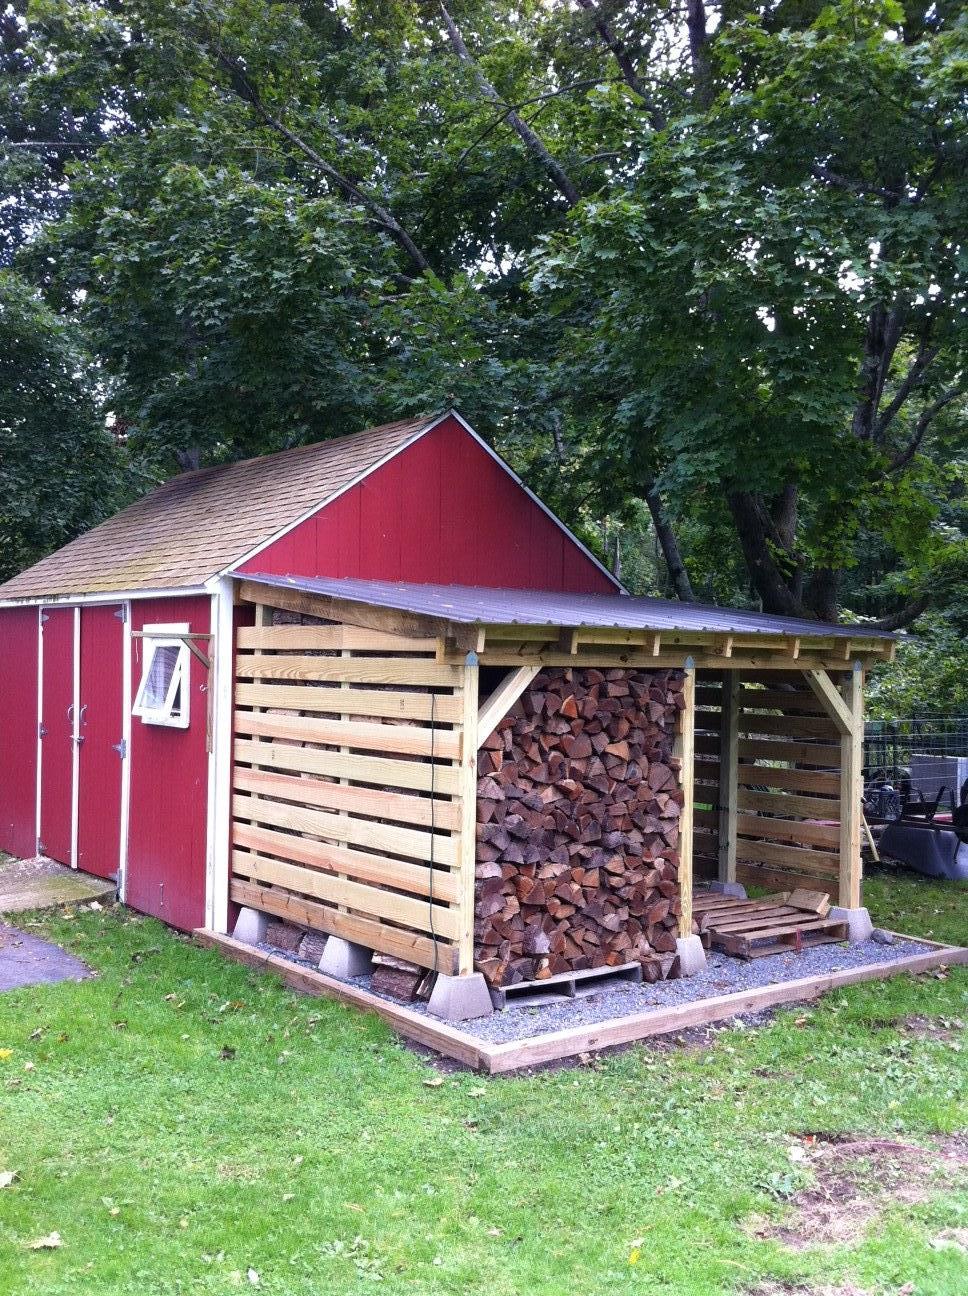
Hey all, I'm a fairly new member here and long time lurker. I thought I'd start my first thread with a little wood shed build to get things off in the right direction. I'm in the concept phase right now and I've pieced together ideas that I've liked from a bunch of other sheds that I've seen here and elsewhere online.

Please feel free to check out the photos posted and let me know what you think! I'll create a new thread and link back to this once I start the build.

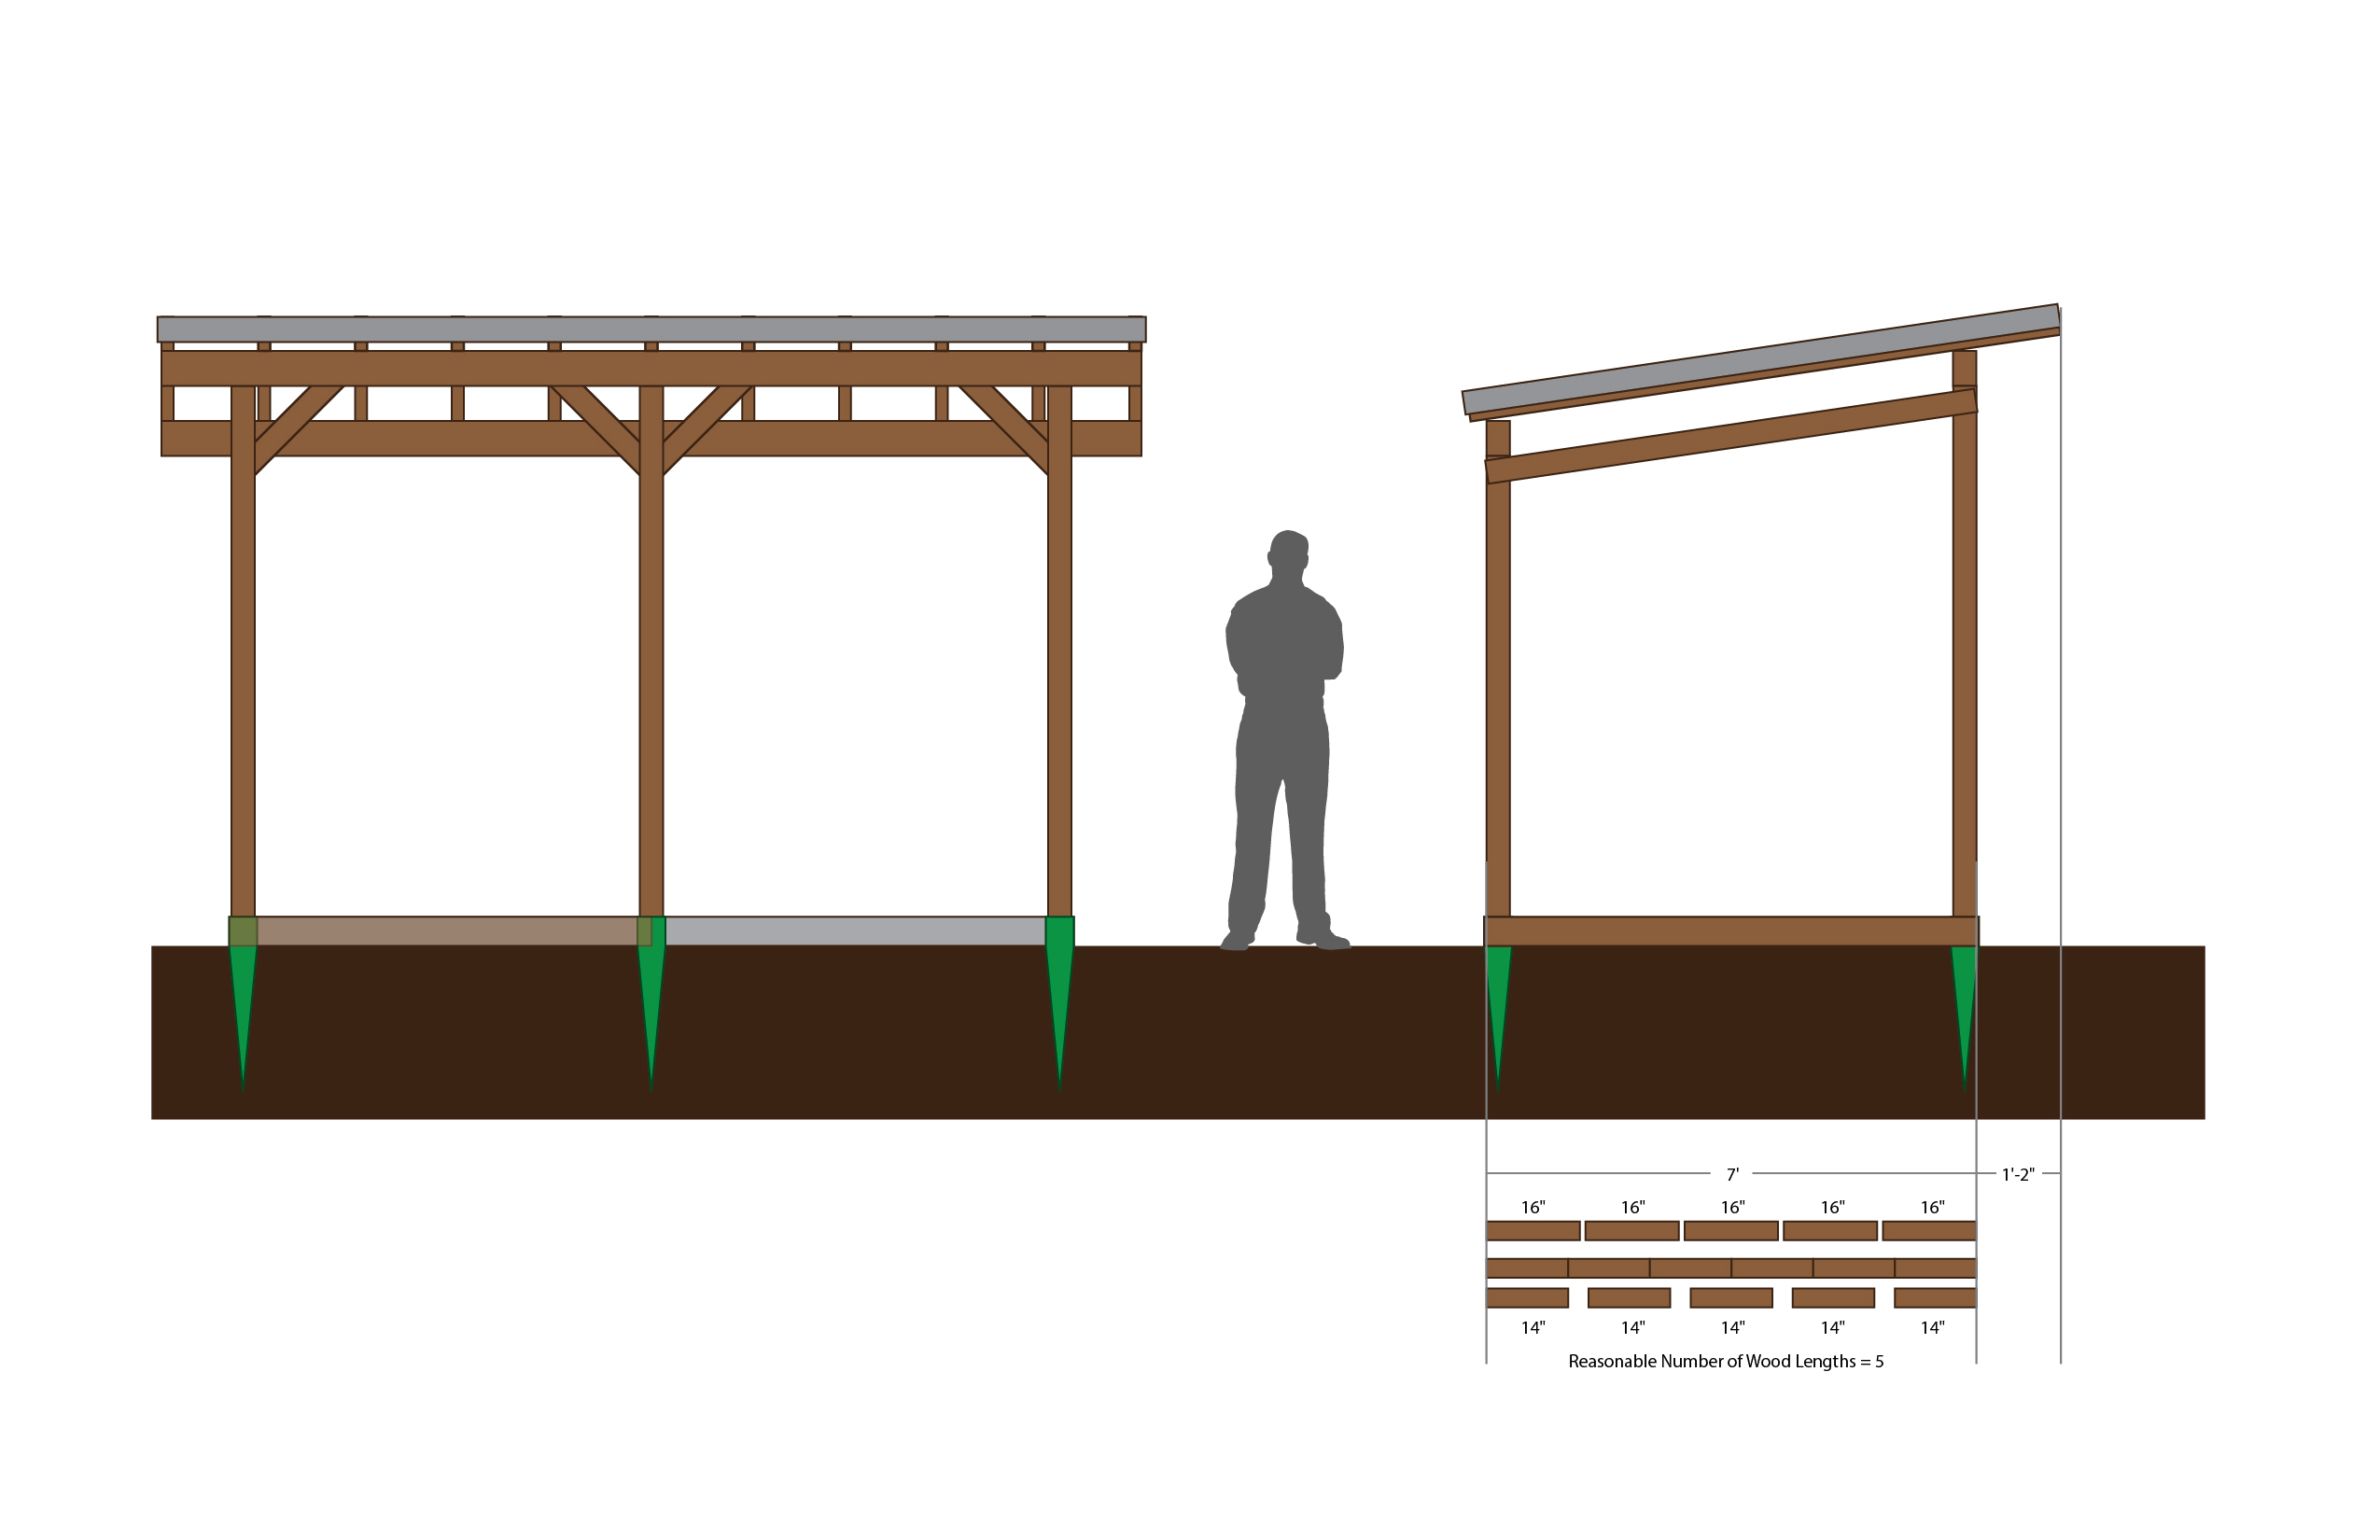
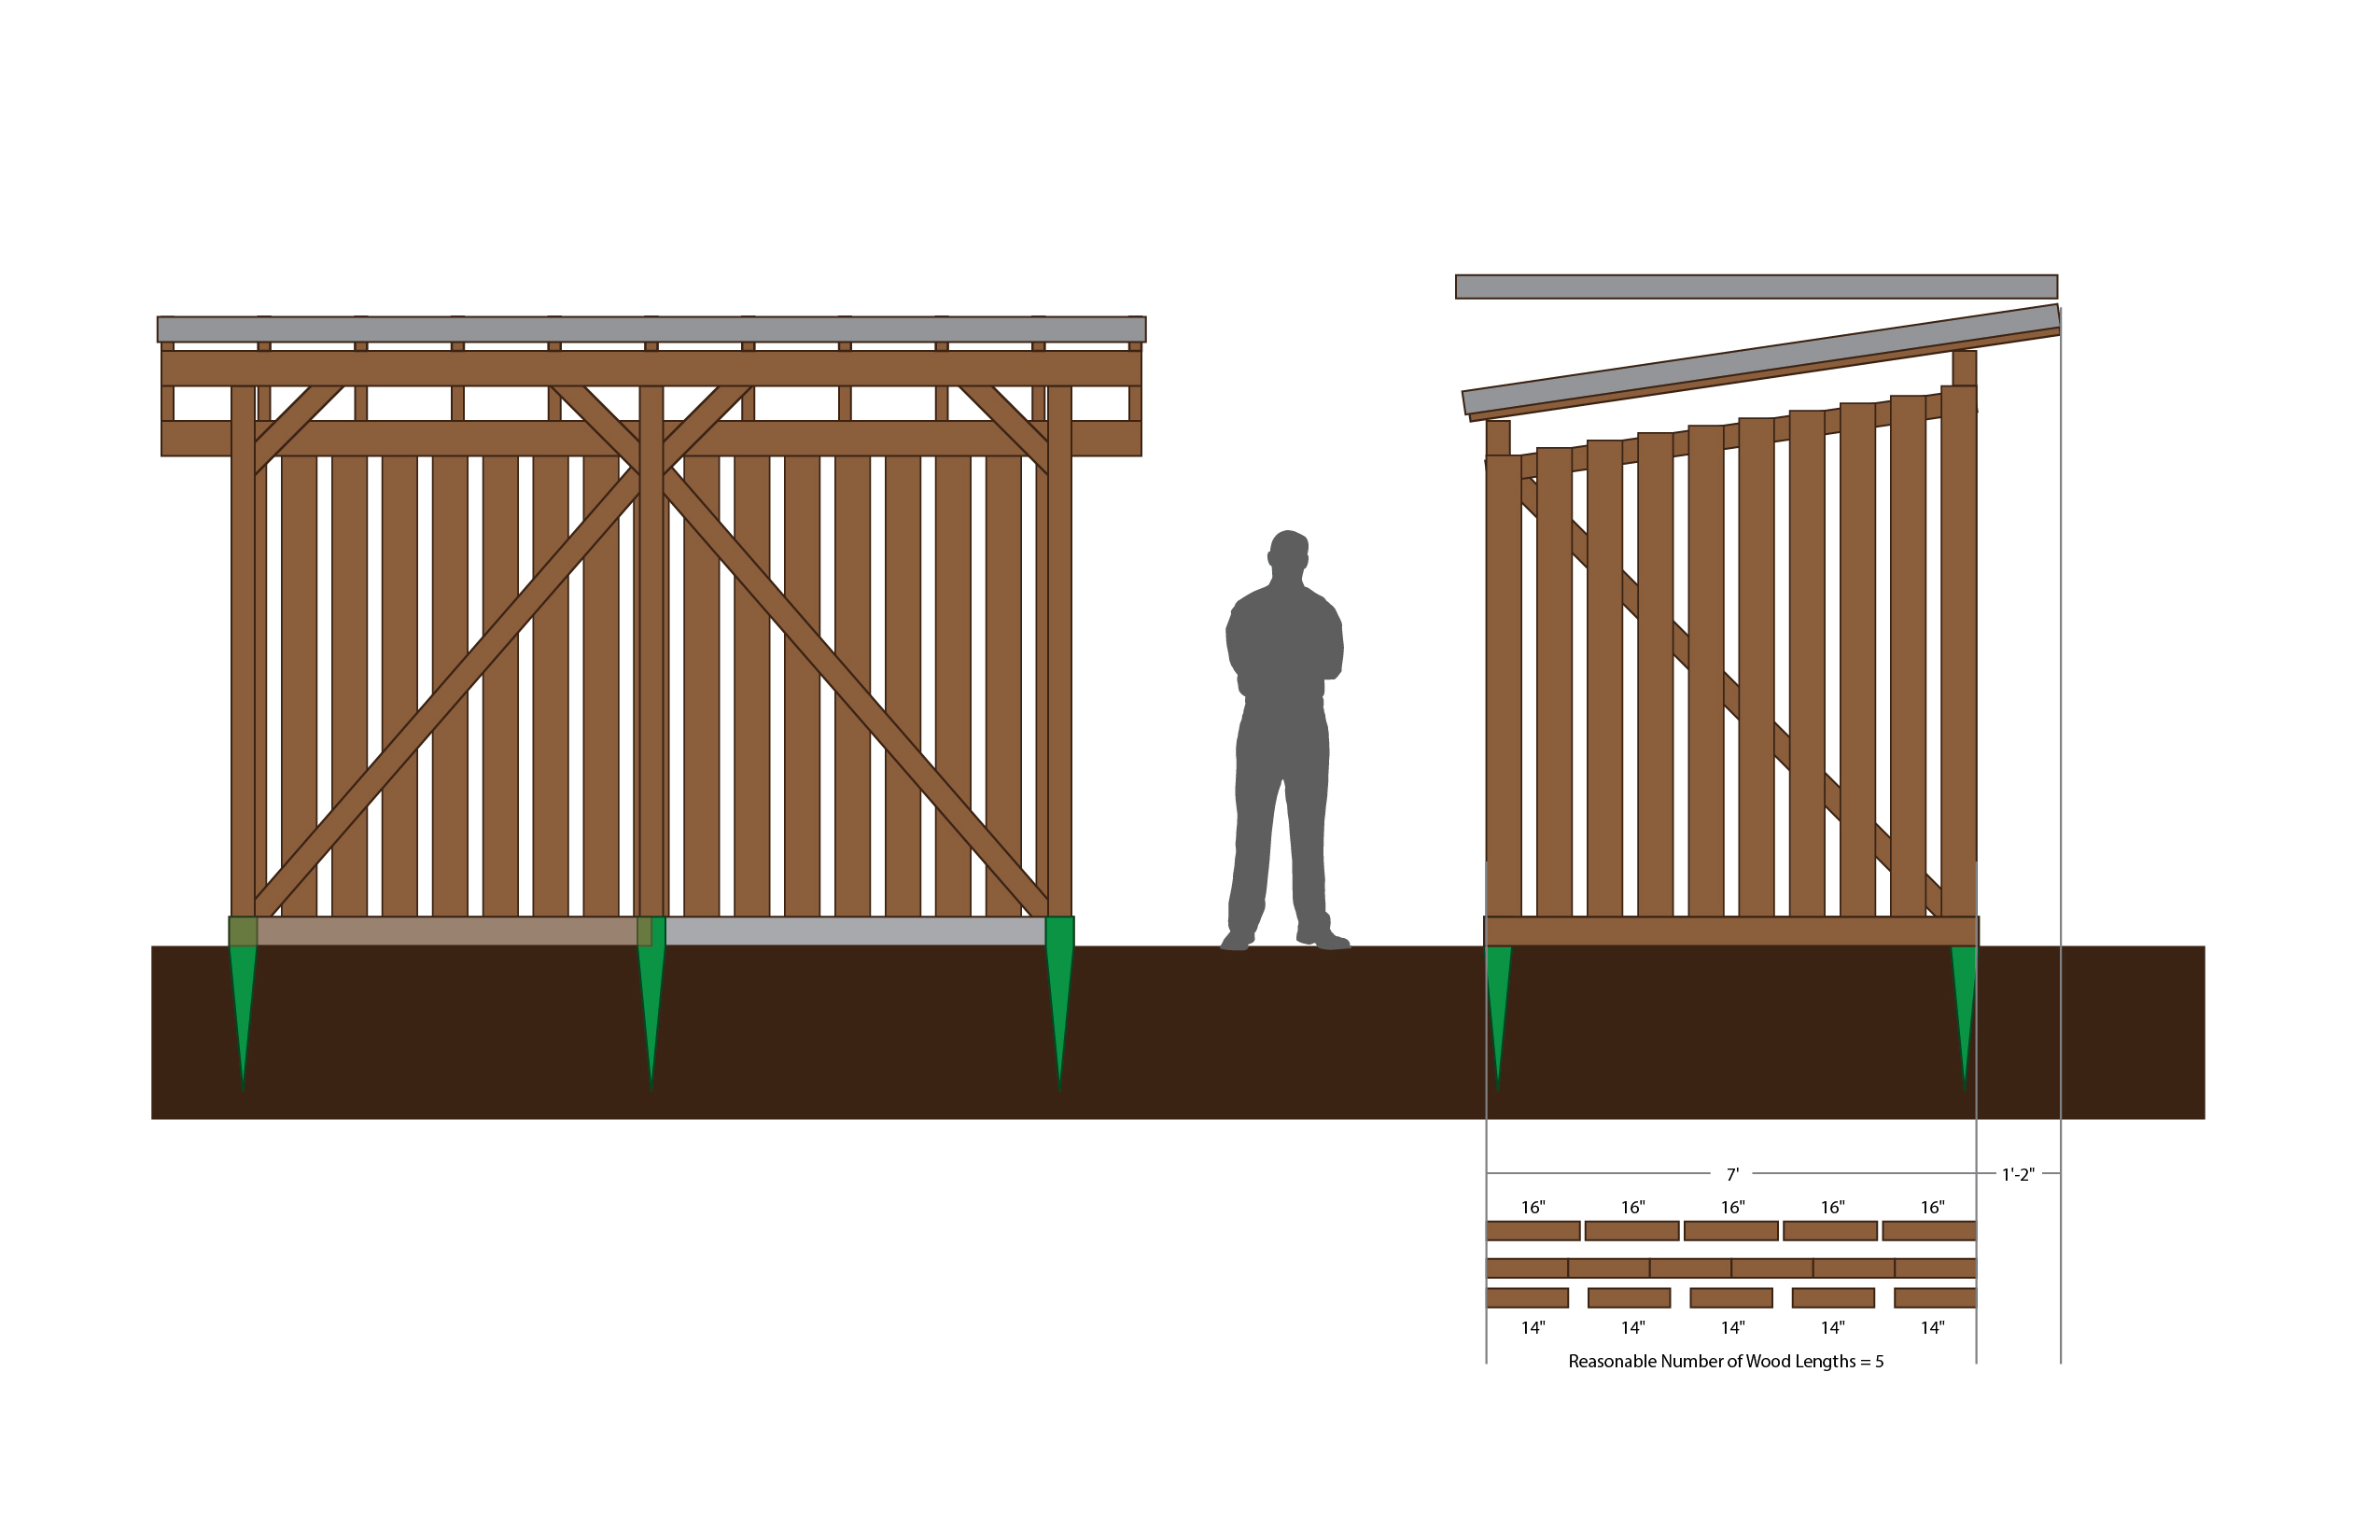
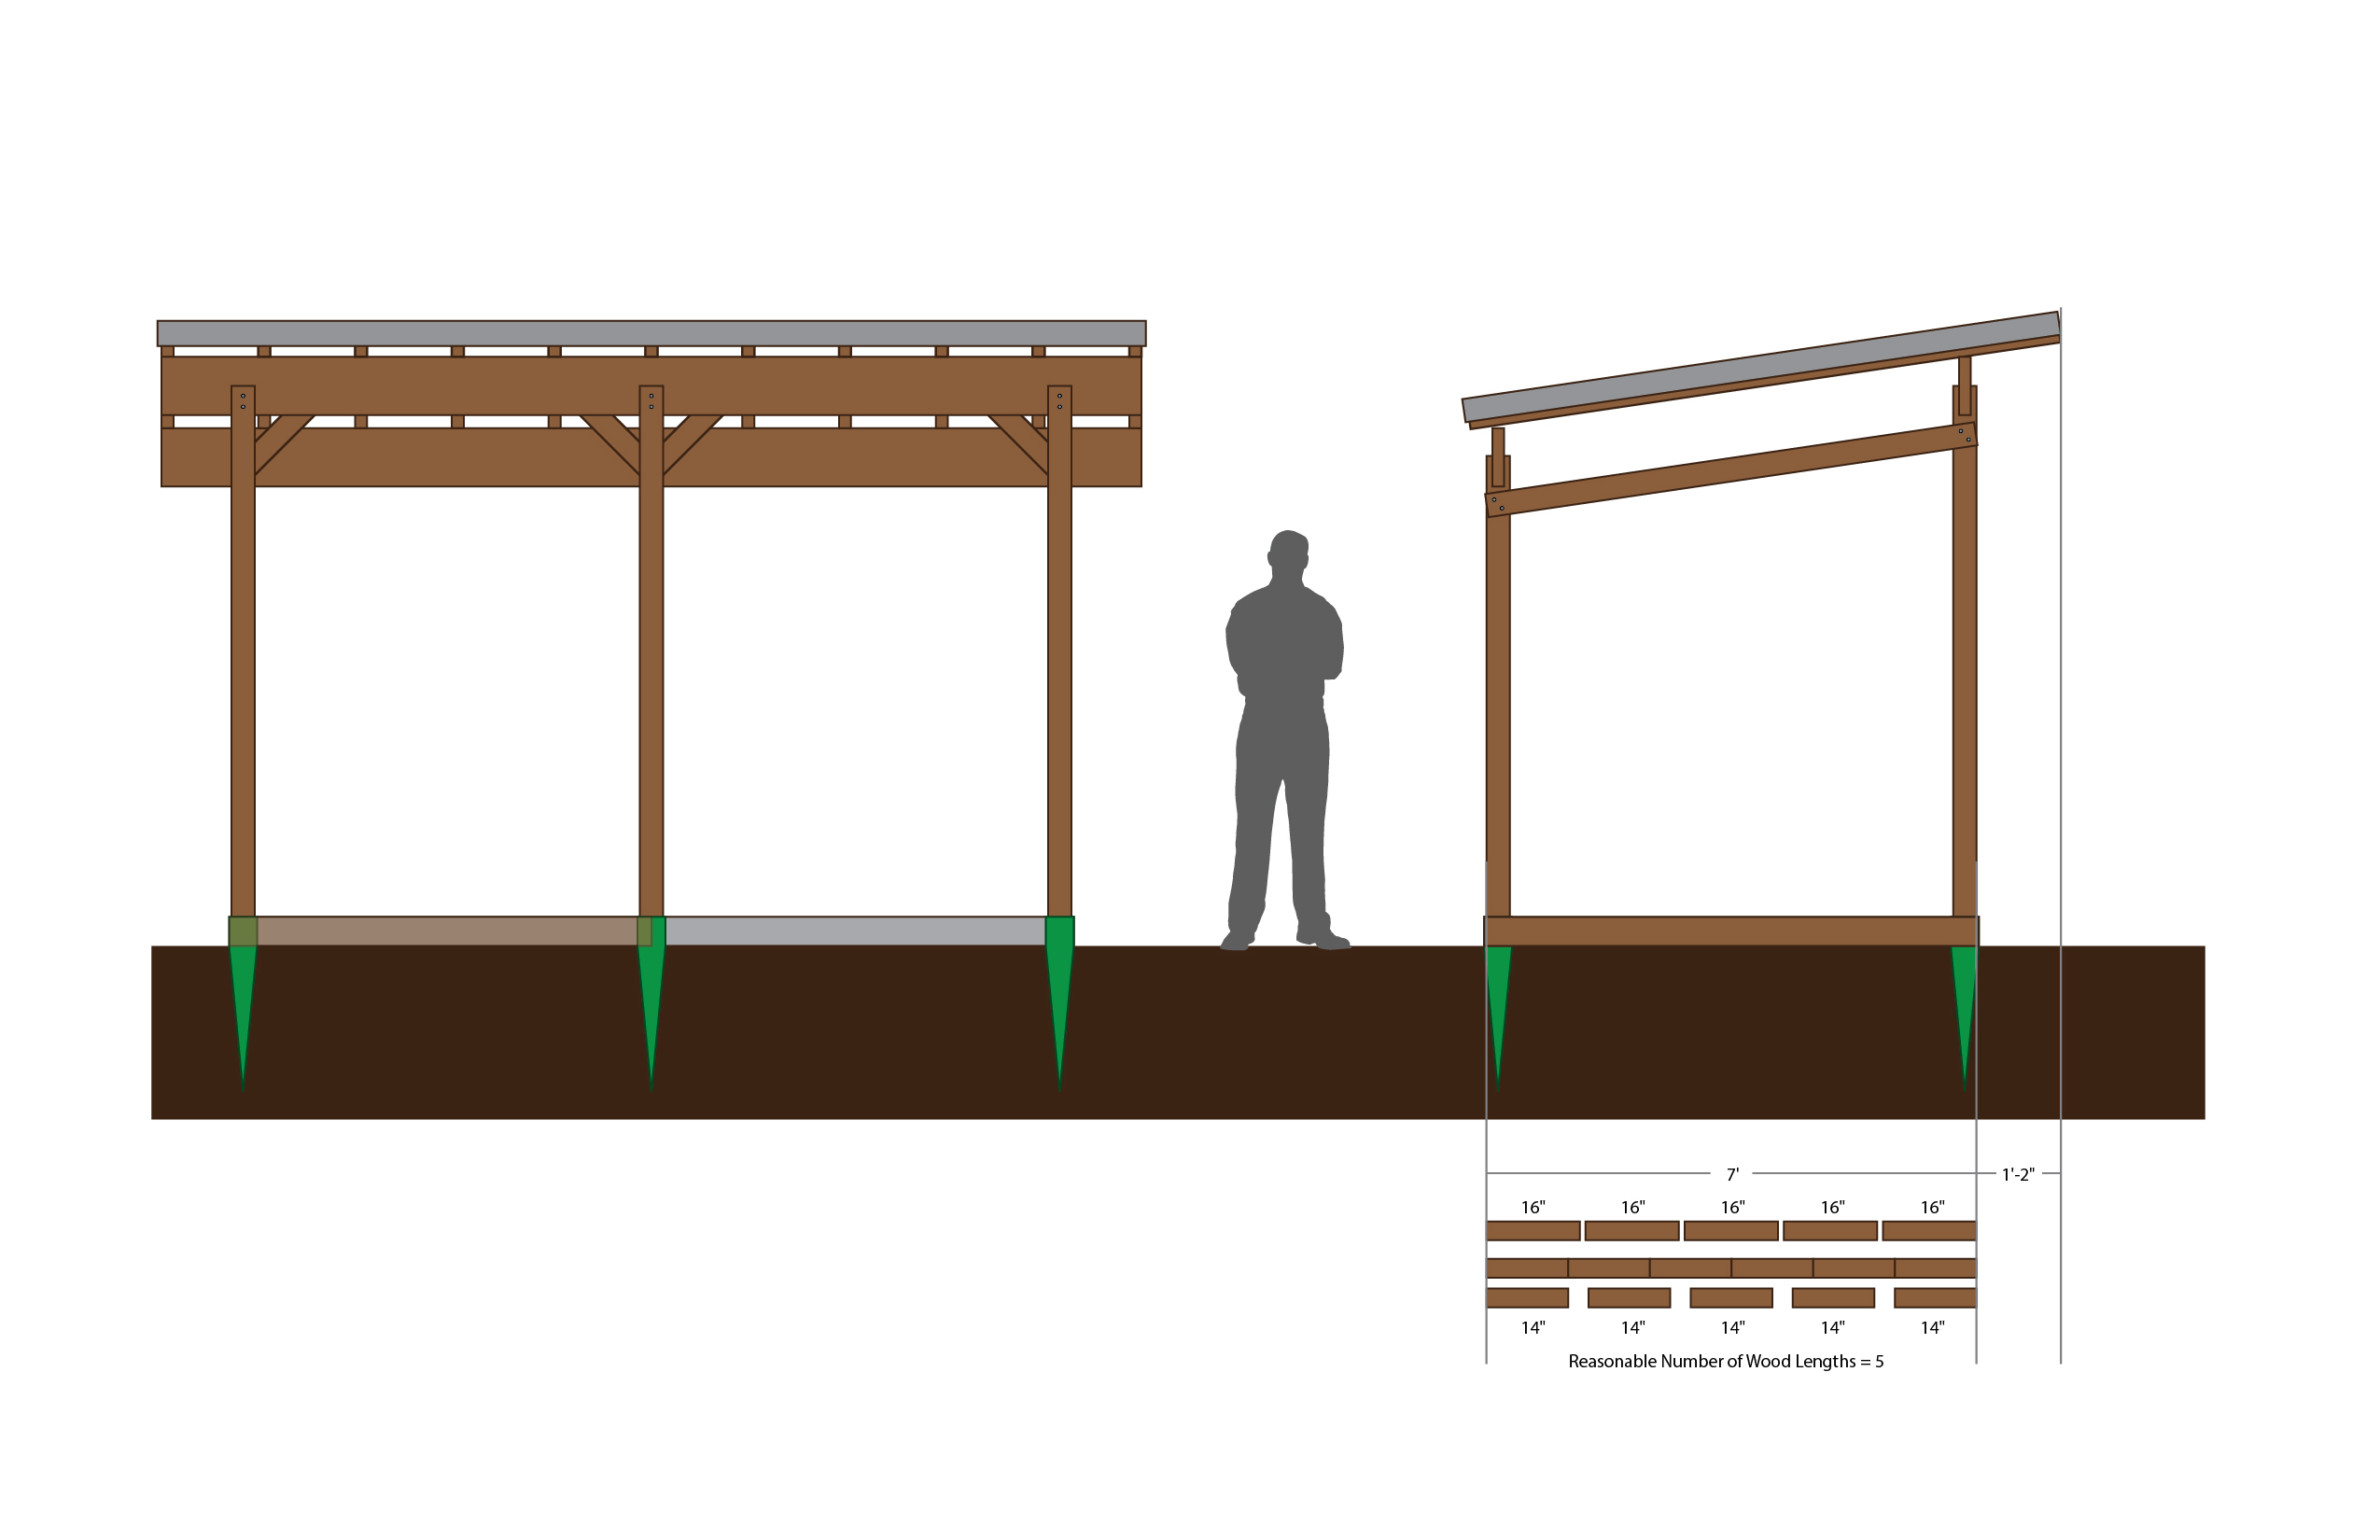
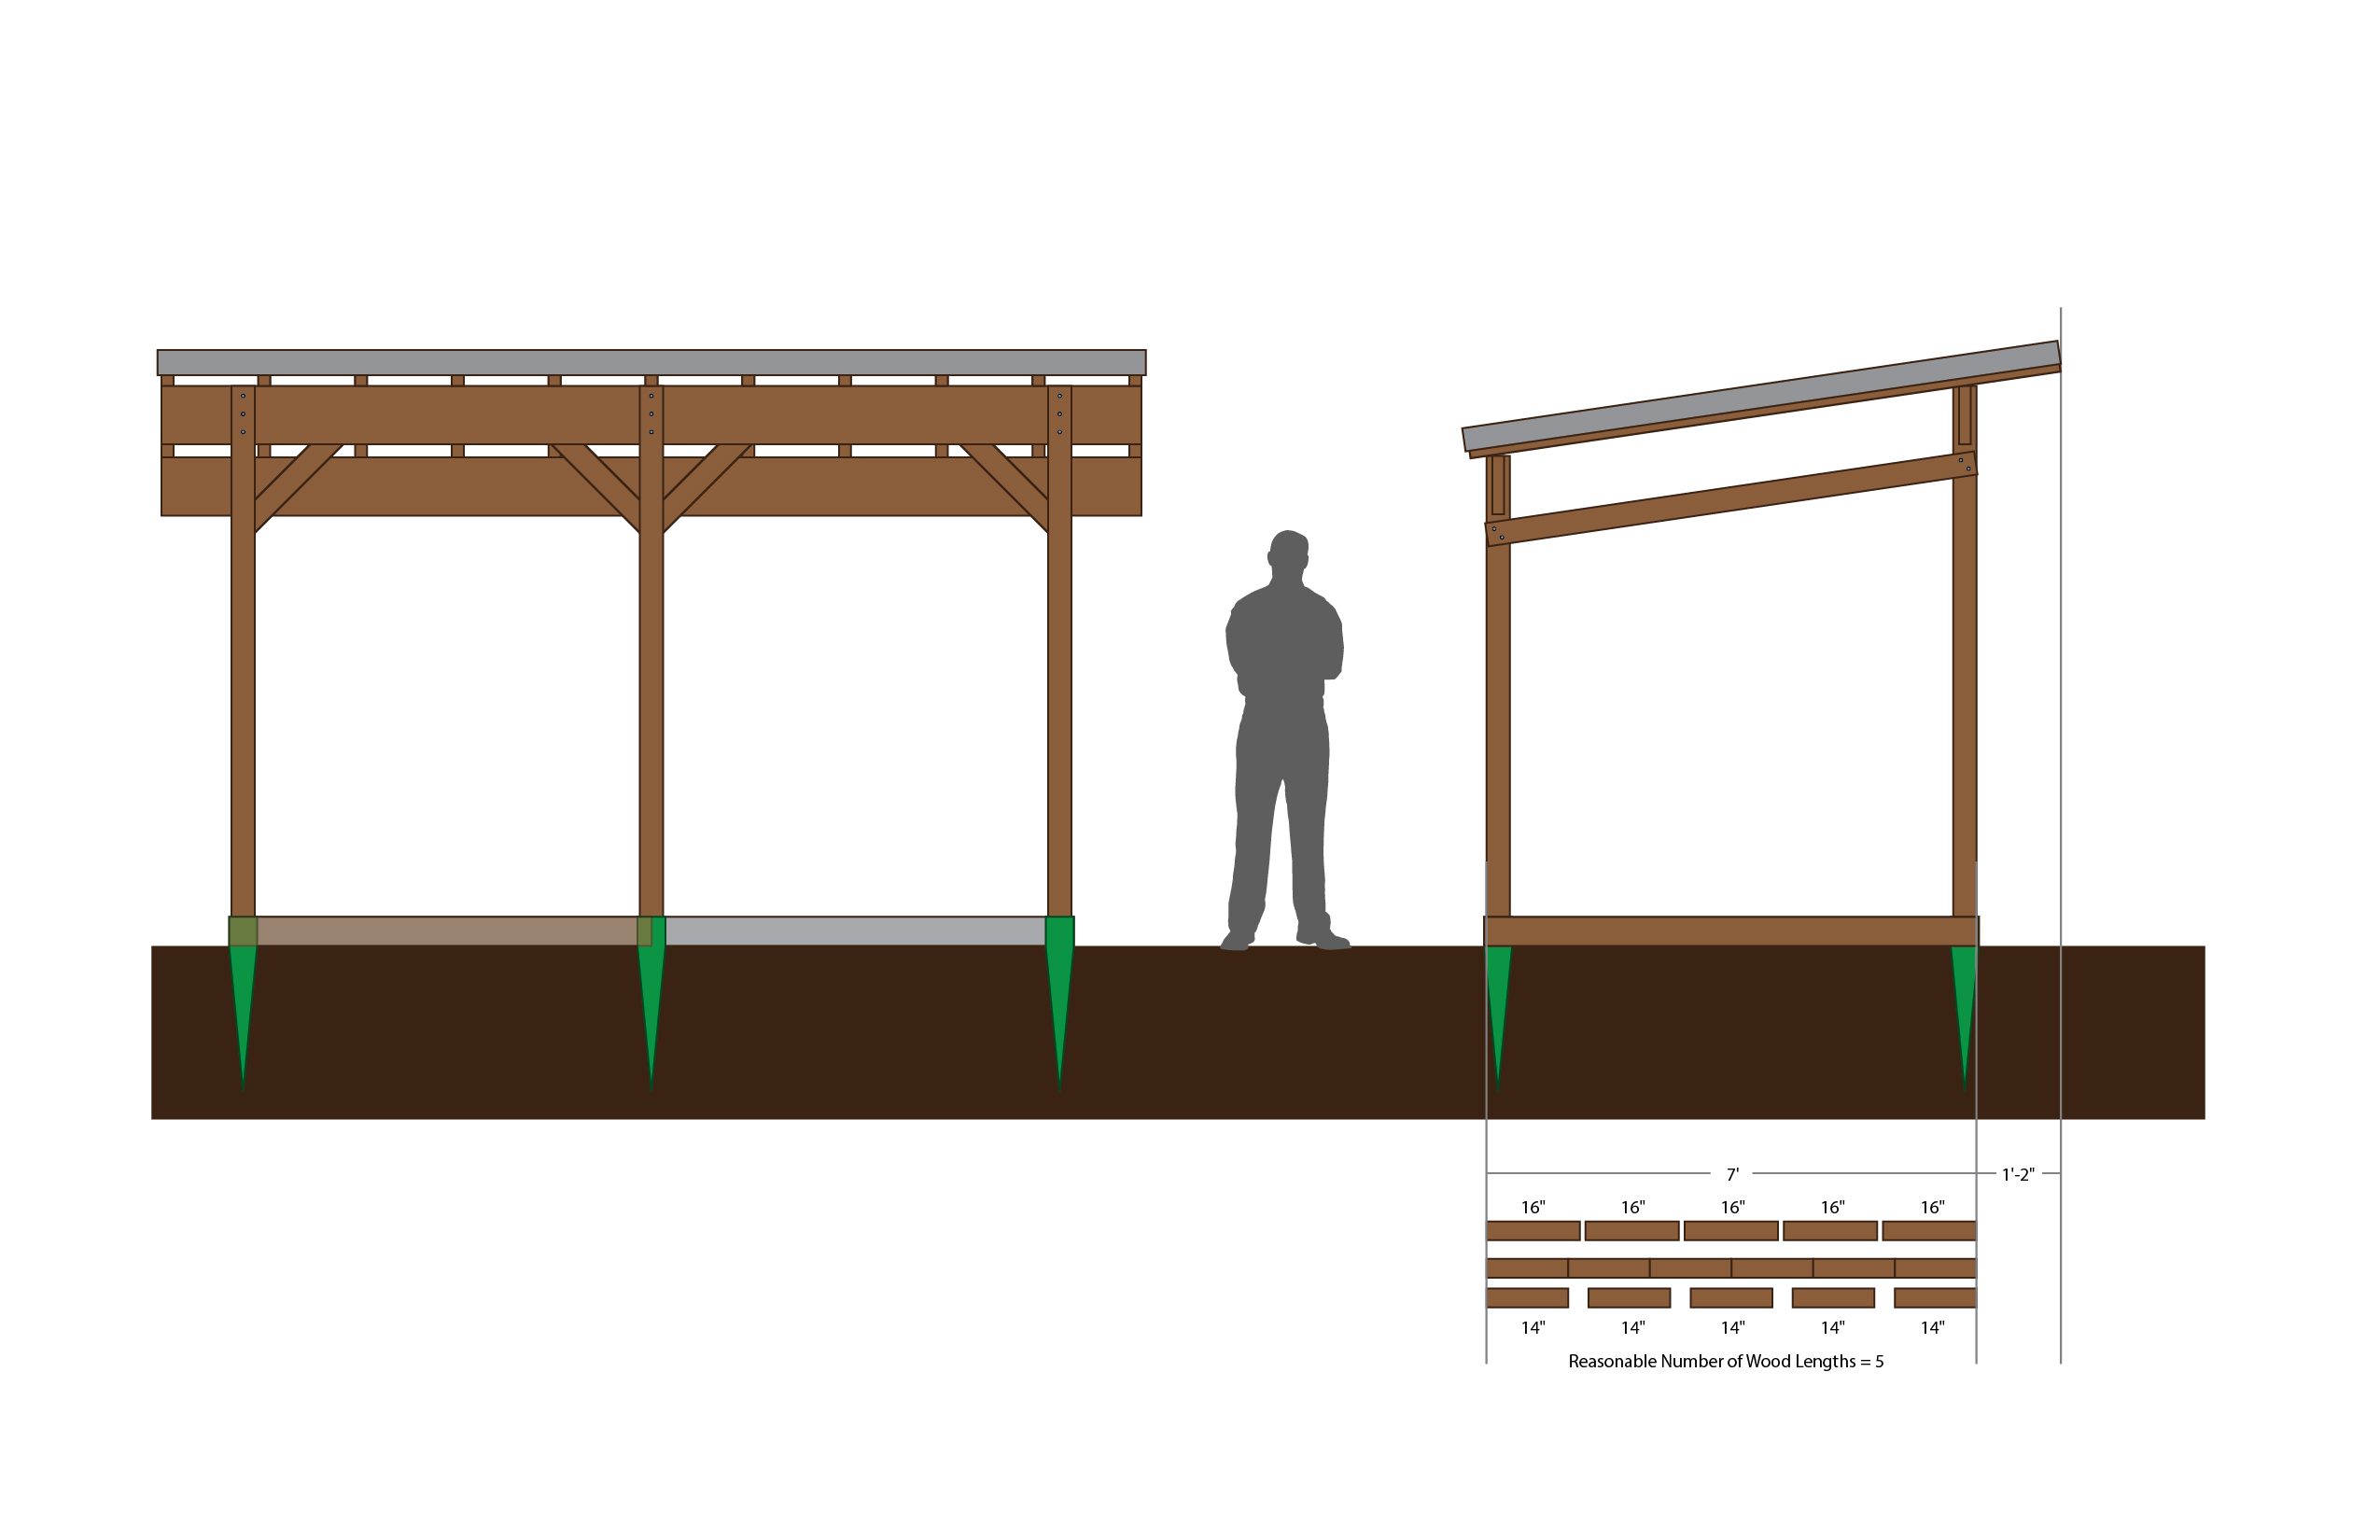
The footprint dimensions are 12x7. Seems weird I know, but it works out better with the wood lengths I'll be using. I'm going to be cutting all my wood to 14" from now on to fit in my Osburn Matrix which burns much better NS than EW. Will be 8' high in the front and 7' high in the back. I plan on stacking to about six or seven feet high.

Top beams: 4x6x14'
Vert posts: 4x4x8'
Side planking: 1x6x8' cedar
Everything else: 2x4 of varying length
rhi2HIT.jpg

g132CvC.jpg


Things I've settled on:
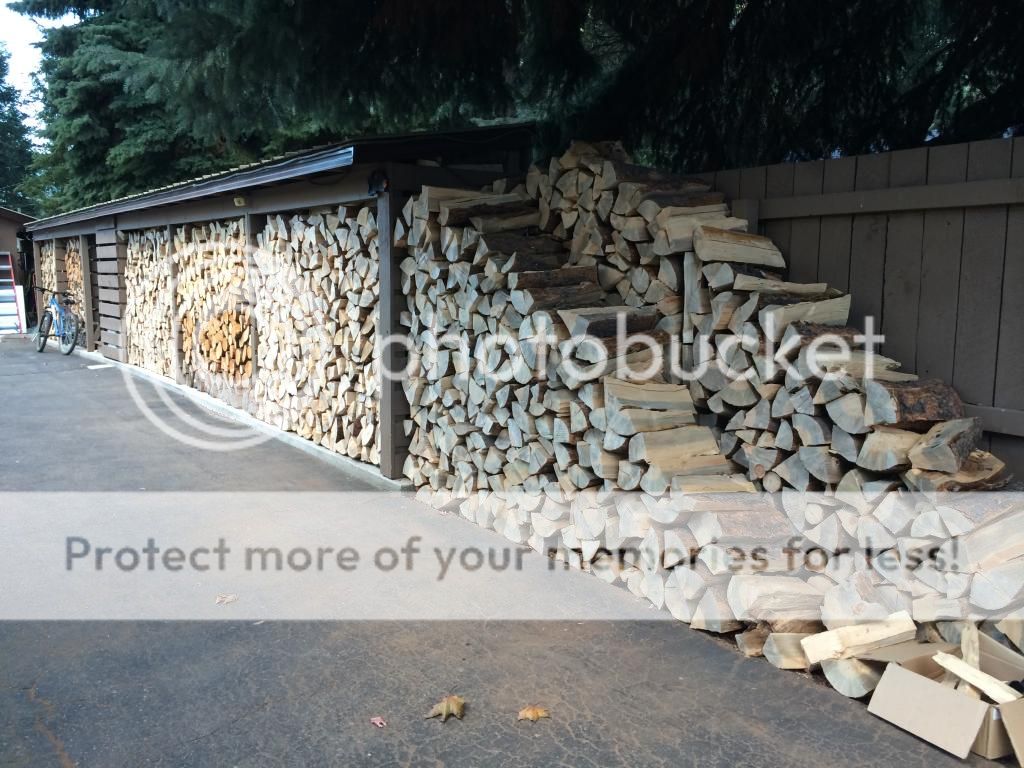
1. Roughly 4 cord capacity. This is my first wood burning year and so far I'm at about the 1.25 cord mark. In Chico CA where I live, we've passed peak burn season and we're only having evening fires these days. The plan is to have two cords worth saved up for winter burning per side. One side will be the current season and the other will be for the next year. I'll season wood during the summer outside the shed and then move it in the fall. The goal is to get three winters ahead so I can have 4 seasoned cords in the shed should I need more than two cords in a winter. I've been cutting all my wood this winter because we get a lot of sun and I like working in the cold over the 100 degree summer heat.

2. Gravel or crushed granite floor. Because I'll be stacking pretty high, I'm planning on having everything on the ground. Running floor joists seemed like a lot more work, engineering, and wood than necessary. I'm not into pallets either. While free/cheap, I want to keep my neighbor happy as this will run right on the property line. Plus they're always different sizes and I don't feel like playing Pallet Tetris.

3. Sliding barn door (not pictured). I have some old barn door hardware laying around and I thought I'd use it to make a sliding door for the front of the shed. I can load my two cords in and slide the door over. It's purely an aesthetic feature, but I think the asymmetry and hardware will look kind of cool.

Things I'm still thinking about:
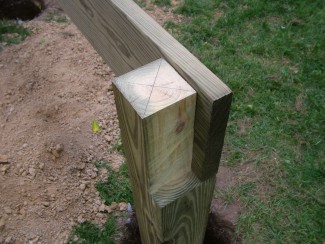
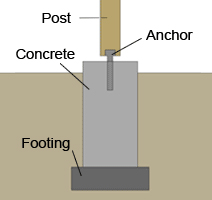
1. Anchoring the shed. Right now, I'm leaning towards these 4x4 stakes that you pound into the ground and set your posts into. I got em for $16 at Lowes. They seem like they'll last longer than pouring concrete around the posts. I've been replacing our 4x4 vertical fence posts which have started deteriorating and I don't want to have to do this to the shed any time soon. As far as driving the stakes goes, the soil is this wonderful rich loam topsoil which is a breeze to work with. I pounded one in about 2/3 of the way today and it seemed pretty darn sturdy.

See here if you don't know what I mean (I don't have the Lowes link): http://www.homedepot.com/p/Simpson-...er-Coated-12-Gauge-E-Z-Spike-FPBS44/100655352

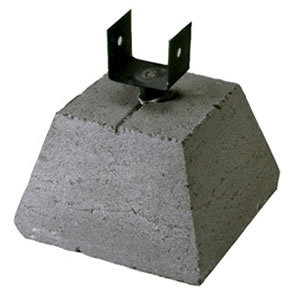
Originally I was thinking about pier blocks, but as you can see from the design I think it'll be easier to contain the gravel if the posts are closer to the ground. With piers on top of the ground the gravel will spill out. Then I can run treated 2x6s around the perimeter to contain the gravel. Now I could bury the pier blocks, set them in concrete, and leave just the top barely sticking out, but this seemed like a lot more work than needed although much sturdier. I'm definitely open to opinions on this one. Note: Where the shed is located there is not a lot of wind exposure as it's protected mostly by the house next door. I'm not too worried about it blowing over.

2. Not using pressure treated wood for the vertical posts. I think I can get away with not using pressure treated wood since the posts won't be in the ground. What do you think? I'd rather not use it if possible just so everything looks the same. It's more an aesthetic preference, but mixing the wood colors seems a little cheesy.

3. Hardware. What would you guys recommend for hardware? I was thinking lags for the big beams and screws for everything else. I want it to be solid!

I would appreciate any feedback!
Thanks!
Oliver
 
Looks like a good plan that a lot of thought went into. Here are my suggestions.

I would skip the sides/door and just let the air flow through, or at least space out the boards even more. You really only need to rain off. To that end, I would do a 1' or 2' overhang on all sides.

I don't think those stakes will do much to keep it held to the ground. You could probably not worry about anchoring if you run some beams across the bottom, secure them to the posts and stack wood on top. Not enough for a floor, just enough so the weight holds the shed down.

If you notch the tops of the posts and set the beams on them that will distribute the weight better than if you just use big bolts to hold it together.
 
I would skip the sides/door and just let the air flow through, or at least space out the boards even more. You really only need to rain off. To that end, I would do a 1' or 2' overhang on all sides.

Thanks for the feedback Jeff. I'll have about one foot overhang on every side but the back. The back side is on the property line and I don't wan't to overhang the neighbor's land. The reason I'm not super concerned about the lack of overhang is right now I have my wood against a chain link fence with plastic dividers. I'm using a tarp to cover the wood with the tarp grommets attached to the fence at the top. The tarp hangs over the wood at a 45 degree angle and then hangs down off the edge. We've had a couple big storms and so far the wood has been surprisingly dry. And that's with zero clearance. I'm thinking the worst case scenario is that the ends of the logs get a little wet and maybe the top layer. Or are you more concerned about the lumber in the weather?

I don't think those stakes will do much to keep it held to the ground. You could probably not worry about anchoring if you run some beams across the bottom, secure them to the posts and stack wood on top. Not enough for a floor, just enough so the weight holds the shed down.

I agree that I don't think the stakes will do much to hold it down. Do you think that's an issue? I can't really see it toppling over, but perhaps I'm not familiar with the stresses a woodshed endures. Do you think it could be uprooted? Reading the review on that home depot site, people seem to think they work pretty well... and most of those are for fences which I would think would take a lot more stress being linear in nature.

If you notch the tops of the posts and set the beams on them that will distribute the weight better than if you just use big bolts to hold it together.

Do you have an example of this? I'm having a hard time figuring out what you mean. It'll be a 4x4 supporting a 4x6 which will be on end. I'll have to cut away wood from both to notch. Is that what you meant?
 
I would suggest that you want to leave some ground clearance to the posts even if it is only an inch. The specific anchoring device, Simpson anchor or block probably won't matter much. Wood will always rot when it is in contact with moist earth and pressure treatment does nothing for rot. The wood treatment, copper salts or arsenic, blocks insect infestations, not water.
If you get a large diameter gravel it will drain better and not run away from you under that bottom rail. It should also help you protect the splits from ground moisture by providing a bit of space for air to flow through the gravel bed. Be sure to place landscape fabric under the gravel or it will slowly let earth move into all the spaces between the individual bits of gravel.The landscape fabric will also help keep down weeds.
Notching can be accomplished by cutting both the post top and the beam to as much as half way each. It will give you some overlap so that the beam can bear on the post top instead of just on the fastener. Here I think I am just agreeing with jueffesonm but it is a good idea. Yes, it will mean removing a third to a half the beam thickness at the posts but if you hold that joint together with a 3/8" carriage bolt it will be a very strong joint.
 
Looks great. Only suggestion I would give is drop the 4x6 top plate and use a 2x10. Also I have built a good many structures here on my farm and prefer 2x6 rafters over 2x4s. A lot more sturdy with shallow pitches and can handle way more roof weight (snow load).
 
N ot much snow where he is located Plow Boy, but I agree that a 2x6 is a good idea for a rafter even on such a short span.
 
Looks great. Only suggestion I would give is drop the 4x6 top plate and use a 2x10. Also I have built a good many structures here on my farm and prefer 2x6 rafters over 2x4s. A lot more sturdy with shallow pitches and can handle way more roof weight (snow load).
N ot much snow where he is located Plow Boy, but I agree that a 2x6 is a good idea for a rafter even on such a short span.

Wow, thanks for all the advice everybody. A 2x10 in place of the 4x6 would definitely make the notching duties easier. I'm beginning to understand why it should be notched. I'll see what it looks like with a 2x10 notched in there.

Yes, the snow load is not an issue. The only time the snow ever stuck here was when I was in kindergarten. Haha. For that reason, 2x6s for the roof rafters surprise me. The plan was to just put corrugated metal roof on it with no plywood or support under it, which doesn't seem too heavy. Besides adding cost and weight, do you think it's really necessary in this application? I'm not questioning the knowledge. Just trying to understand.

+1 on the ground clearance on the posts. That was my plan all along. To have them just floating off the ground. Originally I was planning on using the pier block shown below buried a little deeper than that the diagram illustrates. The problem is, I haven't been able to find them anywhere locally. I went to Lowes, Home Depot, and a lumber yard and nothing. I would still do it that way if I could find these exact ones. Maybe I'm being too anal about it, but I really don't want the wood on the ground.

vbglr7l.jpg
bGQhz5a.jpg
 
  • Like
Reactions: gerry100
Wood will always rot when it is in contact with moist earth and pressure treatment does nothing for rot. The wood treatment, copper salts or arsenic, blocks insect infestations, not water.
Sorry Oldman, but I had to speak up when I read this one.
Most wood preservatives are design to stop bacteria and fungus growth, as well as protect against insects. It's not the water itself that rots the wood, but bacteria growth or fungus, which is accelerated by moist conditions, that "rots" the wood. Insects (termites, etc..) aren't much of a problem where I live, or in more Northern climates, but I have seen untreated fence post rot off in a couple years in damp soil, where as I know of pressure treated fence post (that I planted myself 30+ years ago) that are still firm and strong to this day.
The one thing that people often overlook when constructing any structures with a roof is the drip line. Having a roof (without a gutter and downspout) will concentrate all the water that would normally be spread out over the whole ground area that the roof covers and focus it on the ground along the lower side of the roof. This will cause that area to be much more saturated with water and of course effect any wooden structures close to the ground in that area, even if they are not actually in direct contact with the ground there is always a certain amount of splash back along a drip line.
While on that subject, another mistake people often overlook on a drip line is not making sure they get an adequate drip off the edge of their roof line. I don't know how many roof edges I have seen ruined because they someone didn't allow enough, or proper, drip off at the edge of their roofing material. Things like people using roll roofing and bending the edge of the roofing over and nailing it to the fascia make me cringe when ever I see it. You want the water to drip cleanly off the edge of your roofing material, not run down the side of your fascia and wall. Sometimes this problem is so bad that even when they have a gutter the water will run behind the gutter and down the fascia and rot the edge of the roof completely apart causing hundreds, if not thousands of dollars in damage. And what really amazes me is that people will ignore it for years and years, which only makes thing so much worse.
I won't bother to critique your shed design, but please! just pay attention to the drip line on your roof.
 
Thanks for the feedback Jeff. I'll have about one foot overhang on every side but the back. The back side is on the property line and I don't wan't to overhang the neighbor's land. The reason I'm not super concerned about the lack of overhang is right now I have my wood against a chain link fence with plastic dividers.
Two things I'd bring up regarding your proximity to the property line.
One is that most zoning laws don't allow any permanent structure to be build that close to property lines, something you might want to look into before you get building.
And also, even if you could build that close to the property line, can you not just built the shed slightly farther away from the property line so that you could allow for a proper roof overhang ( see my last comment regarding drip line) on the lower slope of the roof?
 
azLIFRc.jpg

ubheUTQ.jpg


Ok, two options for the 2x10s. The only difference is how far they're notched. I think it looks good like this. I was reading that the shear is better on these and when notched I can see them being a lot sturdier. I think the notch with the full depth of the 2x10 looks a lot stronger and more aesthetically pleasing.

Another question now about the roof...if I do decide to only use 2x4s can I notch the 2x10 going the other way and set them down in there to add strength, or will that take too much shear away?
 
The one thing that people often overlook when constructing any structures with a roof is the drip line. Having a roof (without a gutter and downspout) will concentrate all the water that would normally be spread out over the whole ground area that the roof covers and focus it on the ground along the lower side of the roof. This will cause that area to be much more saturated with water and of course effect any wooden structures close to the ground in that area, even if they are not actually in direct contact with the ground there is always a certain amount of splash back along a drip line.

While on that subject, another mistake people often overlook on a drip line is not making sure they get an adequate drip off the edge of their roof line. I don't know how many roof edges I have seen ruined because they someone didn't allow enough, or proper, drip off at the edge of their roofing material. Things like people using roll roofing and bending the edge of the roofing over and nailing it to the fascia make me cringe when ever I see it. You want the water to drip cleanly off the edge of your roofing material, not run down the side of your fascia and wall. Sometimes this problem is so bad that even when they have a gutter the water will run behind the gutter and down the fascia and rot the edge of the roof completely apart causing hundreds, if not thousands of dollars in damage. And what really amazes me is that people will ignore it for years and years, which only makes thing so much worse.
I won't bother to critique your shed design, but please! just pay attention to the drip line on your roof.

Great points. Regarding zoning: My brother-in-law is an local engineer and he said I can build up to the property line as long as I don't overhang. I have up to 9 feet of leeway from the property line so I could theoretically put the shed forward another foot or so and extend the roof in the rear. The tricky part is a structure is evaluated for local square footage based on the overhang of the roof—not the area of the structure itself. Meaning, by extending the roof, I'll be over the city regs. We have a 120 sq ft max for this type of structure and with my 8x14 total overhang area I'm at 112. If I went 9x14 to account for a 1 foot overhang on all sides I'd be at 126 and over the limit.

Regarding placement on the property, a pic is worth 1000 words so I'll take a pic of the space and show you what I mean.

Edit: I'm definitely going to take your advice on extending the roof in the back. Maybe this means I just have to build a shed that's not quite as deep.
 
I'd increase the rear overhang to at least 8"

Mine has a short rear overhang and during a downpour the runoff "sucks in" and gets the rafter ends wet.

Rafter ends are starting to rot.

May not matter if Chico is in a dry climate with infrequent downpours.
 
Great points. Regarding zoning: My brother-in-law is an local engineer and he said I can build up to the property line as long as I don't overhang. I have up to 9 feet of leeway from the property line so I could theoretically put the shed forward another foot or so and extend the roof in the rear. The tricky part is a structure is evaluated for local square footage based on the overhang of the roof—not the area of the structure itself. Meaning, by extending the roof, I'll be over the city regs. We have a 120 sq ft max for this type of structure and with my 8x14 total overhang area I'm at 112. If I went 9x14 to account for a 1 foot overhang on all sides I'd be at 126 and over the limit.

Regarding placement on the property, a pic is worth 1000 words so I'll take a pic of the space and show you what I mean.

Edit: I'm definitely going to take your advice on extending the roof in the back. Maybe this means I just have to build a shed that's not quite as deep.
With regard to the drip line and overhang, if you plan on putting a gutter and downspout to carry the water away having an extended overhang is not an issue since all the water should run into the gutter and can be directed away from the shed with the downspout. However, you mentioned you are using metal roofing, and if you intend not to use a gutter you can generally cheat a bit with the overhang on your roofing. Metal roofing is the one roofing where you can extend it significantly past the edge of the roof and it will support itself. Generally asphalt roofing materials you'll want to have about 1" - 1 1/2" overhang, more rigid materials like tile and metal you might go 2" even with a gutter, but with metal you could go even more, 6" isn't unreasonable (without a gutter), and I have gone as much as 12" although I would recommend staying 6" or less. And arguably that 6 " could be excused from the max sq footage of your allowed roof area. If you do actually get your shed inspected some tight ass inspectors might get their undies in a bunch, but if you stay on good terms with them they probably wouldn't give you any problem with an extra bit of metal roofing overhang, especially if you were to get the structure inspected before putting the metal roofing on. ;)
 
Last edited:
684_1.jpg


For the rafters, you would notch the rafters not the 2x10s. Google "How to cut rafters framing square" and you will find some good videos. I just did this research myself for a similar plan.
 
Have a look at the picture jeffesonm just posted. That is a great way to take all of the load off your vertical post hardware and turn it into compressive forces on the post instead. If you drill through that remaining 2 inches of post material and the 2x10 and then use a carriage bolt to hold it together you have an almost indestructible joint that will hold lots of weight. There is no need to notch the top of the 4x4 in the center as you show in your drawings. The idea is to cut away just enough of the 4x4 to let the 2x10 rest on its top and then tie the two together so that the 2x10 will not slip off the outside of the post. A couple of 5/16 carriage bolts with nice fender washers will do that for you at each joint. Push the bolt through from the outside for a nice clean look with the washer and nut on the inside where it will not be seen. I like carriage bolts because they look nice once they are in place with that slightly rounded look and you don't need anything to hold them in place while you tighten the nut. The square profile of the bolt holds them still in the wood while you torque them down.
 
Wow, thanks for all the advice everybody. A 2x10 in place of the 4x6 would definitely make the notching duties easier. I'm beginning to understand why it should be notched. I'll see what it looks like with a 2x10 notched in there.

Yes, the snow load is not an issue. The only time the snow ever stuck here was when I was in kindergarten. Haha. For that reason, 2x6s for the roof rafters surprise me. The plan was to just put corrugated metal roof on it with no plywood or support under it, which doesn't seem too heavy. Besides adding cost and weight, do you think it's really necessary in this application? I'm not questioning the knowledge. Just trying to understand.

+1 on the ground clearance on the posts. That was my plan all along. To have them just floating off the ground. Originally I was planning on using the pier block shown below buried a little deeper than that the diagram illustrates. The problem is, I haven't been able to find them anywhere locally. I went to Lowes, Home Depot, and a lumber yard and nothing. I would still do it that way if I could find these exact ones. Maybe I'm being too anal about it, but I really don't want the wood on the ground.

vbglr7l.jpg
bGQhz5a.jpg
We don't have anything that looks like that but Lowes carries a concrete pier block that has a sort of X shaped recess in the top. It is made to let you have 2 two by boards come together and be prevented from shifting around. Unless you have very high winds you do not need the post anchor mounted in the top to hold things in place. By connecting 2 boards at each corner you use the slots cut into the top of the piers and never have any issues. I have a shed I built that way using some nice 2x8 joists and it has been standing for over 10 years now right here in tornado country just 100 miles south of the "windy city". Of course it has yet to be hit by a tornado. No way any reasonable build would stand up to that.
 
Have a look at the picture jeffesonm just posted. That is a great way to take all of the load off your vertical post hardware and turn it into compressive forces on the post instead. If you drill through that remaining 2 inches of post material and the 2x10 and then use a carriage bolt to hold it together you have an almost indestructible joint that will hold lots of weight. There is no need to notch the top of the 4x4 in the center as you show in your drawings. The idea is to cut away just enough of the 4x4 to let the 2x10 rest on its top and then tie the two together so that the 2x10 will not slip off the outside of the post. A couple of 5/16 carriage bolts with nice fender washers will do that for you at each joint. Push the bolt through from the outside for a nice clean look with the washer and nut on the inside where it will not be seen. I like carriage bolts because they look nice once they are in place with that slightly rounded look and you don't need anything to hold them in place while you tighten the nut. The square profile of the bolt holds them still in the wood while you torque them down.

For the rafters, you would notch the rafters not the 2x10s. Google "How to cut rafters framing square" and you will find some good videos. I just did this research myself for a similar plan.

Awesome. Thanks!

I think I'll notch them on the inside of the shed so I can run the diagonal support 2x4s flush behind so I don't have to toe them in like I was thinking I'd have to do with the notch I put in my plan.
 
one suggestion I would make is to make the spacing on the side boards really wide and line the inside with heavy welded chicken wire - I did this with mine and it allows great air flow for better drying.
 
So because I can't leave well enough alone, I was searching Google for more woodshed ideas and I came across this solution by Stegman. It uses pier blocks on top of the gravel. I was thinking I could make the gravel area a little larger and drain off the back of the roof onto it which would make things a little nicer. Mainly, less dirt getting splashed around. I'd still definitely bury the pierblocks into the gravel and onto the dirt for more stability. I can get these blocks for about $4 versus the $16 I paid for the spikes. That'll save me about $60. The extra gravel cost will be marginal since it's only a few extra square feet.

I probably wouldn't have as much gravel in front of the shed so I can navigate my wheelbarrow a little closer.

Check it out. It's pretty smart.
HqUpRhD.jpg

Thread link: https://www.hearth.com/talk/threads/wood-shed-finished-and-half-filled.91086/
 
One thing about me, is I'm a little OCD when it comes to design. Both aesthetic and functional. I'm one of those people that if I discover a shed that I think did it in a better way after I've completed mine I won't be happy any more. I'm all about planning every last detail and then breaking ground with confidence.
 
One thing about me, is I'm a little OCD when it comes to design. Both aesthetic and functional. I'm one of those people that if I discover a shed that I think did it in a better way after I've completed mine I won't be happy any more. I'm all about planning every last detail and then breaking ground with confidence.
Well there is no perfect design, so it's good to look at as many different designs as you can, and pick the ideas from each that suit your idea of aesthetics and functionality.

This is mine. It suited my small lot functionally because it utilized the small unused space I had between my driveway and the neighbors property, and when I built it I first tore down the dilapidated fence that was there and built the new fence as the back wall of the woodshed. As you can see I sloped the roof to the front to avoid having the run off going on to the neighbors property.
IMG_0735_zpsc3061c29.jpg
 
Well there is no perfect design, so it's good to look at as many different designs as you can, and pick the ideas from each that suit your idea of aesthetics and functionality.

Could not agree more. I'm trying to find the right balance between style, function and cost.

Regarding your shed...it's awesome. I saw that bomb shelter video. Way too cool. You're definitely up there for the coolest shed award. I came across your shed mentioned more than a few times on other threads.
 
  • Like
Reactions: Lumber-Jack
Status
Not open for further replies.