Piping progress

  • Active since 1995, Hearth.com is THE place on the internet for free information and advice about wood stoves, pellet stoves and other energy saving equipment.

    We strive to provide opinions, articles, discussions and history related to Hearth Products and in a more general sense, energy issues.

    We promote the EFFICIENT, RESPONSIBLE, CLEAN and SAFE use of all fuels, whether renewable or fossil.
Status
Not open for further replies.

rreihart

New Member
Aug 2, 2007
73
Central PA
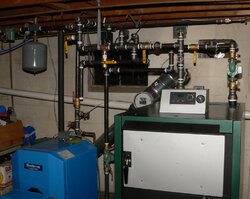
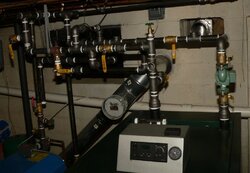
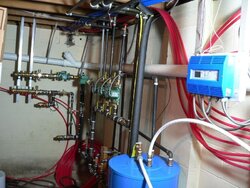
With a couple days off work it seem like a good time to get serious about installing my boiler. I took advantage of Thanksgiving day guests to drop in a new flue liner and then spent quite a bit of time in the basement since. I'm waiting for a zone valve, should have been in by Friday, that I'll use for the low temp return. Other than that, I'm ready to shut down the system and tie in.
 

Attachments

  • Piping1.jpg
    Piping1.jpg
    118.9 KB · Views: 693
  • Piping3.jpg
    Piping3.jpg
    94.2 KB · Views: 624
Looks great, r. Really professional looking job. I love working with the black iron.

I know you're going to be thrilled with it. Those things toss out some heat.
 
For me its more a case of I hate working with copper. Also I think with threaded pipe its easier to make changes.

Thanks, Rob.
 
Thanks for posting pictures of your setup. It sure helps me as I try to figure out how best to hook my EKO up.
 
No new photos, but I was up till about 2:30 last night tying the new piping into the existing. I have a few more things to do, but I'm hoping to maybe start a fire this weekend.

Don, I'm glad to have something useful to offer. I'm pretty new to this, but I've learned a lot from many helpful people here. If this is of any value, I had an earlier post "boiler controls" that sort of describes what I'm trying to do.
 
I had a few leaks on my black iron connections, all of which disappeared after a few heating cycles. I don't know what your experience with black iron is, Rob, but don't be alarmed if you get a few drips right off the bat.
 
One comment...

With the common wet-rotor circulators, the shaft should always be horizontal. In the first pic, at the far left, there is a circulator with the "can" under the pipe. While you're working on the system, unbolt that, and tighten each flange a 1/4-turn, so that the pump can be installed with the shaft horizontal. Most premature circulator failures are due to improper installation.

Looks like you're having fun with black iron, though!

Joe Brown
Brownian Heating Technology
www.brownianheating.com
 
Eric, I did a fair amount with black pipe last year. When I replaced the oil boiler I also replaced the copper monoflo piping. The monoflo left some rooms cooler and I didn't really see a good way of correcting this so I repiped it all with black and put a balancing valve on the return from each room to control flow. I think I've seen this refered to as a direct return system.

The only place I really had problems with leaks was with the unions. I started using a thick liquid type dope and they were good. Last night when I pressured up I didn't find any leaks, Praise the Lord.
 

Attachments

  • ZonePiping.jpg
    ZonePiping.jpg
    98.9 KB · Views: 476
BrownianHeatingTech said:
One comment...

With the common wet-rotor circulators, the shaft should always be horizontal. In the first pic, at the far left, there is a circulator with the "can" under the pipe. While you're working on the system, unbolt that, and tighten each flange a 1/4-turn, so that the pump can be installed with the shaft horizontal. Most premature circulator failures are due to improper installation.

Looks like you're having fun with black iron, though!

Joe Brown
Brownian Heating Technology
www.brownianheating.com

I thought the only unacceptable mount was with the can vertical. However I checked taco's manual and you are absolutely right. Thanks for catching that.
 
rreihart said:
BrownianHeatingTech said:
I thought the only unacceptable mount was with the can vertical. However I checked taco's manual and you are absolutely right. Thanks for catching that.

It's probably the second most common mistake I see on installations (and I'm referring to professional installations). The most common is using air scoops without 18" of straight pipe before the scoop, but it looks like you have that covered, from the pictures. I've actually seen street 90's threaded right into the scoop, with no pipe at all.

Joe
 
Did you get 'er fired up, Rob?
 
WE HAVE LIFT OFF!

First fire about 6:30 last night. One of the first things I did was turn the thermostats up. What a nice feeling. I have some bugs to work out with how I'm controlling the system. When I got up this morning, I had a no fuel alarm even though there was still a good supply of wood inside. I called home ealier and the alarm had tripped again.

Is the fun just beginning?
 
rreihart said:
WE HAVE LIFT OFF!

First fire about 6:30 last night. One of the first things I did was turn the thermostats up. What a nice feeling. I have some bugs to work out with how I'm controlling the system. When I got up this morning, I had a no fuel alarm even though there was still a good supply of wood inside. I called home ealier and the alarm had tripped again.

Is the fun just beginning?

Been refining mine for more than two years now, and I still have a good-sized list of improvements to make:

1) Turbulators for my heat exchanger tubes in the EKO (Thanks, Eric! I needed more stuff to do.)
2) EKO fan override - I want to turn it off earlier when the fire has died.
3) Radiant main floor zone.
4) 'Next fire' calculator function
5) More hx surface area in tank for DHW preheat

and on and on and on. At least each of these improves quality of life.
 
Status
Not open for further replies.