Roof Help, Please

  • Active since 1995, Hearth.com is THE place on the internet for free information and advice about wood stoves, pellet stoves and other energy saving equipment.

    We strive to provide opinions, articles, discussions and history related to Hearth Products and in a more general sense, energy issues.

    We promote the EFFICIENT, RESPONSIBLE, CLEAN and SAFE use of all fuels, whether renewable or fossil.
Status
Not open for further replies.

vinny11950

Minister of Fire
May 17, 2010
1,794
Eastern Long Island, NY
I have been crawling around in the attic the past few weeks fixing electrical requires and adding insulation and sealing with foam.

Was looking at the roof rafter system in the attic and it has me wondering what is preventing roof spread?

It is a small ranch house, 50 feet long and 25 feet wide, a rectangle of approximately 1200 sq. ft, with cathedral ceilings in different rooms. Gable roof, with low pitch.

The attic floor joists and roof rafters are 2 x 6.

Here are some pictures lengthwise:

This is from one end:

roof2.jpg


And here is the opposite end (at the end is a drop ceiling for the cathedral ceiling in the living room:

roof4.jpg

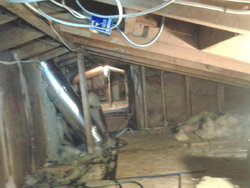
Below is a picture looking into the drop ceiling of the living room:
roof5.jpg

What worries me is:

1) There is no truss system
2) There are no collar ties on opposite rafters
3) The floor joists don't go end to end because of cathedral ceilings in other rooms, so the triangle in never complete.
3) Mostly, they only used 2 nails at the top of the rafters to connect to the ridge board

Any ideas would be helpful. I have looked elsewhere trying to identify the roof framing system used here, but haven't found it.

Thanks.
 

Attachments

  • roof3.jpg
    roof3.jpg
    118 KB · Views: 765
Found a couple of broken 2 x 6.

Not sure how I am going to fix this rafter. It is one side of the framing of the bathroom skylight. Explains the flex on that spot in the roof.

broken2.jpg

And this short joist in the hallway:

broken1.jpg

Made a mess of the sheet rock below!
 
I have been crawling around in the attic the past few weeks fixing electrical requires and adding insulation and sealing with foam.

Was looking at the roof rafter system in the attic and it has me wondering what is preventing roof spread?

It is a small ranch house, 50 feet long and 25 feet wide, a rectangle of approximately 1200 sq. ft, with cathedral ceilings in different rooms. Gable roof, with low pitch.

The attic floor joists and roof rafters are 2 x 6.

Here are some pictures lengthwise:


What worries me is:

1) There is no truss system
2) There are no collar ties on opposite rafters
3) The floor joists don't go end to end because of cathedral ceilings in other rooms, so the triangle in never complete.
3) Mostly, they only used 2 nails at the top of the rafters to connect to the ridge board

Any ideas would be helpful. I have looked elsewhere trying to identify the roof framing system used here, but haven't found it.

Thanks.
1. This is a conventional framed gable roof system, with ridge pole, rafters to the wall plates & then your ceiling joists at the bottom, making the complete roof framing system. The rafters look larger than 2x6 to me.
Truss systems are typically 2x4 construction, with top & bottom chords, king post in the center and web supports diagonally on each side for support, all held together with metal gusset plates.
You don't have a truss system. No worries there.
2.Collar ties are not necessarily required, the ceiling joists help keep the rafters from spreading from load, when the two are fastened together, and also fastened to the wall plate. There are some situations where collar ties may be considered such as very long rafters with a fairly steeply pitched roof, and in high wind situations with a lower pitched roof, collar ties may help hold the ridge assembly together. They make a steel strap for that situation that can be used instead of collar ties. No worries there.
3.Are the ceiling joists sistered together where they don't make a complete run across? Is there a supporting wall underneath if the floor joists end prior to completing the run across? Some walls below may have been intended as load bearing to help support the short ceiling joists if they are indeed short.
4. The first rafter on one side is nailed by nailing 3 nails through the ridge pole into the rafter on on the opposite side. The the opposite rafter set directly across opposite the first rafter and toe nailed with 3 nails on one side and 2 on the other. Sounds like your not too bad off, maybe toe nail a few more nails where the rafter meet to ridge pole.

Re: the broken rafter & ceiling joist. Best option is to sister new 2xs in next to the broken ones, the fuller length the better. but if space is limited, you can sister smaller sections in till you reach a few feet or more (as much as you can get in there)on each end of the break. I would sister new 2xs on both sides of the broken ones.

You're losing a ton of heat through those fiberglass batts in those knee walls, some rigid foam board would insulate a heck of a lot better and tighter if done properly. I am assuming the metal tubing is a sklylight? wrap that good in insulation also.
 
Last edited:
  • Like
Reactions: Ashful
Is there a supporting wall underneath if the floor joists end prior to completing the run across? Some walls below may have been intended as load bearing to help support the short ceiling joists if they are indeed short.

This is the case, all ceiling joists don't complete the run to the other end (opposite rafter). They sit on two center walls that make up the main hallway walls below. A few joists are twisting. I guess them being tied to one side of the rafters is enough.

Thanks for the great info, Hogwildz, it will be very helpful.
 
Can you sister ceiling joists in to complete the runs?
Glad to help, even happier that your fear of major project(s) is not coming true.
You have some fairly easy fixes there, just sucks with limited working room. Watch your head on those roofing nails sticking down, they hurt.
Do it in the winter, spring or fall, so you don't have constant eye burning sweat beads running in your eyes in the summer.
 
  • Like
Reactions: JohnKoP
Thanks, Hog. Winter is definitely the time to do it. I am double layered with old sweat pants and top, hat, p100 respirator, and I still find myself getting hot and sweating at times. Torn knee cartalige does not help either.

Was up there yesterday again, and looked at the ridge and rafters closely. There is some pulling apart at the bottom of the rafters signaling some settling or dropping.

Here is a better drawing of the roof setup:

Roof.png


So about 20 feet of the home length is like this on one side, the next 20 is like this on the opposite side, and then the final 10 feet is cathedral on both sides (no joists to tie them together).

I guess this design places more stress of the rafter connections to the exterior walls.
 
Could use joist hangers to connect to the ridge beam.
Could use flat 5" steel to sister to the broken joists. Make them up as long as possible to span the break. Drill 3/8 holes and bolt with nuts and washers after jacking them into place.
 
Spent my first 30 years on Long Island, typical framing for the area. Hogs hit most of the issues. 2x6's were used a lot on the roof system. With the low roof pitch, the roof is trying to push the wall out, the gaps on the rafter/ridge connection could be from this. Odds are the floor joists/collar ties/ ceiling joists, where not connected properly to start with and have pushed out after all the years.
It was not uncommon to have to install cabling with turn buckles to pull the wall in, which raises the ridge back to where it belongs. you would have to add/fix collar ties to hold in place. they were probably not tied together correctly and have since moved.
you can also add blocking from the top of the supporting walls to the rafters/ ridge to carry the load. I would first raise the roof to where to where it belongs before adding blocking. you could jack the ridge off of the supporting walls to raise it before blocking and then let the ridge back down.
It is not bad to do if you have enough experience or an experienced friend.
 
Thanks for input guys.

This is what I have in mind to support the ridge and keep it from drooping any more.

Roof2.png


I am thinking of running 2 x 4s lengthwise over the ceiling joists, then putting vertical blocks (2 pieces tied together) to the ridge board.

The exterior walls don't look bowed out so I am thinking I don't have to lift the ridge any, just block it below so it doesn't drop any more. Though in the master bedroom cathedral ceiling the sheetrock tape joining the back wall to the ceiling has ruffled out and detached some, so this could be another sign of a slight roof drop.

I could also add some trusses, but I also don't want to overbuild the attic and make it more difficult to move around.

I am thinking if we had had the snow amounts in Massachusetts then the roof would be in trouble.
 
I am thinking of running 2 x 4s lengthwise over the ceiling joists, then putting vertical blocks (2 pieces tied together) to the ridge board.
The exterior walls don't look bowed out so I am thinking I don't have to lift the ridge any, just block it below so it doesn't drop any more. Though in the master bedroom cathedral ceiling the sheetrock tape joining the back wall to the ceiling has ruffled out and detached some, so this could be another sign of a slight roof drop.
I could also add some trusses, but I also don't want to overbuild the attic and make it more difficult to move around.
I am thinking if we had had the snow amounts in Massachusetts then the roof would be in trouble.

If you transfer the weight of the ridge beam onto the attic/ceiling joists (install blocking) be sure there is vertical load bearing all the way down to the footings. If the hallway walls are load bearing like you show and think, then you will probably be fine.

The 2x4 running horizontally across the ceiling joists won't do too much other then give a surface to put the blocking onto. If you intend on having it there for structural reasons to spread the load, sister 2 or 3 boards together and stand on edge instead. If it is only there to make the blocking install easier, line up the blocks vertically over a ceiling joist. For fewer blocks, consider sistering the ceiling joists under the blocks with 1 or 2 more pieces spanning the header on each side of the hallway. For more blocks you don't need to worry about it as much. High weight point loads (fewer blocks) can be tricky to plan for, most things usually end up working until something gives way so you really never know for sure short of running calculations.

The 10' that is full cathedral on both sides, if the ridge beam is properly sized and also properly supported on each end there should not be much splaying of the walls. In order for the walls to splay the beam must drop.
 
Last edited:
  • Like
Reactions: vinny11950
One other thing to consider is extend the hallway walls all the way up to the roofline by building a second knee wall above it. You already have one, just go and build the other.

Then on the 10' section where you have a full cathedral, the outside point of the ridge is supported in the gable. The inside point needs to be supported though which the how is highly dependent of the framing in your hallway walls down below.
 
  • Like
Reactions: vinny11950
may or may not work, where are the joints where the 2x6 ceiling joists overlap? are they sitting on top of both walls? or centered over the walls?
to be safe I would line up the supports with the hallway walls as brian suggested. a few more boards and cuts but structurally sound
 
Nothing like being home from work with the flu and listening National Grid jackhammer (coughing headache does not like it) the street up front to get at salt-water blown transformers that went boom yesterday. That part of the street is a mess, if it's not the electric company digging it is the water company. Wah :(
 
Gotta agree with the above. Hog and ironpony seem spot on.

Could be worse.

http://m.wmur.com/news/rafter-joist...n=wmur9&utm_medium=twitter&utm_source=dlvr.it

20 year old home has roof just slide off!!!! I don't really get the inspectors description of what happened (wmur is also horrible at reporting anything) . Sounds like they shrunk or skipped the birds mouth and didn't properly fasten the collar ties. Crazy.
Not surprising the company went away when the boom slowed down.
 
Sorry I haven't been too involved in the thread lately but flu knocked me out all week. Any response I typed out didn't make sense and was gibberish.
 
Gotta agree with the above. Hog and ironpony seem spot on.

Could be worse.

http://m.wmur.com/news/rafter-joist...n=wmur9&utm_medium=twitter&utm_source=dlvr.it

20 year old home has roof just slide off!!!! I don't really get the inspectors description of what happened (wmur is also horrible at reporting anything) . Sounds like they shrunk or skipped the birds mouth and didn't properly fasten the collar ties. Crazy.
Not surprising the company went away when the boom slowed down.

Yes, crazy that a house that young would have that happen to it. Unless you understand how houses are built, you really are at the mercy of the builder and whatever issues they were having at the time your home was built. I am sure people try to do the right thing, but schedules have to be met even if it means cutting corners.

The house I am working on now was bought 5 years ago. I didn't know much about home structures or other home issues, so I trusted the home inspector. I was there when he inspected the house. Now that I am looking around and fixing things, I scratch my head and wonder how he missed some obvious issues I have had to correct. I guess hind sight is 20/20.
 
The house I am working on now was bought 5 years ago. I didn't know much about home structures or other home issues, so I trusted the home inspector. I was there when he inspected the house. Now that I am looking around and fixing things, I scratch my head and wonder how he missed some obvious issues I have had to correct. I guess hind sight is 20/20.

An unfortunate number of home inspectors have never built/fixed a home, and only so much can be taught in the lack of experience. An inexperienced home inspector notices something wired wrong, writes it up. An experienced home builder, repair man, or inspector notices something wired wrong and first thought is nobody who knows what they are doing would make that mistake, so what *else* is messed up too.
 
i went through a similar issue last year- and posted it on here. my dumbass lazy builder didnt use 2 LVLs for my ridge pole as specd in the plans and the crooked or totally incompetent inspector approved it. as a result, i had (still have) a ridge sag in my vaulted great room space. the front wall is bowed out some as well.

to correct it, my new contractor was going to slide in new LVLs under it from the side of the house and not disturb my whole room (2k). found out quickly that we couldnt do that.... SO they ripped a hole in my ceiling, and put in 3 LVLs and collar ties to support the now slightly jacked up ridge pole. new drywall, lots of paint and freezing cold left us with a 11k price tag. i did have them paint an additional room, and double the insulation in my attic while they were at it. they couldnt bring the whole front wall back in without potentially damaging lots of stuff since EVERYTHING was out of plumb because of it.

did i mention that this was done in the middle of the coldest wx we have had in 30 years? (polar vortex) gosh it was fun.
 
  • Like
Reactions: vinny11950
Status
Not open for further replies.