25-PAH Premature Burn Pot Failure - My fault or the burn pots? (2 burn pots in 4 months)
- Thread starter acammer
- Start date
-
Active since 1995, Hearth.com is THE place on the internet for free information and advice about wood stoves, pellet stoves and other energy saving equipment.
We strive to provide opinions, articles, discussions and history related to Hearth Products and in a more general sense, energy issues.
We promote the EFFICIENT, RESPONSIBLE, CLEAN and SAFE use of all fuels, whether renewable or fossil.
You are using an out of date browser. It may not display this or other websites correctly.
You should upgrade or use an alternative browser.
You should upgrade or use an alternative browser.
Funny timing, my burn pot on my PAH just did one of those hole to hole cracks. Though mine appears in much worse shape overall with lots of metal flaked off here and there. Its not metal, its clinkers that look like metal, folks here usually said. Well I'm pretty sure now it was metal. Cause there ain't much metal left now lol.
How old is your stove, and what are your normal running conditions like?
OhioBurner©
Minister of Fire
I bought mine in the fall, refurbed from amfm. Put about 3 tons through it so far. Not sure if you remember my issues but it degrades to the point of choking itself out in 1-2 weeks. Just did my final effort to get it to run right by pulling my chimney liner and running 4" duravent up it. Ran fine at first (that was last Tuesday) but right on que at 6-7 days I started to get soot again. And today, 8 days later I'm seeing smoke out the chimney, even after cranking the air up to 9 and dialing heat back to 6. So not sure what I'd call normal conditions. Usually 3-9 to 7-9 depending on temps, with 1-4-1 the first few days after a lbt, bumping up air to 5 or 6 once I notice degrading burn, the usually 2 days after that air is on 9 and heat dialed down to low limping until I get a day off for lbt.
Last edited:
I bought mine in the fall, refurbed from amfm. Put about 3 tons through it so far. Not sure if you remember my issues but it degrades to the point of choking itself out in 1-2 weeks. Just did my final effort to get it to run right by pulling my chimney liner and running 4" duravent up it. Ran fine at first (that was last Tuesday) but right on que at 6-7 days I started to get soot again. And today, 8 days later I'm seeing smoke out the chimney, even after cranking the air up to 9 and dialing heat back to 6.
Yours is the other bowed one, isn't it? I think you simply must still have some air-flow issue somewhere. Even with my fuel trimmed way up I can run 48hrs and still have a clean burn pot, and I only see sooting up after about 4-5 weeks and another 1+ ton pushed through. Then I need to knock out the heat exchanger, clean the horizontal run in my vent pipe, and I'm good to go again.
It's good confirmation that I don't have the only failing PAH burnpot, we've seen a couple reported in the other thread with the 25-ip, and now find that yours is coming apart too. All that information leads me to conclude that it's not a tuning issue on my end as much as it is materials that just can't "take the heat." I'm sure that running at full power accelerates things to some extent in my case, but it looks like this is an issue that crops at some point for quite a few folks.
A quick update - I heard from Englander yesterday. First an e-mail indicating that they were sending out another burn pot. I also received a phone call from their tech support and we talked through things - he couldn't find a reason that this should be happening. I wondered if some how my pellets were high in sodium or something, but I find that unlikely as we've not heard any other Heatr's users with that complaint. All in all I'll install this new burn pot and see how it goes.
OhioBurner©
Minister of Fire
Here is mine a few days ago when this thread started.
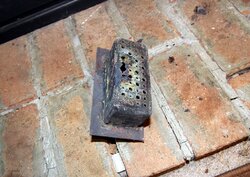
And its degraded fast... a few other chunks apparently came apart between the first pic and when I shut it down yesterday to clean...
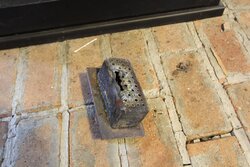
I have to admit though that up to this point the problems I've been dealing with have been less than optimal burns from time to time. Not sure how much that effected the demise of the pot, but its pretty obvious they can't stand up to too much of a beating. And one by one I've been trying to fix or implement whatever suggestions folks have had here.
Yeah and I don't mean to deviate from your thread... but I wonder if the pot in that condition is causing some of my current issues. I've noticed after I lined my chimney with 4" duravent that the pot stays clean. I switched to only cleaning it out every other day and the pot is clean each time with minimal build up. Before, once the burn started to degrade the pot would clog up with junk. Now my pot is staying clean, even yesterday, but I'm still getting soot on the glass and some smoke out the chimney. But I won't draw any conclusions until I have a proper burn pot installed. I sent in a warranty request. I'd shut down the stove entirely if it wasn't for the fact that it still seems to be throwing out plenty of heat and is desperately needed tonight as its suppose to get down around -10F with wind chills pushing it down to around -20. That's about the coldest it ever gets around here.

And its degraded fast... a few other chunks apparently came apart between the first pic and when I shut it down yesterday to clean...

I have to admit though that up to this point the problems I've been dealing with have been less than optimal burns from time to time. Not sure how much that effected the demise of the pot, but its pretty obvious they can't stand up to too much of a beating. And one by one I've been trying to fix or implement whatever suggestions folks have had here.
Yours is the other bowed one, isn't it? I think you simply must still have some air-flow issue somewhere. Even with my fuel trimmed way up I can run 48hrs and still have a clean burn pot, and I only see sooting up after about 4-5 weeks and another 1+ ton pushed through. Then I need to knock out the heat exchanger, clean the horizontal run in my vent pipe, and I'm good to go again.
Yeah and I don't mean to deviate from your thread... but I wonder if the pot in that condition is causing some of my current issues. I've noticed after I lined my chimney with 4" duravent that the pot stays clean. I switched to only cleaning it out every other day and the pot is clean each time with minimal build up. Before, once the burn started to degrade the pot would clog up with junk. Now my pot is staying clean, even yesterday, but I'm still getting soot on the glass and some smoke out the chimney. But I won't draw any conclusions until I have a proper burn pot installed. I sent in a warranty request. I'd shut down the stove entirely if it wasn't for the fact that it still seems to be throwing out plenty of heat and is desperately needed tonight as its suppose to get down around -10F with wind chills pushing it down to around -20. That's about the coldest it ever gets around here.
SmokeyTheBear
Minister of Fire
Don't get me started ohioburner, chimney flues above a certain cross sectional area are problematic for pellet roasters as they impede proper air flow causing a reduction in ash ejection from the burn pot and other non-optimal things to happen.
SidecarFlip
Minister of Fire
Dam thing looks like 16 gage sheet metal, it's mighty thin
You need to write a blanket post in Word, save it to a file and then copy and paste it in a post... saves time and aggrivation.
Don't get me started ohioburner, chimney flues above a certain cross sectional area are problematic for pellet roasters as they impede proper air flow causing a reduction in ash ejection from the burn pot and other non-optimal things to happen.
You need to write a blanket post in Word, save it to a file and then copy and paste it in a post... saves time and aggrivation.
OhioBurner©
Minister of Fire
Don't get me started ohioburner, chimney flues above a certain cross sectional area are problematic for pellet roasters as they impede proper air flow causing a reduction in ash ejection from the burn pot and other non-optimal things to happen.
Yes, of course, but I installed per the manual. The issue here is that either the manual is wishful thinking in what kind of chimney the PAH can vent into, and or just plain wrong or else there is still a defect in my stove. But like I said I'll wait until I have a proper burn pot and burn 2 weeks with it before I come to any conclusions.
SmokeyTheBear
Minister of Fire
Yes, of course, but I installed per the manual. The issue here is that either the manual is wishful thinking in what kind of chimney the PAH can vent into, and or just plain wrong or else there is still a defect in my stove. But like I said I'll wait until I have a proper burn pot and burn 2 weeks with it before I come to any conclusions.
When connecting to an existing masonry chimney, the cross‐sectional area of the flue must be considered.
A chimney with a flue larger than 6” round (28.27sq.in.) may require relining with an approved pellet stove chimney lining system.
Here is mine a few days ago when this thread started.
*picture removed*
And its degraded fast... a few other chunks apparently came apart between the first pic and when I shut it down yesterday to clean...
*picture removed*
I have to admit though that up to this point the problems I've been dealing with have been less than optimal burns from time to time. Not sure how much that effected the demise of the pot, but its pretty obvious they can't stand up to too much of a beating. And one by one I've been trying to fix or implement whatever suggestions folks have had here.
Yeah and I don't mean to deviate from your thread... but I wonder if the pot in that condition is causing some of my current issues. I've noticed after I lined my chimney with 4" duravent that the pot stays clean. I switched to only cleaning it out every other day and the pot is clean each time with minimal build up. Before, once the burn started to degrade the pot would clog up with junk. Now my pot is staying clean, even yesterday, but I'm still getting soot on the glass and some smoke out the chimney. But I won't draw any conclusions until I have a proper burn pot installed. I sent in a warranty request. I'd shut down the stove entirely if it wasn't for the fact that it still seems to be throwing out plenty of heat and is desperately needed tonight as its suppose to get down around -10F with wind chills pushing it down to around -20. That's about the coldest it ever gets around here.
Wow, that's a wrecked pot. As soon as mine took a turn in that direction I was asking for new ones, but I guess I can see where continuing to use it would have probably got mine there as well. That just looks like the metal failing to me, which supports my conclusions.
For what it's worth I've been running all week with the fuel trimmed back to minimum for testing. Overall as I noted initially I am seeing slightly lower temps on the heat exchanger exhaust - but I have noticed that it does seem to come up closer to my previous temps over a very long run. Probably was able to get up to it's maximum temp a lot faster when it was more aggressively fueled, but it looks like the leaner burn can achieve similar temps if given a long run time. The overall bed of fuel in the bottom of the burn pot has less depth with the leaner fueling, I would say barely 1 pellet to less than 1 pellet deep in some spots. I'm not sure if this is better or worse for the pot, maybe there will be a little less heat trapped right against the bottom of the pot. Carbon buildup, while not extreme at all before, is nearly non-existent with the present trim. This seems to support Smokey's theory of a forge. Overall, if I can get similar heat with the fuel pulled back, I'll just keep it there and see what his next pot can do. What I'd really like is to be able to get more output, but I think I probably have "maxxed out" the design parameters of this stove.
OhioBurner©
Minister of Fire
When connecting to an existing masonry chimney, the cross‐sectional area of the flue must be considered.
A chimney with a flue larger than 6” round (28.27sq.in.) may require relining with an approved pellet stove chimney lining system.
I'm not sure what your getting at Smokey, like I said I followed the manual (and my flu was not over 6" round if that was what you were getting at).
Wow, that's a wrecked pot. As soon as mine took a turn in that direction I was asking for new ones, but I guess I can see where continuing to use it would have probably got mine there as well. That just looks like the metal failing to me, which supports my conclusions.
My pot was already prety week over a larger area due to the metal flaking off over the past couple months. I first noticed it when we had our first blast of cold in Novemeber I think it was. The very first time I ran it on 9 for more than just a short bit. The next cleaning I noticed flakes coming off the pot, though many thought they were clinkers but now its a little more apparent.
SmokeyTheBear
Minister of Fire
I'm not sure what your getting at Smokey, like I said I followed the manual (and my flu was not over 6" round if that was what you were getting at). ...snip
Exactly how large is your flue (length x width] because that little line is from your manual.
OhioBurner©
Minister of Fire
Smokey, you probably don’t remember but discussing my problems with you on a different thread I posted a picture of that page in the manual.  so yes I am very familiar with the entire manual including that little line. My flue is 6" round which I lined myself a few years ago for my Hearthstone Shelburne. What I did about 2 weeks ago was reluctantly pull the liner out and put 4" duravent up the old chimney (about 15' tall).
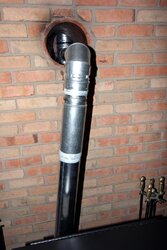 <Here is what it looks like now with duravent all the way, before packing the thimble with Roxul. Still have to finish it off with something to cover the thimble that looks nice though.
I don't want to derail acammer's thread though... got an email back from ESW saying a replacement burnpot is being sent out, so we'll see how the stove performs when I get it.
Just for the heck of it, I dug up a pic I took of it way back Dec 1 when I first noticed bits of metal flaking and chunking off. I had flaking on the outside that I wasn’t sure if it was paint or some kind of coating. On the inside of the pot there looked to be a few spots as well...
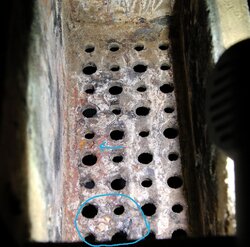
And here you can see the flaking on the outside. Also taken Dec 1, after a little over a month of burning maybe?
 so yes I am very familiar with the entire manual including that little line. My flue is 6" round which I lined myself a few years ago for my Hearthstone Shelburne. What I did about 2 weeks ago was reluctantly pull the liner out and put 4" duravent up the old chimney (about 15' tall).
 <Here is what it looks like now with duravent all the way, before packing the thimble with Roxul. Still have to finish it off with something to cover the thimble that looks nice though.
I don't want to derail acammer's thread though... got an email back from ESW saying a replacement burnpot is being sent out, so we'll see how the stove performs when I get it.
Just for the heck of it, I dug up a pic I took of it way back Dec 1 when I first noticed bits of metal flaking and chunking off. I had flaking on the outside that I wasn’t sure if it was paint or some kind of coating. On the inside of the pot there looked to be a few spots as well...

And here you can see the flaking on the outside. Also taken Dec 1, after a little over a month of burning maybe?

Last edited:
adam6979
Member
I would suspect a flaw in the metal of your pots - perhaps over heating by an inexperienced welder? I seen that degradation in miscellanous items that were "over-heated" by poor welding skills. If it was my stove I would plasma out the bottom and re-weld a new floor in it.... but then again you need welding skills too..
SmokeyTheBear
Minister of Fire
I would suspect a flaw in the metal of your pots - perhaps over heating by an inexperienced welder? I seen that degradation in miscellanous items that were "over-heated" by poor welding skills. If it was my stove I would plasma out the bottom and re-weld a new floor in it.... but then again you need welding skills too..
Along with that you also have excess chlorides in the pellets, improper air/fuel ratios, and even the cleaning of the the pot. Lots of interesting thermal and chemical induced things outside of possible improper grade of metal being used for the burn pot.
You can have any combination of the above at work at the same time in a single pot pelletized fuel does not evenly distribute itself over the burn pot bottom.
SmokeyTheBear
Minister of Fire
Your stove produces among other things H2O, CO2, CO, C , and byproducts of any chlorides in the fuel. C, and CO are all voracious oxygen consumers, when the C is burned the temperature is very high (metalworking conditions). Chlorine and H2O are corrosive, as are other byproducts of the process.
Thermal stress by itself can over time crack the metal due to repeated heating and cooling cycles.
Thermal stress by itself can over time crack the metal due to repeated heating and cooling cycles.
My new pot landed Saturday, I'll be dropping it in at my next cleaning this evening or tomorrow morning. Both of my old pots do have metal flaking off of them. I definitely understand what Smokey is saying about how the combustion process can attack and erode the material through a variety of means (chemical, thermal, etc). However, I believe that these pots should be engineered to tolerate these conditions to a extent further than the appear to be able to. I had 30 days on a new burn pot before a opening formed between holes on the bottom. I was diligent in my cleaning, the stove is unmodified, and I've never heard any complaints that the fuel I'm burning creates any issues regarding burn pot degradation. (It is renown for sticking in the hopper - Gosh I hate Heatr's, never again!) 30 days and then failure is a materials defect - accelerated by maximum load, but a defect none the less.
LordmetalZ28
Minister of Fire
Where having the same problem with our ashley 5660l burn pots. The problem is cheap chinese crap metal. ( yes my stove is spotless all nooks and crannies, chimney pipe, combustion motor removed all flue passages clean, before somebody starts that conversation) its not your fault. My burn pot is actually getting built today as we speak at a machine shop with better materials. Thats the only solution in my eyes.
Where having the same problem with our ashley 5660l burn pots. The problem is cheap chinese crap metal. ( yes my stove is spotless all nooks and crannies, chimney pipe, combustion motor removed all flue passages clean, before somebody starts that conversation) its not your fault. My burn pot is actually getting built today as we speak at a machine shop with better materials. Thats the only solution in my eyes.
I'm pursuing a similar route - having a better burn pot built.
mchasal
Burning Hunk
My burn pot is actually getting built today as we speak at a machine shop with better materials. Thats the only solution in my eyes.
I'm pursuing a similar route - having a better burn pot built.
Would be interested in knowing the details of your builds. Type of steel, costs, etc. Of course how well it performs as you use it also.
LordmetalZ28
Minister of Fire
Ill keep posted. The shop is trying to go thicker with metal not from the east end of the worldWould be interested in knowing the details of your builds. Type of steel, costs, etc. Of course how well it performs as you use it also.
adam6979
Member
Exactly what I would suggest for anyone - if you have the resources or the contacts get a better one made, for everyone else keep buying from the same factory that makes money on replacing them... I think 1/4" stainless could make a heck of a burn pot.... or possibly AR500 as long the temps do not exceed the tempering... I know we shoot at it with 556 and 308's with 1000's of rounds and not a blemish... might make a great pot if you can find someone to work with the materials. My current pot in my 55trpah is now in it's 3rd year and I just noticed it is starting to burn through in a couple small areas... if I buy another one and it lasts another 3 years I'd be happy.. but most likely I will cut out the floor and replace with another piece of 1/4" flat stock.
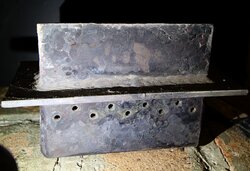
Hey all - I finally got around to dropping my new burn pot last night after spending a week fighting with the roof, the plow frame on the RZR, the garage door opener, the bathroom sink, etc (I just love being a homeowner). I took a couple of pictures just for comparisons sake Couple interesting things between the pots - the newest pot seems to have the largest holes of the three. This is really evident on the front vertical wall of the pot. In that same photo you can see on both of the failed pots that there is metal flaking off of the pot at the edge of the front wall and floor of the pot. The failures are both near this area, and can be seen in the picture of the bottoms of the pots.
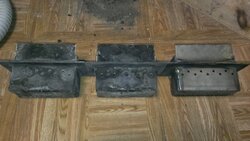
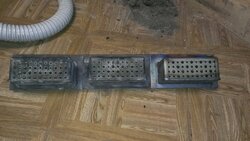
Finally, I snapped an interesting photo of the second burn pot that really shows the metal flaking off. Its interesting to note that this is even occurring on the front wall where it is the coolest of any point on the pot. When that big chunk fell off I heard it clank on the floor, it's definitely metal and not a build up. This sort of degradation is what occurs to the bottom of the pot as well, just cheap metal.
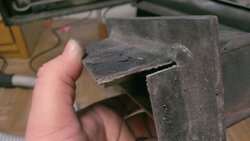
I don't have any high hopes for the new pot they sent, but I am working with someone to have a stainless steel version constructed which should tolerate whatever I throw at it. It may be several weeks before I have that in hand, but I'll grab some pictures once I do.


Finally, I snapped an interesting photo of the second burn pot that really shows the metal flaking off. Its interesting to note that this is even occurring on the front wall where it is the coolest of any point on the pot. When that big chunk fell off I heard it clank on the floor, it's definitely metal and not a build up. This sort of degradation is what occurs to the bottom of the pot as well, just cheap metal.

I don't have any high hopes for the new pot they sent, but I am working with someone to have a stainless steel version constructed which should tolerate whatever I throw at it. It may be several weeks before I have that in hand, but I'll grab some pictures once I do.
OhioBurner©
Minister of Fire
I got my new pot put in a few days ago also. I hear you about home ownership. My next week off in my rotation I plan on ripping out two rooms with original plaster and lath walls in the upstairs that have uninsulated walls and ceiling, and the laundry room downstairs which has all sorts of cold air leaking up from the basement and between the walls of the addition.
I'd consider having one fabbed up locally out of stainless but I'm still half tempted to upgrade to a nicer stove, and sell the PAH (if I can be sure its running decently finally). There is such a jump in price to a nice unit though. Seems there isn't much in the middle? $1000 for a refurb ESW, $1500 for new. Or $4000 for a new Quad, Harman, etc... so where are all the $2-3k stoves? Anyhow, topic for a different thread. Along with the burn pot I got new combustion blower gaskets finally so I can pull it and do a true deep clean. Just waiting on a bit warmer weather and the time off. Below zero this morning, hopefully for the last time this winter.Was going to try to do it all at once, but couldn't wait on the pot mine was literally falling apart. The hole was big enough, and I was desperate to keep it running in the cold, that I put a chunk of brick in the bottom of the pot to cover up the gaping hole that pellets could just fall through lol. But as soon as I got the new pot I put it in.
I didn't compare side by side my new pots, but I did carry the new one out to the garage to find some drill bits to clean the holes with. I think my reaming with a flat screwdriver with the cheap burn pot isnt the best method and probably contributes to wearing the metal out. The small holes I picked an 11/64" bit and the big ones 15/64". The holes might have been a 64th larger but I didn't want to take the chance of tearing into the side of the hole if the bit wasn't perfectly aligned. Plus I won't miss those odd sizes from the set if I leave them permanently by the stove.
Last edited:
Similar threads
- Replies
- 1
- Views
- 755
- Replies
- 0
- Views
- 822
- Replies
- 2
- Views
- 275
- Replies
- 6
- Views
- 573


 They all seem to be failing. Not good.