I saw that someone had posted some questions about the Kuma Sequoia in the last couple of days, so I decided to post some pictures and give a brief summary of my install experience from this past fall. This is my first insert, and I found this website to be extremely helpful throughout the process. In addition, we did not have a local dealer at the time of my purchase, so the Freeman family of Kuma very patiently answered all of my questions. Kuma really seems like an excellent American family-oriented company.
We have about a 3,500 sq. ft. two story home in southwest Missouri with a centrally located brick fireplace in a vaulted living room. I installed two 68" ceiling fans to help move air around better, and I did not purchase the optional fan for the insert because I was hoping to have less noise. We had a heatform type metal firebox liner that I had to greatly alter using a grinder (slow, noisy, and dirty, but eventually successful). I purchased the 8" chimney liner from Fireside Chimney Supply and installed it (no pictures because I had my hands full trying to not die). I placed Roxul insulation just below the chimney top as well as above the block off plate I made from a piece of sheet metal. I used an appliance dolly with moving blankets, a furniture dolly, a motorcycle jack, a roll bar, a sheet metal slide, and some friends to move the insert from my garage to the inside of the fireplace. We decided to cut the surround down and make a decoration in it. We did this partly because my wife didn't like that much brick covered or the solid black appearance. We also thought there might be just a tiny bit of heat that was be available to come through the holes in the surround. Finally, I wanted to be able to see the catalytic thermometer that is normally hidden behind the surround. I used my jigsaw and electric drill to cut down the surround and make the little holes all over it. I then used the paint they recommended to repaint the surround. I made a slate hearth pad to get the 18" protection in front of the insert. I converted my fireplace toolkit broom into an ash rake, and I made a rolling woodbox out of some cedar.
I only had about 1 1/2 cords of wood good and dry, so I haven't burned it quite as much as I would have liked, but I have plenty ready for next winter which we are excited about. Being a woodburning rookie, I don't have much to say comparing the performance to anything else. However, we have been totally satisfied and have really enjoyed the insert this winter. When I've kept it going, it was able to meet all of our heating needs by itself even on our coldest days this winter and made the main part of our home much more comfortable than we had been before. I definitely want to express my appreciation to all of you who have been such a great resource for me. It would have simply been too overwhelming to try to figure all of this out and do it myself without all of your advice and experience.
 View attachment 152983
 View attachment 152986
  View attachment 152988


We have about a 3,500 sq. ft. two story home in southwest Missouri with a centrally located brick fireplace in a vaulted living room. I installed two 68" ceiling fans to help move air around better, and I did not purchase the optional fan for the insert because I was hoping to have less noise. We had a heatform type metal firebox liner that I had to greatly alter using a grinder (slow, noisy, and dirty, but eventually successful). I purchased the 8" chimney liner from Fireside Chimney Supply and installed it (no pictures because I had my hands full trying to not die). I placed Roxul insulation just below the chimney top as well as above the block off plate I made from a piece of sheet metal. I used an appliance dolly with moving blankets, a furniture dolly, a motorcycle jack, a roll bar, a sheet metal slide, and some friends to move the insert from my garage to the inside of the fireplace. We decided to cut the surround down and make a decoration in it. We did this partly because my wife didn't like that much brick covered or the solid black appearance. We also thought there might be just a tiny bit of heat that was be available to come through the holes in the surround. Finally, I wanted to be able to see the catalytic thermometer that is normally hidden behind the surround. I used my jigsaw and electric drill to cut down the surround and make the little holes all over it. I then used the paint they recommended to repaint the surround. I made a slate hearth pad to get the 18" protection in front of the insert. I converted my fireplace toolkit broom into an ash rake, and I made a rolling woodbox out of some cedar.
I only had about 1 1/2 cords of wood good and dry, so I haven't burned it quite as much as I would have liked, but I have plenty ready for next winter which we are excited about. Being a woodburning rookie, I don't have much to say comparing the performance to anything else. However, we have been totally satisfied and have really enjoyed the insert this winter. When I've kept it going, it was able to meet all of our heating needs by itself even on our coldest days this winter and made the main part of our home much more comfortable than we had been before. I definitely want to express my appreciation to all of you who have been such a great resource for me. It would have simply been too overwhelming to try to figure all of this out and do it myself without all of your advice and experience.
View attachment 152983 View attachment 152986 View attachment 152988
Last edited:

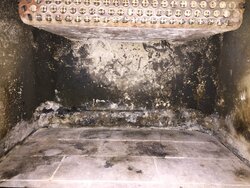
 I'm curious as to what the actual usable firebox size is? In lieu of measurements, a couple of pics would be nice. The Buck 91 claims 4+ cu.ft. but it's more like 3, usable; The height from the floor of the box to the cat shield is probably around 12".