Finally did a wood shed

  • Active since 1995, Hearth.com is THE place on the internet for free information and advice about wood stoves, pellet stoves and other energy saving equipment.

    We strive to provide opinions, articles, discussions and history related to Hearth Products and in a more general sense, energy issues.

    We promote the EFFICIENT, RESPONSIBLE, CLEAN and SAFE use of all fuels, whether renewable or fossil.
Status
Not open for further replies.

golfandwoodnut

Minister of Fire
I haven't been on here in a long time, but wanted to share.

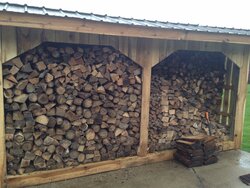
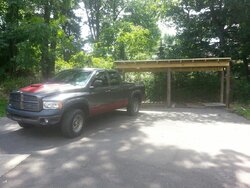
I have been wanting to do a wood shed for a long time. On my property, deep in the woods, were the remains of some old telephone poles. I always thought it would be neat to use some of the poles for a woodshed and finally got around to cutting them and using my Bobcat to haul them out of the woods. I dug holes with a manual post hole digger and a pry bar (to soften up the dirt) and concreted them into the ground.

It cost about $280 to put this together and I did a metal roof. The dimensions are 20' X 8'(it is about 8 ft high in the front, 7 ft in the back) but will probably only store about 5' of wood to allow for the overhang and rain or snow blowing in. For now I put rubber roofing material on the ground to keep the mud off my shoes and put some pallets on top. Will leave an opening to walk through to get to wood on the far side. (there is some gravel under the rubber) I figure just putting on the ground is a lot cheaper than putting in a floor and sturdier, I can replace pallets at any time. Also, I figure if water puddles I will put some holes in the rubber to let it drain.

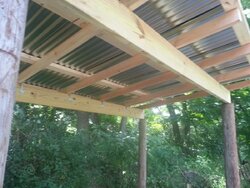
I put 2 X8's treated for the header, then 2 X4's every 2 feet for joists, attached with hurricane straps, then 2X4X10's for the purlins and then the metal roofing material you can get at the box stores. No plywood (it can be expensive now).
 

Attachments

  • 20150805_133537_resized.jpg
    20150805_133537_resized.jpg
    228.1 KB · Views: 602
  • 20150805_133628_resized.jpg
    20150805_133628_resized.jpg
    158.7 KB · Views: 674
Last edited:
Great job. I am doing one with the same basic design... roof on some poles.

How are the headers attached to the poles? Looks like they're just sitting on top?
 
Great job. I am doing one with the same basic design... roof on some poles.

How are the headers attached to the poles? Looks like they're just sitting on top?
On a couple of the poles I notched them (cut in an L shape), cut them with a chain saw of course. A carpenter that builds pole barns showed me that trick. It really is not necessary, but does add some strength and you can screw right into the pole. On the back ones I just cut them flat and toe nailed the headers in place. When they built my deck 25 years ago that is how they did it and they never went anywhere. When you think about it, with all those joists attached they are all holding it in place, they are not going anywhere.
 
Last edited:
It's nice to have asphalt right up to it! I had an old basketball slab that was hardly used. I built my woodshed right up against it, I can process my wood right in front of it. It cut out several steps!
 

Attachments

  • image.jpg
    image.jpg
    521.1 KB · Views: 328
  • Like
Reactions: golfandwoodnut
It's nice to have asphalt right up to it! I had an old basketball slab that was hardly used. I built my woodshed right up against it, I can process my wood right in front of it. It cut out several steps!
That looks nice webby, I like the roof too. I agree about having the pavement up to the shed. I leveled that area and had it paved and left the area behind it for the wood shed. It is close enough to the house, but not too close for bugs etc. I can drive my truck or quad right up to it and keep the mud and ice to a minimum and plow the snow up in the winter with the quad. Building it was probably the easiest thing, it is taking longer to fill it than to build it. Probably only about 6 hours to build after digging the holes.
 
That looks nice webby, I like the roof too. I agree about having the pavement up to the shed. I leveled that area and had it paved and left the area behind it for the wood shed. It is close enough to the house, but not too close for bugs etc. I can drive my truck or quad right up to it and keep the mud and ice to a minimum and plow the snow up in the winter with the quad. Building it was probably the easiest thing, it is taking longer to fill it than to build it. Probably only about 6 hours to build after digging the holes.
Mine took a little more than 6 hours. There was quit a lot involved with the floor structure. It was fun though!
 
It's nice to have asphalt right up to it! I had an old basketball slab that was hardly used. I built my woodshed right up against it, I can process my wood right in front of it. It cut out several steps!
Hey Webby do yo cut split and stack right into your shed? If so how long does it take it to dry? I would love to do something similar. Getting tired of moving wood all around. It's tough when your a 1 man operation.
 
Hey Webby do yo cut split and stack right into your shed? If so how long does it take it to dry? I would love to do something similar. Getting tired of moving wood all around. It's tough when your a 1 man operation.
I bought all the wood that's in the shed. It had been split and stacked for 2 years when I got it. So I'm not sure yet how well it will dry in the middle. I can feel air moving through it though.
 
Last edited:
THANK YOU. I'm just in the process of doing nearly exactly the same thing. Your pictures and description will help me greatly, especially the roofing details.
great, glad it helps. by the way, make sure you get the self tap screws made for metal roofs. I had a bunch left over after some guys built a pole barn. It makes it really simple to screw in and has a washer to seal out the rain.
 
Thanks again to golfandwoodnut.. Here''s my progress on my woodshelter, 20' x 55" with 6' rear and 7.5 ft front. I should be able to get between 2.5 - 4 full cord in there depending on how high I want to stack and whether I stack 2 vs. 3 rows of 16-18" splits. I've got clear polycarbonate roofing left to install. I think I'm good shape. Again, O.P. really helped me work out the details and saved a bunch of time. Many thanks..
20150824_194638_zpstjtw8yb5.jpg
 
Status
Not open for further replies.