My ash solution for the Jotul F55 (pic heavy)

  • Active since 1995, Hearth.com is THE place on the internet for free information and advice about wood stoves, pellet stoves and other energy saving equipment.

    We strive to provide opinions, articles, discussions and history related to Hearth Products and in a more general sense, energy issues.

    We promote the EFFICIENT, RESPONSIBLE, CLEAN and SAFE use of all fuels, whether renewable or fossil.
Status
Not open for further replies.

7acres

Minister of Fire
Dec 5, 2013
653
South East USA
Last year was our first Winter running the F55 or any wood stove for that matter. I wanted to identify what I needed as I went along instead of investing in an ash vacuum and a set of fireplace tools up front. For anybody running a wood stove with the need to transport hot coals you've needed to solve this problem one way or another.

At first I made due for a couple months with just a 17" metal dust pan simply scooping up a load of hot coals and carefully walking them outside the house where I would dump them and put them out with water. After putting too many burn spots in the wood floor from the inevitable coal that would get loose on me I engineered the following solution. I used it the remainder of the season last year and it proved to be a great design that totally filled my need. Here's what I made and some blurry pics of how it is used.
IMG_20150201_182836.jpg

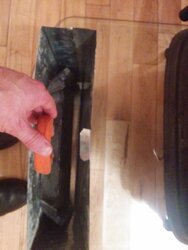
Notice the tab that points inward.
IMG_20150201_182943.jpg

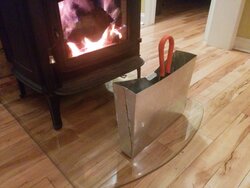
In storage. The wood stove is directly opposite the wall where this lives.
In Storage.jpg

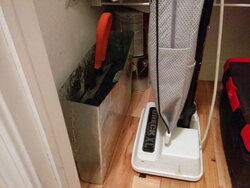
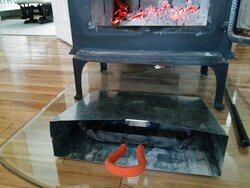
Step 1: Set it down on the hearth and slide it under the stove.
Slide it under the stove.jpg

Step 2: Get a nice big scoop of hot coals. As tall of a scoop as you can.
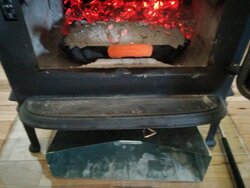
Big scoop with dust pan.jpg

Step 3: Carefully remove the dust pan from the stove and slide it inside the metal guard. Lift up on the dust pan handle and pull toward you. The pan catches on the inverted tab.
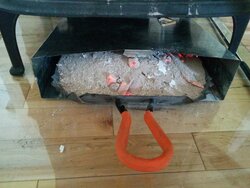
Place loaded dust pan into caddy.jpg

Step 4: Walk outside with the secured and protected coal load. Setting the load on the ground effectively pushes the guard away from the dust pan allowing you to remove the pan and discard the coals. Some coals will be left inside the guard. Simply dump those out too. Put the dust pan back inside the guard and walk back inside. Repeat 1-4 until your coal bed is reduced to where you want it. The whole process takes 1 minute. I can have my stove coal-free in just 3 scoops.
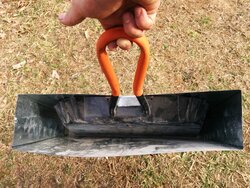
Carry a load of coals outside to discard.jpg

I designed it using AutoCad 3D. Just kidding. Only used a piece of cardboard to design a pattern.
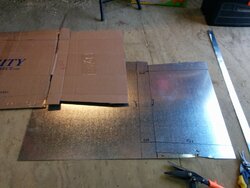
1 Fabrication.jpg

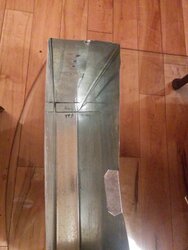
Then I made all the folds on a commercial metal forming brake press. Eh, kidding again. Just used the sharp edges of my old cast iron table saw wings, some clamps, a pine board and a little elbow grease. My neighbor did the welds to the galvanized sheet metal as we both held our breath to prevent inhaling the toxic wisps of smoke.
2 Folded _ Welded.jpg
Serial #000001 has passed all testing. I like it a lot. Not sure there's demand for more than one of these units though :)
 
Last edited:
Good Job, I use a smaller shovel and scoop into a Metal bucket with a lid, when done it goes to front porch to cool...
 
Forgot the topic...liking the glass pad. Others have posted the same, when you have beautiful flooring, glass really sets it off.
 
  • Like
Reactions: 7acres
And a Golf Club for a Poker :)
 
  • Like
Reactions: 7acres
Good Job, I use a smaller shovel and scoop into a Metal bucket with a lid, when done it goes to front porch to cool...

Just the act of dumping the ash into the bucket causes a woosh of air and hot lighter-than-air ash flies up and out. How do you prevent that?
 
Just the act of dumping the ash into the bucket causes a woosh of air and hot lighter-than-air ash flies up and out. How do you prevent that?

For me, when I have to do a little scooping of ash, I don't "dump" the ash into the bucket. I put the lip of the scoop all the way to the bottom and gently lay the ashes into it. I leave the coals behind and try to just scoop ash so it isn't as hot.
 
  • Like
Reactions: Beer Belly
For me, when I have to do a little scooping of ash, I don't "dump" the ash into the bucket. I put the lip of the scoop all the way to the bottom and gently lay the ashes into it. I leave the coals behind and try to just scoop ash so it isn't as hot.

Makes sense. That's the only way it would work. For me it's too slow and tedious.
 
I don't dump coals; it's fuel after all. First I push everything (ashes and coals) to the back. Then I carefully rake the coals forward until they form a nice pile behind the door. Then with a simple fireplace shovel I take a scoop of ash from the back. The bucket is right in front of the door. I put the scoop inside, cover with the lid only leaving a small opening for the handle, and then slowly let the ashes slide into the bucket. Minimal ash escapes and what comes out is usually sucked into the stove by the draft.

After that I reload the stove with fresh wood, some E-W behind the coal pile and the rest N-S on top of that mixed coal-wood bottom layer. The air from the air wash will then help burn down the coals and ignite the fresh wood. Burning some occasional softwood is also a good way of getting rid of excess coals.
 
  • Like
Reactions: Beer Belly
That galvanized steel is very likely off gassing once the hot coals get loaded up. Be careful.
It's a neat design, very innovative! My Ashford has a very nice Ashpan system, but if I had no Ashpan I would definitely be interested in something like this.
 
Part of my goal was to have something easy and safe my wife would be comfortable using when I'm not home. I had her buy-in on this concept before I fabricated it. When it was done and I demonstrated it for her she was quite impressed. I wasn't really trying to impress her, per se. But I'll take anything I can get ;)
 
It looks like a nice design, but like Grisu said, taking out so many hot coals isn't typical for most folks who are removing some ash from their stoves. I would never try to empty ashes from stove with as many hot coals as you show in your photo. Maybe you don't either and just had them in your photos. One thing I would be very careful of with your system is that you don't slip or bump something on you way out of the house with that hopper filled with hot coals and ash. The lip that goes over the back edge of your dustpan looks like it could come dislodged pretty easy if you slipped. I know when I am emptying my ash pan I'm always very cautious when carrying a pan filled with hot ashes as I go down a set of carpeted steps.
 
  • Like
Reactions: Beer Belly
It looks like a nice design, but like Grisu said, taking out so many hot coals isn't typical for most folks who are removing some ash from their stoves. I would never try to empty ashes from stove with as many hot coals as you show in your photo. Maybe you don't either and just had them in your photos. One thing I would be very careful of with your system is that you don't slip or bump something on you way out of the house with that hopper filled with hot coals and ash. The lip that goes over the back edge of your dustpan looks like it could come dislodged pretty easy if you slipped. I know when I am emptying my ash pan I'm always very cautious when carrying a pan filled with hot ashes as I go down a set of carpeted steps.

I fully agree with your comments. Just for the record, I'm not putting this out there as any type of recommended industry best practice. It's just the solution I settled on. Folks thinking of buying the F55 reach out to me via PM for my thoughts, pros and cons, etc. With the F55 there is no built in ash solution. So you're going to have to figure something out. I put this post out mainly for those folks. It can be hard to describe what I did without all the pictures and such.

I admit, my solution is not for everybody but you always have to be safety conscious when transporting hot coals no matter what your solution. Slipping and bumping on the way out the house won't end well even for those using a proper bucket and lid. !!! Of course the ultimate solution is to only use perfectly seasoned wood and practice what Grisu described above (which I do most of the time).
 
Last year was our first Winter running the F55 or any wood stove for that matter. I wanted to identify what I needed as I went along instead of investing in an ash vacuum and a set of fireplace tools up front. For anybody running a wood stove with the need to transport hot coals you've needed to solve this problem one way or another.

At first I made due for a couple months with just a 17" metal dust pan simply scooping up a load of hot coals and carefully walking them outside the house where I would dump them and put them out with water. After putting too many burn spots in the wood floor from the inevitable coal that would get loose on me I engineered the following solution. I used it the remainder of the season last year and it proved to be a great design that totally filled my need. Here's what I made and some blurry pics of how it is used.

View attachment 160831

Notice the tab that points inward.
View attachment 160832

In storage. The wood stove is directly opposite the wall where this lives.
View attachment 160833

Step 1: Set it down on the hearth and slide it under the stove.
View attachment 160834

Step 2: Get a nice big scoop of hot coals. As tall of a scoop as you can.
View attachment 160835

Step 3: Carefully remove the dust pan from the stove and slide it inside the metal guard. Lift up on the dust pan handle and pull toward you. The pan catches on the inverted tab.
View attachment 160836

Step 4: Walk outside with the secured and protected coal load. Setting the load on the ground effectively pushes the guard away from the dust pan allowing you to remove the pan and discard the coals. Some coals will be left inside the guard. Simply dump those out too. Put the dust pan back inside the guard and walk back inside. Repeat 1-4 until your coal bed is reduced to where you want it. The whole process takes 1 minute. I can have my stove coal-free in just 3 scoops.
View attachment 160837

I designed it using AutoCad 3D. Just kidding. Only used a piece of cardboard to design a pattern.
View attachment 160838

Then I made all the folds on a commercial metal forming brake press. Eh, kidding again. Just used the sharp edges of my old cast iron table saw wings, some clamps, a pine board and a little elbow grease. My neighbor did the welds to the galvanized sheet metal as we both held our breath to prevent inhaling the toxic wisps of smoke.
View attachment 160839
Serial #000001 has passed all testing. I like it a lot. Not sure there's demand for more than one of these units though :)
 
I really like your flooring what kind of glass and what would be the approx. cost
 
I had her buy-in on this concept before I fabricated it. When it was done and I demonstrated it for her she was quite impressed.

The only Shark Tank that matters for a husband.

I had to sell my wife on 1) a cast iron stove would be warmer and ultimately cozier than her big brick fireplace, and 2) a cast iron stove would look really nice in her big brick fireplace. Selling #1 was hard enough, but the price of oil was working with me. Once the stove was in, she was sold on its form as well as its function.

I like your design, but no matter what kind of stove (or fireplace) we have, my wife will make sure it has an ash solution: me.
 
I really like your flooring what kind of glass and what would be the approx. cost

Just under $600. The shipping was a significant cost since Morso will only ship via a flatbed truck after having too many break shipping via other methods. I actually sourced a cloned hearth plate from a local glass dealer. The cost was only about $50 cheaper than going with a Morso. So I opted to go with the real deal in the end.

Also, you will need a slightly larger ember protection footprint than only the Morso plate here provides if you intend to use it with this stove. Just butt an extra plate in the back to get to the size you need. Also, make sure to use clear caulk around the perimeter of the entire glass surface. An invisible bead will prevent any dust/ash/dirt from accumulating under the plate.
 
...my wife will make sure it has an ash solution: me.

You got that right! Honestly with this solution it just means I can stay on top of it easier so she never has to worry about it whatsoever. ==c
 
That galvanized steel is very likely off gassing once the hot coals get loaded up. Be careful.
It's a neat design, very innovative! My Ashford has a very nice Ashpan system, but if I had no Ashpan I would definitely be interested in something like this.
Yeah, but how the heck do you get that stupid plug re-installed in the hole on a hot stove full of coals? I've only tried it in a cold stove, and find it nearly impossible... can't even imagine trying it hot.
 
Yeah, but how the heck do you get that stupid plug re-installed in the hole on a hot stove full of coals? I've only tried it in a cold stove, and find it nearly impossible... can't even imagine trying it hot.
It's super easy! If you don't already have an ash hoe, go get one.
 
Got one. Actually, two! Your plug must fit looser than mine, though.

Is your plug strap hole at a 45 degree angle? I'm thinking I might bend hook tool from 90 to 45, to make it easier to use.
 
Got one. Actually, two! Your plug must fit looser than mine, though.

Is your plug strap hole at a 45 degree angle? I'm thinking I might bend hook tool from 90 to 45, to make it easier to use.
No, that was part of the 30.1 revision. Including a larger plug.
 
I wonder what revision mine are. I bought two, and they were both delivered from BK at the same time. One has numbers on the dial, the other has the new sticker without numbers. Both seem to have the same ash plug and modified brick pattern, tho.
 
I'm pretty sure they changed the stickers after the 30.1 was in production.
 
I don't dump coals; it's fuel after all. First I push everything (ashes and coals) to the back. Then I carefully rake the coals forward until they form a nice pile behind the door. Then with a simple fireplace shovel I take a scoop of ash from the back. The bucket is right in front of the door. I put the scoop inside, cover with the lid only leaving a small opening for the handle, and then slowly let the ashes slide into the bucket. Minimal ash escapes and what comes out is usually sucked into the stove by the draft.

After that I reload the stove with fresh wood, some E-W behind the coal pile and the rest N-S on top of that mixed coal-wood bottom layer. The air from the air wash will then help burn down the coals and ignite the fresh wood. Burning some occasional softwood is also a good way of getting rid of excess coals.
This is pretty much what I do as well - coals are good fuel, so I don't know why you would want to scoop them out.
 
I have no ash pan on my stove either. The simplest solution I've found is to burn down all the coals to ash and let the stove burn out. Then I scoop them into bucket and carry them outside. Restart the fire and I'm good for another 2 weeks.
 
  • Like
Reactions: jeffesonm
Status
Not open for further replies.