Boiler "Upgrade" to Jetstream

  • Active since 1995, Hearth.com is THE place on the internet for free information and advice about wood stoves, pellet stoves and other energy saving equipment.

    We strive to provide opinions, articles, discussions and history related to Hearth Products and in a more general sense, energy issues.

    We promote the EFFICIENT, RESPONSIBLE, CLEAN and SAFE use of all fuels, whether renewable or fossil.
Status
Not open for further replies.
You may want to review Tom's website (Americansolartechnics.com) before you build a tank. A 1" hx is not the most efficient and epdm is not the ideal liner material.

No that wasn't the plan. I actually just got back from picking up a 500Gal propane tank at Tri-province, I'm going to try it with 500G and later upgrade it with another tank to 1000 If I feel the need. For anyone wondering you can fit a 500 gallon propane tank on the back of a short box half-ton, days like this I wish I had a real truck.

I'm going to stand the propane tank on it's end, seems to me that would be better for keeping all the hot water at the top of the tank. Anybody know if it would be worth the extra bother of building the stand? Or would I be better off just laying it on it's side the way it was designed to be.
 
Lol, he doesn't want to sell one does he?

I'm planning on using an actual shop vac for mine, at least to start.


The vacuum motor that I have used is a Ametek Lamb Electric (116311-01) producing 99 CFM and can be bought from the link below.

http://www.centralvacuummotor.com/lighthouse.htm


The difference between 120 CFM and 99 CFM is big in performance: the 120 jumping the boiler output to close to 200,000 BTUs per hour and taking the refractory beyond its working limits in temperature.

So was 120 CFM what the original fan unit produced?
 
The original was 96 CFM, the water column is also important and the original was 85 which the 1163-01 produces.

Google "jetstreams out with the old" and you will find my install of a new Jetstream last Sept.


Because he doesn't have a draft inducer yet he can size the port to blow any excess flow up the stack.

Hobbyheater, I've read your Jetstream posts, lots of very useful information. I've got to admit I had to hold back a tear when you mentioned breaking up the old refractory base to get it out! I know it lead a long useful life but it's still sad knowing that there e is one less unit out there.

My shopvac motor that I have here supposedly produces 120CFM. As slowzuki mentions I am missing the draft inducer and will have to fabricate one. I could divert more air through that but I have a feeling it would still increase the CFM's running through the firebox. The plan at the moment is to use a fan speed controller to slow the vac motor down to the correct CFM. I couldn't find any mention of the original fan's output, many thanks for that.

CFM I understand, but I admit the water column confuses me a little. Wouldn't it stand to reason that the same CFM running through that particular size pipe (Stainless steel air nozzle on the Jetstream) would natural create the same water column measurement?
 
CFM I understand, but I admit the water column confuses me a little. Wouldn't it stand to reason that the same CFM running through that particular size pipe (Stainless steel air nozzle on the Jetstream) would natural create the same water column measurement?

The two stage vacuum motors when used as blowers create a certain amount of pressure. I tried using a forge blower that was 120 CFM. It lacked the pressure and could not do the job.
 

Attachments

  • 4.jpg
    4.jpg
    111.6 KB · Views: 149
With the correct wc (pressure) on the nozzle into the chamber, the size of that nozzle sets the air flow. As the unit gets older and the nozzle wears a larger opening, the CFM will climb. The inducer slightly affects the airflow but it runs at a just barely negative pressure and doesn't affect it that much. Even when full flow diverted to the inducer with lid open.
 
i think its worth it. stratification is more awesomer like this. save floor space also.
https://www.hearth.com/talk/threads/sending-500-gallon-tanks-verticle.107273/

I originally wanted to stand it up, but after getting the tank here it looked like it would be so easy to just set it in the building under the pallet racking, I could even use the ports already in it. I've heard that stratification is not so important for radiant heat, but after taking measurements my pallet racking is only 8ft and the tank 9, so I've got to stand it up. Just as well I'm sure as you say it will work better.

I like your tank stands, they look much better and easier to build than what I had in mind. How thick is your steel plate? Do you think you bleed any heat to the floor?
 
For anyone wondering you can fit a 500 gallon propane tank on the back of a short box half-ton, days like this I wish I had a real truck.
Having had a "real truck" (1-ton crew-cab-longbed-4x4) I strongly suggest getting through the "backing up a trailer" learning curve and only take the large bed along when you need it. Twice the fuel milage the REST of the time is nice...and a 14 foot bed is handy, too.
 
the tank keeps failing my pressure test. I attached an airline to the boiler and filled it to 30PSI. Seems like every time I get one air leak fixed another pops up.
Just a note - this is the REALLY hairy way to do this. You should fill with water, not air, to pressure test. If you get a serious failure when pressure testing with water, you get wet. With air, you can get shrapnel.
 
I like your tank stands, they look much better and easier to build than what I had in mind. How thick is your steel plate? Do you think you bleed any heat to the floor?
i think its 5/16". originally i was jsut going to weld 4 angle iron legs to the side and call it done. but i think the whole frame is more stable. plus the added surface area doesnt hurt.
bleed heat to the floor. i suspect i do. concrete doesnt feel warm but i have to be losing BTUs. if i were to do it over i would lay down a sheet of HDPE or similar between the floor and the steel plate to try to isolate the heat transfer. thought about that after the fact...
 
Just a note - this is the REALLY hairy way to do this. You should fill with water, not air, to pressure test. If you get a serious failure when pressure testing with water, you get wet. With air, you can get shrapnel.

Thanks for the warning! I actually had a buddy of mine over helping me, who pointed it out already, so I stopped doing it. Stupid really, I ought to know better. If I'd taken a moment to think about it, 30 Psi of compressed air is very different from water pressurized to 30 Psi.
 
Just a note - this is the REALLY hairy way to do this. You should fill with water, not air, to pressure test. If you get a serious failure when pressure testing with water, you get wet. With air, you can get shrapnel.
No, not really. If you peek inside and see no signs of prolonged corrosion damage and the outside has no significant defects, then 30 psig in a used propane tank should be no problem whatsoever. The test was for leaks, not for tank integrity under pressure.
 
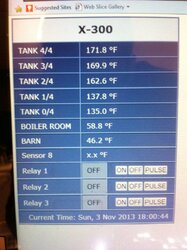
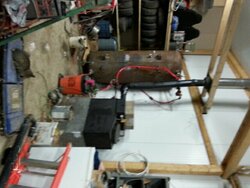
Finally got it together and fired up! Seems to work pretty good, got lots of fine tuning to do but it sure burns wood.

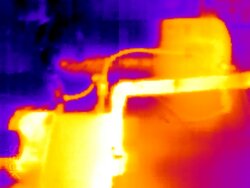
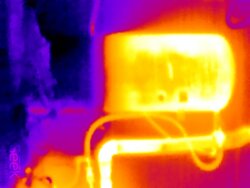
Propane tanks make decent radiators, 30C in the shop, guess insulation for that tank is my next step.
 

Attachments

  • jetstream1.jpg
    jetstream1.jpg
    66 KB · Views: 211
  • jetstream3.jpg
    jetstream3.jpg
    33.5 KB · Views: 209
  • jetstream2.jpg
    jetstream2.jpg
    35.6 KB · Views: 210
Well, after having a few fires in the boiler this fall the cement that bonds the steel tank to the refractory base has failed. Smoking a little. I used this stuff I found local at Canadian Tire: http://bit.ly/1MWpJP2
In the end it appeared to be more related to some form of silicone or something after hardening, didn't really look like any kind of cement. It was very brittle when cured and I think that's what caused the failure. I'm also thinking that it probably isn't very thermally conductive, and not helping me move the heat out of the refractory base and into the water.
Thinking about ordering this stuff from Amazon: http://amzn.to/1KHJV5N
This appears to be an actual cement, my only concern being that it is only rated to 2200 degrees. I seem to remember in the back of my mind reading a post by hobbyheater that said he recommended 2800 degree refractory, but as of yet I have been unable to find any rated that high. Anybody know what the original refractory base is made of?
 
An aside - did you get an email a couple days ago from someone pointing to a Jetstream on kijiji? That was me. Too bad you missed it - it looked in pretty good shape in the pic.

Good luck going forward -hopefully you get more input.
 
I phoned about that jetstream too but it was gone asap. Re the cement, it is very brittle, I was warned by the former dealer not to be stingy with the cement when bedding it down. Thick layer all around. The refractory is a few different types of material, the base is supposed to be more insulating, the burn pot is supposed to a very durable type so log's dropping in don't erode the wall. If it has separated at the top layer only and is still bonded to the base, a thin careful layer of highest temp rated silicone should survive fine to reseal. The metal tank even where it touches the base will be close to 100 C, the thicker the layer of silicone though the higher it will get in temp as it insulates.
 
An aside - did you get an email a couple days ago from someone pointing to a Jetstream on kijiji? That was me. Too bad you missed it - it looked in pretty good shape in the pic.

Good luck going forward -hopefully you get more input.

Thanks. I had already called about it and unfortunately it was gone. I was kinda surprised actually. You would think your average Joe would look at one of those and be a bit intimidated by how odd it is. Anyway just gotta keep my eyes peeled apparently there are a few Jetstreams still out there in the wild.
 
The original was 96 CFM, the water column is also important and the original was 85 which the 1163-01 produces.

Google "jetstreams out with the old" and you will find my install of a new Jetstream last Sept.

I see you are casting your own replacement pieces for the jetstream.
Could you send me the dimensions for the tunnel.
I've been using split fire brick but they dont give quite as clean combustion

Brian
 
I see you are casting your own replacement pieces for the jetstream.
Could you send me the dimensions for the tunnel.
I've been using split fire brick but they dont give quite as clean combustion

Brian

I've never cast a replacement nozzle, I believe hobbyheater has, but I had mine out cleaning ashes this morning and took a few measurements. I've been thinking I should probably try to make a plaster mold of it or something now while it's still in such good shape. It's a pretty complex shape so it's hard to explain the measurements, hopefully this can be some use to you.

The casting is 1.5 inches thick
The tunnel is 8.5 inches wide, 13.5 inches long
The 'shelf' is roughly 3.5 inches long, the main body is 9 inches long at the top and 8 at the bottom.
The Tunnel is 7 inches tall at the high part and 6 at the low end.
DSC05311.JPG
DSC05312.JPG
DSC05313.JPG
DSC05314.JPG
DSC05315.JPG
DSC05316.JPG
DSC05317.JPG
DSC05319.JPG
DSC05320.JPG
 
I've never cast a replacement nozzle, I believe hobbyheater has, but I had mine out cleaning ashes this morning and took a few measurements. I've been thinking I should probably try to make a plaster mold of it or something now while it's still in such good shape. It's a pretty complex shape so it's hard to explain the measurements, hopefully this can be some use to you.

You have a perfect tunnel - very carefully make a reusable mold from it.
Some pictures of my reusable mold.
100_3230.JPG


100_3231.JPG

100_3232.JPG

100_3233.JPG
 
Last edited:
Status
Not open for further replies.