Pellet Stove Vent Installation

  • Active since 1995, Hearth.com is THE place on the internet for free information and advice about wood stoves, pellet stoves and other energy saving equipment.

    We strive to provide opinions, articles, discussions and history related to Hearth Products and in a more general sense, energy issues.

    We promote the EFFICIENT, RESPONSIBLE, CLEAN and SAFE use of all fuels, whether renewable or fossil.
Status
Not open for further replies.

Thomas Tanczos

New Member
Sep 15, 2015
5
Pennsylvania
I just bought the Pleasant Hearth Model # PH35PS from Home Depot and was looking to install.

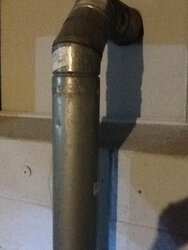
I am new to pellet stoves and could use some help.. I moved into my house 3 years ago and the pellet stove installed was a german brand old school pellet stove with Selkirk pipe.. From inside to inside the pipe measures 3" across..

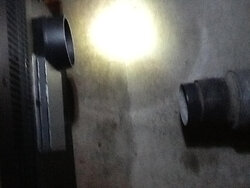
The model I bought measures 2.5 so would need a 3" connect...

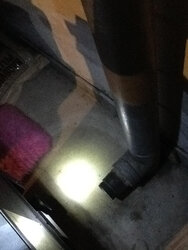
Now heres the problem. The existing pipe is about 2" lower than the back of the stove vent.. Is there a way I could connect them efficiently? Or what do you recommend?
 
Last edited by a moderator:
Hello Thomas, I have the same stove and installed it myself . I'm no expert but the Vent pipe should not be down, neither should any pipe slope down. If anything it should have a rise of 1/4" per foot. Therefor i believe you can not make that connection. I am not familiar with Selkirk but lots of guys use it on this site. Post some pics of the existing installation. Is it out and up or through the ceiling and roof ?.
A little more detail would be helpful.

Once installed you will enjoy the heat.

Dan
 
I agree with Dan. The vent cannot go down and vent properly.

A picture or two would help.
 
Thanks for the reply guys, here are some pics. Will be a little dark as I'm running it out of the basement and lighting is not the best.
 

Attachments

  • Stove1.jpg
    Stove1.jpg
    97 KB · Views: 230
  • Stove 2.jpg
    Stove 2.jpg
    85.1 KB · Views: 262
  • Stove3.jpg
    Stove3.jpg
    84.4 KB · Views: 225
Remove the existing vertical pipe & replace it piece by piece, starting from the stove adapter, to see what you need to make it work.
An adjustable length or one short piece & you should be good to go.
Just make sure the manufacturers of the old & new (if you need it) are the same.
 
  • Like
Reactions: CapeMayDan
Remove the existing vertical pipe & replace it piece by piece, starting from the stove adapter, to see what you need to make it work.
An adjustable length or one short piece & you should be good to go.
Just make sure the manufacturers of the old & new (if you need it) are the same.

X2

Where abouts in Pa. are you?
 
Remove the existing vertical pipe & replace it piece by piece, starting from the stove adapter, to see what you need to make it work.
An adjustable length or one short piece & you should be good to go.
Just make sure the manufacturers of the old & new (if you need it) are the same.

That is the smart way to do it. Check out Selkirks Catalog - http://www.selkirkcorp.com/WorkArea/showcontent.aspx?id=6026
Lots of info, drawings, pipe length and I saw the Adjustable pipe.

Dan
 
Hi, thank you for all the replies.. I have bought the Selkirk 3-4 pipe system and have replaced it piece by piece... two pieces that came with the set was the 4-3 pipe increaser as well as the 3" connector... The increaser fits really snug over the back of the pleasent hearth flu.. Do I still need to use a connector? or could I use high temp alum foil tape with sealent to connect ? Papellet- im from the Quakertown area.
 
Last edited:
I have heard of people doing either way, with or without the stove adapter. I would be worried about smoke escaping between the inner pipe and out pipe if you just used the pipe without the adapter. I'm from Perkasie!
 
I'm going the opposite from MtDew - if the kit included a connector, and it fits, wrap it up (or use RTV - which I believe is what the stove's manual says to), and be done with it. Guess we need a 3rd opinion :)
 
It is really a critical connection, you want a good mechanical connection. They also make connectors for variances in dimensions. You could give them a call if it is a dimension problem.
I would install the pipe connector to the wall pipe, apply High heat caulk to the connector, slide it on to the flue, check to make sure you have a good bead all the way around, Install 3 screws and let it harden up for 24 hrs.

Here are the instructions from Selkirk
COMMON VENT SYSTEM PARTS AND THEIR INSTALLATION
PIPE CONNECTOR (VP-PC, VP-PCB, VP-MFC, VP-APC)
The Pipe Connector is a (“starter section”) fitting used to connect the flue
collar of the appliance to the Model VP vent system. Available in black (PCB)
or unpainted (PC), the connector consists of a single wall cylindrical piece of
stainless steel (which is attached to the flue collar of the appliance) on one
end and a short double wall section of vent on the opposite end which
incorporates a coupling for attachment to other Model VP vent sections. To
install: depending upon the appliance flue collar, insert the Pipe Connector
into or over the appliance flue collar and attach with a minimum of two screws.
A drill with 3/32” bit may be used to drill through the collar and into the connector.

I use self drilling and self tapping screws. the clutch on the drill driver is set low. the screws can be difficult to find in the correct size.
JMO, foil tape is more for pipe to pipe connection which are leaking.

Dan
 
Last edited:
Status
Not open for further replies.