Any reason to rip out old Heatilator?

  • Active since 1995, Hearth.com is THE place on the internet for free information and advice about wood stoves, pellet stoves and other energy saving equipment.

    We strive to provide opinions, articles, discussions and history related to Hearth Products and in a more general sense, energy issues.

    We promote the EFFICIENT, RESPONSIBLE, CLEAN and SAFE use of all fuels, whether renewable or fossil.
Status
Not open for further replies.

snowmanFS

New Member
Oct 16, 2015
2
New England
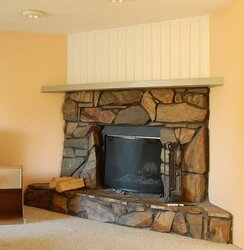
I'm settled on a Century Heating CW2900 (2.4 ft^2 firebox) insert and was about to start demo on the steel fireplace liner in my 1950's era Heatiliator; but then I modeled the basic dimensions and need to pause.

Fireplace.jpg

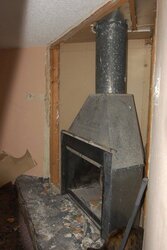
What I have drawn is the basic stove inside the existing steel liner, (which is in working condition). I pushed the insert all the way back until interference occurred and was surprised to see the result. I only need to move back an additional 2.5". I have 3" until the back of the stove touches the sloping back of the firebox.

So my question is, how much of the old box do you think I should remove? I'm leaning towards just enough of the side walls to get my 3" and stuff the surrounding gaps with Roxul. Is there a benefit to removing more?
 
Last edited by a moderator:
Welcome!

Could you please post pictures and a model # for your heatilator? Usually the prefab fireplace cannot be altered in any way other than removing the damper, screens etc. when installing an insert in it. That insert should also be approved for an install in a prefab ZC fireplace. Even then we have frequent discussions here whether that kind of install is really safe. I cite the Century manual:
[The factory built ZC fireplace] must be suitable for use with solid fuel and nothing in the owner’s manual must specifically prohibit the installation of a fireplace insert. When in doubt, check with the fireplace manufacturer. The installation of the zero-clearance fireplace MUST be thoroughly inspected by a qualified person to ensure that it still meets the
manufacturer’s specifications. The chimney must be at least 1" (25 mm) larger in diameter than the stainless steel liner that will run from the insert flue collar to the top of the chimney termination. Never remove parts intended to insulate the zero-clearance fireplace from combustible material. Only readily detachable parts that are easily replaced, such as damper parts, screens, and doors, are to be removed from the fire place. These parts should be stored and available for reinstallation if the insert is ever removed. Removal of any parts which render the fireplace unfit for use with solid fuel requires the fireplace to be permanently labeled by the installer as being no longer suitable for solid fuel until the removed parts are replaced and the fireplace is restored to its original certified condition. Also, any air vents, grilles, or louvers that allow air circulation around the fireplace must not be removed or blocked.
(Emphasis mine.)
 
My opinion - the best thing about built in fireplaces is -usually- the builder does enough math for the chimney pipe to be free of elbows and clear the jpists and rafters.

So I (you) can rip the fool thing out, install modern class A chimney with no elbows in it, and have a proper woodstove radiating heat form all six surfaces instead of settling for an insert in a mountain of brickwork.

If you haven't bought the insert yet I firmly believe it is worth a serious look.
 
Here is three pics of mine before to after. The stone was just a veneer. Demolition was not bad at all, I hung a plastic sheet from the ceiling and put down a chunk of carpet padding to protect the existing carpet.

Once I got to bare Heatilator my chimney installers took out the old and installed the new class A chimney. Then I demo'd the framing under where the heatilator used to be, repaired the drywall, built a hearth, wood stove in was plug and play. Saved enough on fossil fuel to upgrade to a BK one year later...
 

Attachments

  • start.jpg
    start.jpg
    50.2 KB · Views: 3,346
  • demo.jpg
    demo.jpg
    44.5 KB · Views: 6,921
  • done.jpg
    done.jpg
    22.4 KB · Views: 2,750
Hi - just want to be sure that we're not really talking about a 'heatform' unit like mine. Steel shell/vents built into masonry.
I used to use 'Heatilator' incorrectly when referring to it.
 
  • Like
Reactions: begreen
Sorry for the delay on an update, I had some issues with the forum.

1346503409-1-jpg.124400.jpg
To answer questions. The "old" truly is a Heatilator and not a Heatform. Installed in a brick chimney with clay tile liner on an outside wall. A local sweep came by with the cw2900 manual in hand. The consensus was even without the Heatilator the existing masonry surround and chimney is a masonry fireplace, (without a brick smoke shelf). The insert is fine to go in the cavity. The only measure to be mindful of is the floor protection distance, all else is more than adequate, (floor protection rules have changed since the 40's). The masonry footprint dimensions are approximately 6'x4'.
I have now cut out the inner firebox on the Heatilator as well as enough of the steel smoke shelf to give working space for the flue liner to pass through. The demo was not exactly fun. I used a 4 1/2" cutoff wheel to get "pilot" holes started and then a 6" reciprocating blade to run the cuts. I made 7 vertical cuts in the walls of the firebox and a horizontal cut to connect them all above the masonry opening height. That let me bend the sections down and fracture them off at the hearth slab level.

I'll update with pics once I open it up again for the stove install. I boxed it all back in temporarily to prevent drafting the home heat away.
 
That is about all you can do, rip out the old to fit in the new, my suggestion as usual is if this is an exterior fireplace to stuff the cavity behind the metal firebox with roxul and install durock board all inside the fireplace and a block off plate around the liner.
 
Status
Not open for further replies.