Roof Leak

  • Active since 1995, Hearth.com is THE place on the internet for free information and advice about wood stoves, pellet stoves and other energy saving equipment.

    We strive to provide opinions, articles, discussions and history related to Hearth Products and in a more general sense, energy issues.

    We promote the EFFICIENT, RESPONSIBLE, CLEAN and SAFE use of all fuels, whether renewable or fossil.
Status
Not open for further replies.

KindredSpiritzz

Minister of Fire
Oct 31, 2013
798
appleton, wi
PICT4344.JPG PICT4343.JPG
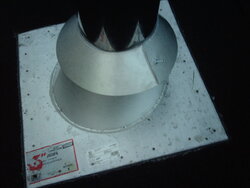
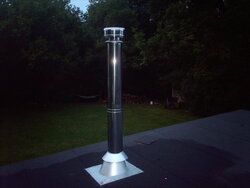
Two weeks i noticed water on top of the stove and a rust ring around the stove pipe collar going into the stove. This weekend while it was raining i sat and watched water drip at a pretty good pace right down the stove pipe from the ceiling. When i installed this i had put 2 rings of silicon around the flashing to seal it to the rolled roof, then a bead along all 4 edges and a dab on all the nail heads and a bead around the storm collar. Thought i did a good job but apparently not. Im going to go up today to use roofing cement to seal along the edges again and hit the nail heads as i noticed the silcon really didnt bond well on some of those. Anything im missing? It's got to be that flashing right? Do i need to be worried about the rust now on my stove?
 
That flashing should be under the roofing not attached to the top. I would get some of the 30 year roofing tar in the gallon bucket and smear a good amount all around the flashing. You don't want any water under there especially once it starts to get below freezing otherwise the water will get under and heave the flashing from the water freezing.

I am also having an issue with water down my stove pipe I need to seal it somehow around the storm cap.
 
  • Like
Reactions: Snotrocket
That flashing should be under the roofing not attached to the top.

its rolled roofing, i dont know how you'd get the flashing under that otherwise i'd agree with you. Had it of been shingles i'd of tucked it underneath. What do you mean by vertical seams?
 
Like the high temp type of silicon you use on cars?
The surface of the chimney does not get that hot. I used GE Silicone II on our old Selkirk chimney seams. It stopped the dripping on the stove. The chimney was removed 7 yrs later and the silicone looked fine.
 
  • Like
Reactions: webby3650
Sorry I didn't answer your question before, I would cut out what you would need to slide the flashing underneath from the bottom edge. It looks like it already covers part of the lower level so cut a u shape out of the layer it is nailed to and you are set after throwing some nails under the layer of shingle. The picture shows what I would do in your case. the black is what needs to be cut out of the shingle and the silver is where it should fall underneath of it.

Shingle cut out.png
 
  • Like
Reactions: bholler
I would bet the flashing is leaking as well.
 
  • Like
Reactions: webby3650
Yeah, the vertical seams in the class a pipe. I had a problem in the past. Water was running down the seam, wicking into the class a pipe down to my support box and then dripping on my stove. Sealed the seams and it stopped.
That is one reason i like ventis stuff they are welded seams so nothing to leak. But in all honesty with the flashing installed like that if it is not leaking now it will it needs to be done correctly like chas said
 
Typically with flashing around a chimney like yours, you would tuck the top of it under the shingle and the bottom would be exposed. That allows the water coming down the roof to go over the top of the shingle and roll down the exposed flashing. I just did my roof and it came out well.

I went a little extreme and along the top of the flashing that touches the decking, I sealed it with a snow and ice underlayment....since I did the entire roof with that as well. That way, if water is under the shingle above the flashing, it could not seep under the flashing.

It does seem strange to transition from the flashing being right on the decking up high, to over the top of a shingle later,,,but it is the right way to do it.
 
I feathered some roofing cement along the flashing edges and over the nail heads and i think that solved the problem. It's been raining for 2 days now and no leaks.
 
This roll roofing looks like a membrane or torch down. Not like regular shingles. Once you cut into it to put the flashing under it would open a can of worms.

Silicone isn't usually too happy sticking to petroleum roofing, the cement is the right product. It should seal better.
 
feathered some roofing cement along the flashing edges and over the nail heads and i think that solved the problem. It's been raining for 2 days now and no leaks.

I am afraid that will be a very temporary fix you really need to get that top edge under the roofing material
 
Pinging @Hogwildz. Flat roof flashings sealing problem needing advice. Personally I'd have a pro come out to install and seal the flashing in this circumstance.
 
Are you getting rain again, or are you wetting it to see if it leaks? We're killing for rain here in New Hampshire. Seems like it's raining there every other day! Lol I still would still try the vertical seams. It won't hurt to try.
 
Are you getting rain again, or are you wetting it to see if it leaks? We're killing for rain here in New Hampshire. Seems like it's raining there every other day! Lol I still would still try the vertical seams. I

its raining yet again :(
tomorrow its supposed to be sunny out so i'll crawl up there and seal the vertical seams and slather some more roofing cement around. Too late in the year to tear anything apart.
 
Put some silicon sealant over each nail head.
 
You really need to get that flashing under that layer of shingles otherwise just a little wind slightly moving the stack will cause it to leak again and again.
 
Status
Not open for further replies.