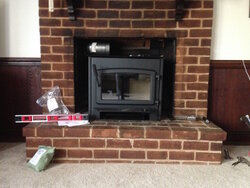
Stove is in the house!!! Thank you all...

  • Active since 1995, Hearth.com is THE place on the internet for free information and advice about wood stoves, pellet stoves and other energy saving equipment.

    We strive to provide opinions, articles, discussions and history related to Hearth Products and in a more general sense, energy issues.

    We promote the EFFICIENT, RESPONSIBLE, CLEAN and SAFE use of all fuels, whether renewable or fossil.
Status
Not open for further replies.

SeanG

Member
Feb 25, 2015
92
Charlottesville, VA
Dear hearth.com brothers and sisters,

Yesterday was an exciting and monumental day. For the past 10 days I've been trying to get friends and neighbors to help me devise a plan to get my new Century Heating CW 2900i out of my minivan and into the house.

All the local sweeps and stove shops were booked solid until December. Yesterday the phone rang...A chimney sweep from a couple towns away whom I had called last week was going to be in my neighborhood tonight if that would work for me. "Of course", I replied. He was from the other side of the mountain and only in town for the evening.

Chris from Blue Ridge Chimney assessed the situation and said that if we couldn't get it onto the hearth he wouldn't charge me. I was game. He was a great help and said that after 100's of installs you figure out how to use physics to your advantage. The insert weighs 409 pounds so I was skeptical since we only had a hand truck but we got it in gently and without pain. My wife has been very concerned about me installing the insert so while Chris was there I explained to her that now was the time to ask all her questions. He addressed all her concerns which gave her peace of mind. Best $150 I've spent in a long time.
IMG_2716.JPG

Once the stove was in place I insulated the liner, meshed it up and lugged it to the roof. Mind you it was 1:15 AM by now. If you recall I was in-between a 15' and a 20' liner last week. I bought the 20'. Could have went with the 15'. Oh well. I muscled the liner into the chimney by myself. No I just need to trim the five or six extra feet and connect the liner to the stove. That will happen tonight and then the break in fires will commence.

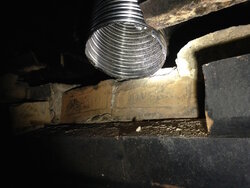
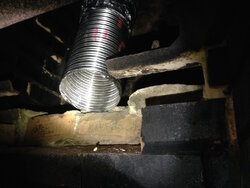
I'm still working on my block off plate since it's a weird space to block off. It's not flat and horizontal like all the other firebox/damper areas I've seen posted here. We took out too many bricks when taking out the damper and now I have to seal off a much larger hole. I still have two of those bottom bricks and may mortar them into place tonight if that would help. Thoughts? I made a cardboard template, it seemed to fit well and once the stove is test connected to the liner I'll trim the sheet metal and seal it in place before I make the final connection and seal it.

Here is a pic of what I'm dealing with. Any design suggestions would be welcome:
IMG_2719.JPG IMG_2717.JPG

Anyway, just wanted to say thank you to everyone who has helped me along the way. I hope I can now give back to others in the future. Will post pics once I have made fire.

Cheers,

Sean
 
1:15am installing the liner? That's hard core! Looks good so far. I would do the same thing for the block off plate. Make a cardboard template and tweak it for a good fit. Then use that template for the sheet metal cutting.

I like the clean lines of the Century. Keep us posted with progress.
 
I agree. I like the clean lines and the way it fills out the firebox. I don't really want to put the surround on it. Just don't know if I want to look at that SS elbow. I'm guessing if I painted it black it would sort of disappear or blend into the background.

I too a very much looking forward to the fire! Hopefully tonight but its 65 degrees outside and its not supposed to get too cold tonight. Should be cool enough for a break in fire though.
 
I don't really want to put the surround on it. Just don't know if I want to look at that SS elbow. I'm guessing if I painted it black it would sort of disappear or blend into the background.
I did that, high temp black, you don't even notice the pipe now
 
What a nice stove, and wow your worse then the kids at Christmas night trying to guess there wrapped gifts. Hopefully you get it all squared away before the weekend.
It maybe easier to pull the stove out if you can to connect the block off plate. *good luck
 
Looking good man!!! I know your pain with liner lol don't forget to get some insulation for your block off plate and around the top of the chimney.
 
What a nice stove, and wow your worse then the kids at Christmas night trying to guess there wrapped gifts. Hopefully you get it all squared away before the weekend.
It maybe easier to pull the stove out if you can to connect the block off plate. *good luck

I likened my condition yesterday to a junky trying to get a fix. The real reason for the late night was the big rain that is coming. OK, and the fact that I just really want to light a fire in this thing. The stove room is always cold and I just can't wait for it to be warm.
 
I did that, high temp black, you don't even notice the pipe now

Good deal. I'll pick some up this weekend. I think it looks better without the surround and from what I've read here people with this stove claim that they get a little more heat with the surround off.
 
That's where I found mine as well. We may not need a fire this week but looking at the extended forecast next week it's on.
 
That's where I found mine as well. We may not need a fire this week but looking at the extended forecast next week it's on.

Indeed. Hoping to get my break-in fires done tonight and tomorrow so I can be ready for the blast of cold air later in the week/weekend. That was also part of the reason I wanted to get this done before the rain.
 
Nice job! It will be plenty cool enough this weekend to get the paint curing over with!
 
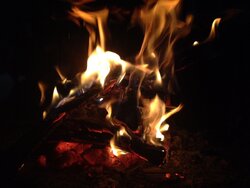
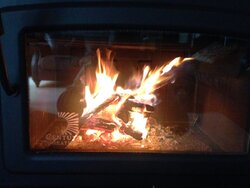
Well, I did it. I made fire! In a box. In my house. It was a special moment indeed. I just stared at the fire for about two hours last night. I think it may be been 58 degrees outside and 64 in my stove room. I played with the air control for a while too. It was loads of fun. So much different than an open fire. I really enjoyed hearing the stove creaking as the steel warmed. It was smelly but not too bad. Had the doors to the deck and garage (open) wide open the whole time so that helped I'm sure.

Nice job! It will be plenty cool enough this weekend to get the paint curing over with!

Thanks Smoked. Its supposed to be 64 again today and 71 tomorrow so I should be able to fully break the stove in before the cold weather arrives on Friday. Then we'll be below freezing and the real testing can begin. I can't wait.

Good looking stove and brick work. I hope you enjoy the new stove and stay warm.

Thanks FCB. I really like it too. I was dead set on a Blaze King Princess but cash was limited. However, the more I look and and use this stove the more I like it. Granted I've only burned tiny kindling/small split break in fires but still, I'm impressed.

And the proof...Not my best work but it was almost an after thought as I was leaving for work this morning.

Cheers,

Sean

IMG_2721.JPG IMG_2720.JPG
 
Last edited by a moderator:
  • Like
Reactions: Blazing
Looks good SeanG. What are your plans for ember protection in front of the insert? It looks like you have carpeting down on the floor directly in front of the stove. The first time a hot ember rolls out the front door your carpet will have a burn on it in seconds. Most inserts require at least 16" of clearance up front of the stove. Good Luck with your burning.
 
Well, I did it. I made fire! In a box. In my house. It was a special moment indeed. I just stared at the fire for about two hours last night. I think it may be been 58 degrees outside and 64 in my stove room. I played with the air control for a while too. It was loads of fun. So much different than an open fire. I really enjoyed hearing the stove creaking as the steel warmed. It was smelly but not too bad. Had the doors to the deck and garage (open) wide open the whole time so that helped I'm sure.


Thanks Smoked. Its supposed to be 64 again today and 71 tomorrow so I should be able to fully break the stove in before the cold weather arrives on Friday. Then we'll be below freezing and the real testing can begin. I can't wait.


Thanks FCB. I really like it too. I was dead set on a Blaze King Princess but cash was limited. However, the more I look and and use this stove the more I like it. Granted I've only burned tiny kindling/small split break in fires but still, I'm impressed.

And the proof...Not my best work but it was almost an after thought as I was leaving for work this morning.

Cheers,

Sean

View attachment 167259 View attachment 167258
Yea, my second one is finally installed. I have had a real quick little fire but looking forward to this weekend so I can have a more significant fire in both stoves.
 
Looks good SeanG. What are your plans for ember protection in front of the insert? It looks like you have carpeting down on the floor directly in front of the stove. The first time a hot ember rolls out the front door your carpet will have a burn on it in seconds. Most inserts require at least 16" of clearance up front of the stove. Good Luck with your burning.

Hi Nick, you are correct. I'm being extra cautious right now. I'm looking for a nice rug but haven't found one yet. Have any recommendations. I don't like the look of the fiberglass ones I've seen online but I don't think the 100% "flame proof" ones I've seen will protect me from embers.

Yea, my second one is finally installed. I have had a real quick little fire but looking forward to this weekend so I can have a more significant fire in both stoves.

You must really like those Heritage models. This weekend is going to be very fun. Will be putting the stove through it's paces for sure.
 
a floor
protection must extend at least 16" (406 mm USA) and 18" (457 mm Canada) with an
R value of 1.24 or more. If the hearth elevation is lower than 5”, the non-combustible
(B) floor protector in front of the insert should have an R value equal or greater than
2.00 and shall extend 29 inches (737 mm) in front of the unit.


If I am reading the manual correctly there is an R value requirement for the floor protection in front of the stove. I don't know if a hearth mat would satisfy those requirements.

I read that too but I don't understand why you need an R value of 1.24 if the stove is on a raised 11" off the floor. I was under the impression that stoves on a raised hearth just needed ember protection 16" in front of them.
 
I read that too but I don't understand why you need an R value of 1.24 if the stove is on a raised 11" off the floor. I was under the impression that stoves on a raised hearth just needed ember protection 16" in front of them.

There are a lot of requirements that the manufacturers have that do not make much sense. In this case they even address a hearth of varying height having different R values. So they have their reasons. Ember protection only may be the usual requirement but in some cases like this one the manufacturer has an R value requirement. I know some people avoid certain stove models just because they have an R value required instead of just ember protection.
 
There are a lot of requirements that the manufacturers have that do not make much sense. In this case they even address a hearth of varying height having different R values. So they have their reasons. Ember protection only may be the usual requirement but in some cases like this one the manufacturer has an R value requirement. I know some people avoid certain stove models just because they have an R value required instead of just ember protection.

I'm going to call SBI today and see if I can find out why they more than ember protection. I'll report back what I find out.
 
With an 11" hearth height I'd be comfortable with ember protection on at the floor level. Give SBI a call and ask about the exception to NFPA R1001.9.2
https://www.hearth.com/talk/threads...-floating-hearth-r-value.148544/#post-1996140

I called SBI this morning but didn't ask about the exception to R1000.9.2 since I didn't see this until now. SBI said that I must follow the manual. So, I must have, according to them a minimum of 3" of extension with an R value of 1.24 or greater since the door of my insert is sitting 3.5" out on the hearth which is 16.5 inches deep.

I think I'll go with one of the flat black ones I found on Amazon so I can remove it in the summer. He did say that it was important to make a seal to the hearth so that embers didn't fall behind the extension. Makes sense.

On a side note, he asked if I had a block off plate installed? I said I was working on it this weekend. He even said, "if you google block off plate you find some great instructions..." I said, from hearth.com and he said, yeah. So, we are making an impact on stove resellers. I thought that was pretty cool. They even have an entire section in the manual about block off plates and why you need one.

All my interactions with SBI have been very informative and helpful.

Sean
 
Status
Not open for further replies.