
Hello, all. I inherited a whitfield pellet stove when I bought my house a few years ago. I've been trying to get it working for what seems like forever. It starts up, but I've noticed that the control board lights will all flash on and off continuously the entire time it is running. At first I thought this was normal, but after reading the forum I wonder. Can anyone help me troubleshoot? Much appreciated and great site. Thanks in advance.
newbie question...whitfield control board
- Thread starter rnd1979
- Start date
-
Active since 1995, Hearth.com is THE place on the internet for free information and advice about wood stoves, pellet stoves and other energy saving equipment.
We strive to provide opinions, articles, discussions and history related to Hearth Products and in a more general sense, energy issues.
We promote the EFFICIENT, RESPONSIBLE, CLEAN and SAFE use of all fuels, whether renewable or fossil.
You are using an out of date browser. It may not display this or other websites correctly.
You should upgrade or use an alternative browser.
You should upgrade or use an alternative browser.
- Status
- Not open for further replies.
Bioburner
Moderator
Welcome. First we need to know what model.(better yet put it in your signature for future inquiries) Whitfields were the first freestanding pellet stove introduced in 1983 so there was improvements and safety upgrades along the way.
If you don't know the model try and shoot a picture and post it as there is several members here that still use and repair them for daily use.
If you don't know the model try and shoot a picture and post it as there is several members here that still use and repair them for daily use.
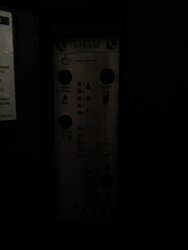
Thanks. Here are a few pics of the stove. From the labeling it seems like it's either a quest plus or advantage plus, but I really have no way of being sure since I don't have a manual.Hello, all. I inherited a whitfield pellet stove when I bought my house a few years ago. I've been trying to get it working for what seems like forever. It starts up, but I've noticed that the control board lights will all flash on and off continuously the entire time it is running. At first I thought this was normal, but after reading the forum I wonder. Can anyone help me troubleshoot? Much appreciated and great site. Thanks in advance.
Attachments


Bioburner
Moderator
")
Bioburner
Moderator
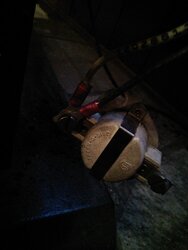
Mine seems to have a different control board. Here's a pic.Heres technical manual. New server won't let me upload larger files
Attachments
Stovensen
Minister of Fire
Mine seems to have a different control board.
Hello rnd1979, and welcome to the forum. The service manual Bioburner uploaded is for the regular Quest stove. Your stove is a Quest Plus ( like mine ). The control boards are very different on these stoves. Also, a quick way of telling a regular Quest from a Quest Plus is the shape of the pellet drop chute: It is oval on a regular Quest and rectangular on a Quest Plus.
On page 11 in the operation/installation manual you'll find a useful hint to make your Quest Plus run as it should. All you need to do is connect a short jumper wire to the thermostat terminals.
One thing they forgot to mention in the note at the bottom of page 11, is that the LED lights will be flashing when stove is in "idle mode". Just like the lights on your stove.
This jumper wire should hopefully make your Quest Plus work as intended.
Good luck and take care. Keep us posted.

Stovensen
Minister of Fire
Oh, I forgot to upload the operation/installation manual for the Quest Plus. It has many useful informations, troubleshooting etc.
Oh oh, manual pdf file is 2.0 mb. Too large for the server, so rnd1979, if you're interested in the manual pdf, please PM me your e-mailaddress and I'll send it to you.

Oh oh, manual pdf file is 2.0 mb. Too large for the server, so rnd1979, if you're interested in the manual pdf, please PM me your e-mailaddress and I'll send it to you.
You're the man. I fixed the jumper and the blower works now and no more flashing lights. I was gonna replace my low limit switch, but I wonder if that's necessary. The stove had been cutting off after about a half hour and smoking up my house, but apparently it's been in idle mode the entire time. Could that have been the cause or should I go ahead and swap out the limit switch?Oh, I forgot to upload the operation/installation manual for the Quest Plus. It has many useful informations, troubleshooting etc.
Oh oh, manual pdf file is 2.0 mb. Too large for the server, so rnd1979, if you're interested in the manual pdf, please PM me your e-mailaddress and I'll send it to you.
View attachment 167446
Stovensen
Minister of Fire
The stove had been cutting off after about a half hour and smoking up my house, but apparently it's been in idle mode the entire time. Could that have been the cause or should I go ahead and swap out the limit switch?
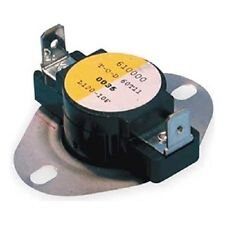
That the stove cuts off after 30 minutes clearly indicates a faulty low limit switch ( or its wiring ). Temporarily you can bypass the low limit switch simply by connecting the two spade plugs on the switch to each other. Electrically, that's what the switch does when it has warmed up and snaps. If the stove runs perfectly and continuously with the switch bypassed, then you know for sure that the switch is not snapping.
Note: The low limit switch carries full line voltage, so be sure to disconnect power to the stove first!
PS: If the combustion blower housing (to which the low limit switch is attached ) is full of ash and soot, this could isolate the low limit switch so much that it is unable to reach the snapping temperature, so before condemning the switch, I suggest you take a look inside the combustion blower housing. You'll have to pull the blower motor to do this inspection/cleaning. And while you're at it... also clean the metal barb for the pressure switch hose. A pipe cleaner or something similar will do the job.
I will give it a shot. Unfortunately I think it is the switch. I previously had bypassed the limit switch and tested it out. The stove ran for longer than thirty minutes with it bypassed (still in idle mode). I've actually got a replacement switch. Only problem is it doesn't have the screw on connectors like the original. Thanks for all your help.That the stove cuts off after 30 minutes clearly indicates a faulty low limit switch ( or its wiring ). Temporarily you can bypass the low limit switch simply by connecting the two spade plugs on the switch to each other. Electrically, that's what the switch does when it has warmed up and snaps. If the stove runs perfectly and continuously with the switch bypassed, then you know for sure that the switch is not snapping.
Note: The low limit switch carries full line voltage, so be sure to disconnect power to the stove first!
PS: If the combustion blower housing (to which the low limit switch is attached ) is full of ash and soot, this could isolate the low limit switch so much that it is unable to reach the snapping temperature, so before condemning the switch, I suggest you take a look inside the combustion blower housing. You'll have to pull the blower motor to do this inspection/cleaning. And while you're at it... also clean the metal barb for the pressure switch hose. A pipe cleaner or something similar will do the job.
Attachments
Stovensen
Minister of Fire
I've actually got a replacement switch. Only problem is it doesn't have the screw on connectors like the original.
Have you checked the replacement switch for correct snapping temperatures? In a Whitfield stove the low limit switch should close at 140 degrees F and open again at 120 degrees F.
Yes. It is a 140/120 switch. I just don't know how to connect it without the screw on terminals.
Stovensen
Minister of Fire
Yes. It is a 140/120 switch. I just don't know how to connect it without the screw on terminals.
What you need is a kit like this. In car accessory shops they usually have them on discount... It takes a little practice to crimp the spade plug to the wire correctly, though, so I suggest you first make some attempts on a piece of wire from your work shop.
Bkins
Minister of Fire
You can also get just the terminals you need at most big box stores. I perfer to use insulated terminals that cover the part that slides over the spade connector on you snap disc. You are after the female end of spade terminals. Thaler the disc with you and ask for help if your not sure what your after. You will need to cut the screw on terminal off and strip the wire enough to get it into the female spade terminal. Again ask for help if your not sure what your doing.
VERY, VERY important. Make sure you unplug the stock before doing any kind of electrical work or testing and the stove should be on a good surge protector to help protect your circuit board form electrical spikes.
Just trying to cover some bases so you don't further damage your stove if you have no experience.
Let us know how you make out.
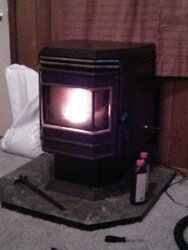
Hey, thanks. I had to replace the vent pipe too so I'm waiting for the rtv sealant to set up before I fire up the stove and test out the snap disk. Can't believe it's finally up and running. Here's hoping I save a little on my heating bill this winter. I will let you know how it turns out.
bjr23
Member
I'm glad to say it seems to be up and running now without any major hiccups. Knock on wood. Thanks, everybody!
Believe me when I say "Im not a member of the Safety Police Squad", but in that last pic. it looks like some window curtains right behind the stove. That would make me very nervous for a fire danger. I'd use some sheetrock to block off the window and get them curtains outta there. I've put a 4'x8' drywall right behind the stove up against the existing wall. Makes me sleep better at night. bjr23
- Status
- Not open for further replies.
Similar threads
- Replies
- 4
- Views
- 1K
- Replies
- 0
- Views
- 282
- Replies
- 2
- Views
- 536
- Replies
- 4
- Views
- 441