I have an old custom stove. It actually has no markings on it at all but the design, dimension, everything is exactly identical to the Grandpa Bear. I'm looking for information on the hearth pad. I'm installing it straight onto a plywood floor. My original plan was to stack 2 1/2" pieces of cement board with a layer of porcelain tiles on top, but now I'm second guessing whether that will be enough. Any thoughts? Thank you in advance.
Hearth pad for Grandpa Bear
- Thread starter Namasti12
- Start date
-
Active since 1995, Hearth.com is THE place on the internet for free information and advice about wood stoves, pellet stoves and other energy saving equipment.
We strive to provide opinions, articles, discussions and history related to Hearth Products and in a more general sense, energy issues.
We promote the EFFICIENT, RESPONSIBLE, CLEAN and SAFE use of all fuels, whether renewable or fossil.
You are using an out of date browser. It may not display this or other websites correctly.
You should upgrade or use an alternative browser.
You should upgrade or use an alternative browser.
- Status
- Not open for further replies.
It's not a simple calculation since it goes by thermal resistance or R value (cement board is poor for r value) Conductivity, or k factor and thermal conductance or C-Factor. There are formulas for calculating the minimum values if the manufacturer of material only gives one value. Manufacturers are given the minimum required values during UL testing. The standard used was 3/8 asbestos millboard which is no longer available. Yours wouldn't have a minimum given anyway. Leg height becomes an important factor and must be minimum 6 inches. Sitting on bricks to raise stove bottom helps lower value required. An air space or shield on bottom makes the biggest difference and is what I do with unlisted stoves to keep the floor cool under them. Double cement board and tile or brick is normally fine but I add the shield anyway. Depends on if the stove is lined with good firebrick on the bottom or other means. Material containing asbestos was used under brick of some stoves with shorter legs requiring higher protection.
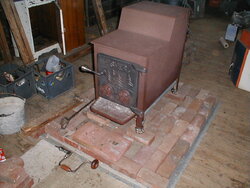
I fired this Mama Bear stove on my kitchen floor with single cement board and tile which I knew wasn't enough. It was uncomfortable to the touch directly under it, so I added the shield shown below. It then stayed cold in the center directly under it. I had it raised on bricks with felt on the bottom of them as well to prevent scratching tile. A 1 inch airspace is worth far more than any material you can add.
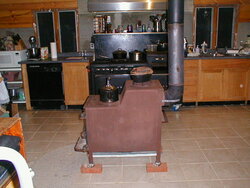 This stove was placed under insulated chimney in my kitchen to test and became the test chimney for baffles in all the other models. The simple heat shield clamped onto the stove legs kept the floor cold under all the Fisher Stoves tested.
I fired this Mama Bear stove on my kitchen floor with single cement board and tile which I knew wasn't enough. It was uncomfortable to the touch directly under it, so I added the shield shown below. It then stayed cold in the center directly under it. I had it raised on bricks with felt on the bottom of them as well to prevent scratching tile. A 1 inch airspace is worth far more than any material you can add.
 This stove was placed under insulated chimney in my kitchen to test and became the test chimney for baffles in all the other models. The simple heat shield clamped onto the stove legs kept the floor cold under all the Fisher Stoves tested.
Be aware that you have an unlisted appliance that is not going to be "legally installed" in most any jurisdiction. Adding a shield that is not tested does not make it legal or approved for safe installation when required for local codes or insurance. A listed appliance installed as per listing (testing) or using approved materials is required. A heat shield as shown in NFPA 211 for unlisted stoves does reduce clearance by 66% for unlisted stoves.
The concern is not surface temperature igniting combustible material right away. It is due to moisture content of building materials having a lower ignition temperature as they are dried out over a period of time. 1/8 inch of air space is almost equal to 1 inch air space. Proof is keeping your finger away from a hot surface that would burn you. 1/8" of air space prevents a burn, but a quick touch is an instant burn. Air is the best insulator.
You need to raise the bottom to 6 inches either extending legs or on bricks or solid blocks. This minimum is found in NFPA 211 under floor protection as well. It gives minimum requirement of stoves with 6 inch height and stoves over 6. Yours was probably made for use on a non combustible hearth. You could also use a UL listed stove board for added floor protection. Then you have an approved installation.
Making your own shield is much cheaper with minimum 24 ga. sheet metal like a shelf under the bottom with at least 1 inch air space between stove and shield. It is the silver looking metal under the stove above.
You could set a metal shield on top of 4 inch blocks to gain height and set stove on it. This gives you a shield the 2 or 3 inches from stove bottom and 4 inches off floor. You won't feel much heat on the floor under that. Here is the shield I added on my Kitchen Queen on the same tile floor in the middle of the same kitchen. It is a UL Listed stove with floor protection given. Cook stoves generally require more floor protection than freestanding stoves require. One sheet of cement board and tile with the UL Listed stove board on top was just under the required minimum protection, so I added this shield. It is a product made for garage floor protection under vehicles and fit perfectly under the stove. The UL stove board stays cool under firebox compared to being uncomfortably warm.
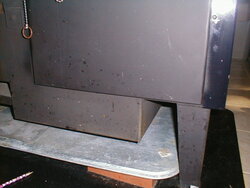 Shield under ash pan on bricks that radiated heat downward. Since the appliance was not tested with shield installed on it, this would not be UL approved as installed. I added a thermostat to the stove and am not concerned about UL approval.
The concern is not surface temperature igniting combustible material right away. It is due to moisture content of building materials having a lower ignition temperature as they are dried out over a period of time. 1/8 inch of air space is almost equal to 1 inch air space. Proof is keeping your finger away from a hot surface that would burn you. 1/8" of air space prevents a burn, but a quick touch is an instant burn. Air is the best insulator.
You need to raise the bottom to 6 inches either extending legs or on bricks or solid blocks. This minimum is found in NFPA 211 under floor protection as well. It gives minimum requirement of stoves with 6 inch height and stoves over 6. Yours was probably made for use on a non combustible hearth. You could also use a UL listed stove board for added floor protection. Then you have an approved installation.
Making your own shield is much cheaper with minimum 24 ga. sheet metal like a shelf under the bottom with at least 1 inch air space between stove and shield. It is the silver looking metal under the stove above.
You could set a metal shield on top of 4 inch blocks to gain height and set stove on it. This gives you a shield the 2 or 3 inches from stove bottom and 4 inches off floor. You won't feel much heat on the floor under that. Here is the shield I added on my Kitchen Queen on the same tile floor in the middle of the same kitchen. It is a UL Listed stove with floor protection given. Cook stoves generally require more floor protection than freestanding stoves require. One sheet of cement board and tile with the UL Listed stove board on top was just under the required minimum protection, so I added this shield. It is a product made for garage floor protection under vehicles and fit perfectly under the stove. The UL stove board stays cool under firebox compared to being uncomfortably warm.
 Shield under ash pan on bricks that radiated heat downward. Since the appliance was not tested with shield installed on it, this would not be UL approved as installed. I added a thermostat to the stove and am not concerned about UL approval.
Be aware that you have an unlisted appliance that is not going to be "legally installed" in most any jurisdiction. Adding a shield that is not tested does not make it legal or approved for safe installation when required for local codes or insurance. A listed appliance installed as per listing (testing) or using approved materials is required. A heat shield as shown in NFPA 211 for unlisted stoves does reduce clearance by 66% for unlisted stoves.
The concern is not surface temperature igniting combustible material right away. It is due to moisture content of building materials having a lower ignition temperature as they are dried out over a period of time. 1/8 inch of air space is almost equal to 1 inch air space. Proof is keeping your finger away from a hot surface that would burn you. 1/8" of air space prevents a burn, but a quick touch is an instant burn. Air is the best insulator.
You need to raise the bottom to 6 inches either extending legs or on bricks or solid blocks. This minimum is found in NFPA 211 under floor protection as well. It gives minimum requirement of stoves with 6 inch height and stoves over 6. Yours was probably made for use on a non combustible hearth. You could also use a UL listed stove board for added floor protection. Then you have an approved installation.
Making your own shield is much cheaper with minimum 24 ga. sheet metal like a shelf under the bottom with at least 1 inch air space between stove and shield. It is the silver looking metal under the stove above.
You could set a metal shield on top of 4 inch blocks to gain height and set stove on it. This gives you a shield the 2 or 3 inches from stove bottom and 4 inches off floor. You won't feel much heat on the floor under that. Here is the shield I added on my Kitchen Queen on the same tile floor in the middle of the same kitchen. It is a UL Listed stove with floor protection given. Cook stoves generally require more floor protection than freestanding stoves require. One sheet of cement board and tile with the UL Listed stove board on top was just under the required minimum protection, so I added this shield. It is a product made for garage floor protection under vehicles and fit perfectly under the stove. The UL stove board stays cool under firebox compared to being uncomfortably warm.
View attachment 168375 Shield under ash pan on bricks that radiated heat downward. Since the appliance was not tested with shield installed on it, this would not be UL approved as installed. I added a thermostat to the stove and am not concerned about UL approval.
Thank you. I'm not worried about an approved installation. This is going into a non permanent uninsured structure. I just want to be safe!
Thank you for the info on the heat shield. That seems like a good idea and fairly simple to do. I also assumed I would have to put firebrick under the legs to raise it up. I'm also considering placing a few rows of firebrick under the cement board to create another airspace between that and the floor. So it would be plywood floor, firebrick rows, two 1/2" sheets of Durock, and porcelain tiles on top. Does this sound like it will be sufficient?
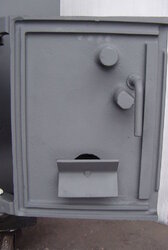
Also, like I said before, I'm pretty sure this is a custom stove. But on the off chance someone recognizes it I will post a few photos.
It looks smaller in photos for some reason but the dimensions are almost identical to the grandpa bear numbers listed in this forum.
Is there any other information on this site about inspecting an old stove for safety, what to look for, etc?
Thanks again
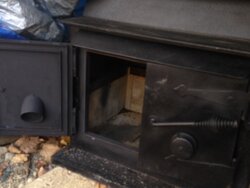
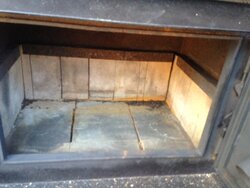
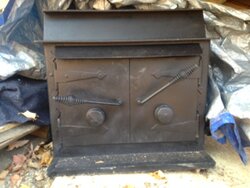
It looks smaller in photos for some reason but the dimensions are almost identical to the grandpa bear numbers listed in this forum.
Is there any other information on this site about inspecting an old stove for safety, what to look for, etc?
Thanks again


That is quite the contraption! It does need legs to get the bottom at least 6 inches off the floor.
The top style is Timberline, the deflector over doors is Frontier, pipe caps, bricks, and latch handles Fisher, and the hinges are definitely unique.
Your floor protection is fine adding brick. Here's a thread giving cement board values;
https://www.hearth.com/talk/threads/r-value-cement-board.11766/
Fisher bottom is similar to yours and requires "3/8 Millboard or equivalent". 3/8 Millboard having R value of 0.45 plus the layer of brick. The manual doesn't specify which way to lay the brick ! (4" regular red brick has an R value of .8 and a C-factor of 1.25) so total is R 1.25.
The Kitchen Queen cook stove which requires more floor protection than any freestanding stove requires R 1.8, so that gives you an idea of what would be overkill.
Many newer stoves with shields require ember protection only. That gives you an idea how well the air space works.
I have that same stove pictured above in my log cabin now. I put down 24 ga. sheet metal for ember protection, one sheet cement board, then a layer of regular solid building bricks. They make bricks for this purpose with air holes through them too. Our local Lowe's has them. You put them sideways and can hold them together with threaded rod.
The bricks under the center got quite warm which was probably OK since I wasn't measuring the temp under them. I'm remote with no water, so I added the shield and it stays cold under it.
You can find tables with R and C values of common building materials if you want to figure out other materials. You just don't have a basis to go by since it was probably never tested, but Fisher should be close. You just add the tile, cement board, and mortar thickness together for the total R or C value. When only C or K are known, you have to convert to R. Let me know if you need those formulas.
You want higher numbers in Resistance and lower numbers in Conductance and Conductivity.
Manufacturers still use Mineral Board as a standard and it is confusing.
The top style is Timberline, the deflector over doors is Frontier, pipe caps, bricks, and latch handles Fisher, and the hinges are definitely unique.
Your floor protection is fine adding brick. Here's a thread giving cement board values;
https://www.hearth.com/talk/threads/r-value-cement-board.11766/
Fisher bottom is similar to yours and requires "3/8 Millboard or equivalent". 3/8 Millboard having R value of 0.45 plus the layer of brick. The manual doesn't specify which way to lay the brick ! (4" regular red brick has an R value of .8 and a C-factor of 1.25) so total is R 1.25.
The Kitchen Queen cook stove which requires more floor protection than any freestanding stove requires R 1.8, so that gives you an idea of what would be overkill.
Many newer stoves with shields require ember protection only. That gives you an idea how well the air space works.
I have that same stove pictured above in my log cabin now. I put down 24 ga. sheet metal for ember protection, one sheet cement board, then a layer of regular solid building bricks. They make bricks for this purpose with air holes through them too. Our local Lowe's has them. You put them sideways and can hold them together with threaded rod.
The bricks under the center got quite warm which was probably OK since I wasn't measuring the temp under them. I'm remote with no water, so I added the shield and it stays cold under it.

You can find tables with R and C values of common building materials if you want to figure out other materials. You just don't have a basis to go by since it was probably never tested, but Fisher should be close. You just add the tile, cement board, and mortar thickness together for the total R or C value. When only C or K are known, you have to convert to R. Let me know if you need those formulas.
You want higher numbers in Resistance and lower numbers in Conductance and Conductivity.
Manufacturers still use Mineral Board as a standard and it is confusing.
One thing I would do to your stove is drill a bunch of holes (3/8 or 1/2 inch) through the intake air pipe at the top of shroud type pipe. It now directs all air to the fire bed and the only air you're getting above fire is if there is door leakage. The fire can consume all oxygen at the bottom and have unburned smoke particles that would normally burn if they could get oxygen. This would be secondary air, not to say you're going to get a secondary ignition of smoke particles, but it would probably burn cleaner and should have some oxygen to the top of the fire.
Many stoves incorporated hollow doors with an air chamber to get air above the fire;
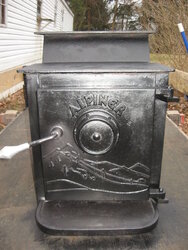
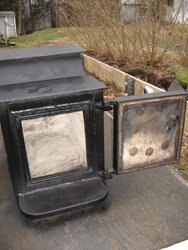
Many stoves incorporated hollow doors with an air chamber to get air above the fire;


Thanks for the info! It has been incredibly helpful. I was pretty set on using cored red brick, cement board and tile top, but now I'm concerned about the weight. People keep recommending large pieces of bluestone to help distribute the weight. But I'm concerned because the r value is not as high.
Also, where exactly should I drill the holes in the stove?
Also, where exactly should I drill the holes in the stove?
Open the doors and you see the angled pipe pointing down where the air is admitted near the bottom. All the air comes out the bottom of that angled tube. Holes in the angled pipe close to the door around the circumference of that pipe will allow air through the holes directed more at the top of fire.
Here's a picture of intake deflector directing air to firebed bottom and above fire used by Timberline.
 Yours only directs it to bottom.
You want most air going to bottom and a few holes drilled at the top of that tube will assure some oxygen above fire. The incoming air is pushed toward the stove outlet trying to get up the chimney. Too much directed above fire slips up the chimney cooling it, that is the reason for the tube. Now we know admitting oxygen above fire allows more unburned particles to burn in the firebox reducing smoke and getting more heat from the unburned fuel that lacks oxygen.
Here's a picture of intake deflector directing air to firebed bottom and above fire used by Timberline.
 Yours only directs it to bottom.
You want most air going to bottom and a few holes drilled at the top of that tube will assure some oxygen above fire. The incoming air is pushed toward the stove outlet trying to get up the chimney. Too much directed above fire slips up the chimney cooling it, that is the reason for the tube. Now we know admitting oxygen above fire allows more unburned particles to burn in the firebox reducing smoke and getting more heat from the unburned fuel that lacks oxygen.
- Status
- Not open for further replies.
Similar threads
- Replies
- 13
- Views
- 733
- Replies
- 8
- Views
- 958
- Replies
- 0
- Views
- 753
- Replies
- 3
- Views
- 2K

