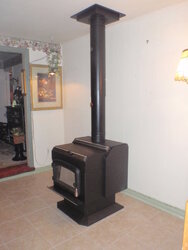
Here's the finished installation of Mom's wood stove

  • Active since 1995, Hearth.com is THE place on the internet for free information and advice about wood stoves, pellet stoves and other energy saving equipment.

    We strive to provide opinions, articles, discussions and history related to Hearth Products and in a more general sense, energy issues.

    We promote the EFFICIENT, RESPONSIBLE, CLEAN and SAFE use of all fuels, whether renewable or fossil.
Status
Not open for further replies.

bryansong

New Member
Dec 2, 2015
67
Independence, Mo.
I


I am having trouble creating an album with the upload size too large so I just copied and pasted to this post.
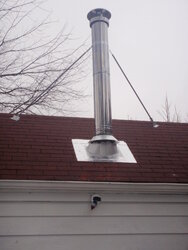
The biggest problem I had was the hole in the roof. The top end of the hole ended up bigger than I was hoping for and I worried my flashing might not cover it but it did. The picture is my son and son-in-law.
 
No pics yet...I always have to edit my pics to about 50% size using "paint" whenever I post here...
 
......i hated cutting a hole in the roof. was not the most fun thing i've ever done, but everything turned out ok..... congrats.....oh, still no pics
 
that worked.....at least the link did. nice work on the chimney and the install.
 
  • Like
Reactions: bryansong
I put a couple of them up for you. Posting pictures instructions are here:
https://www.hearth.com/talk/threads/putting-images-into-your-forums-posts.87212/

Can't tell by the picture but is the upper edge of the flashing under the roofing shingle or on top of it? Is the flashing covered with metal tape?
brian1.jpg brian2.jpg
 
I put a couple of them up for you. Posting pictures instructions are here:
https://www.hearth.com/talk/threads/putting-images-into-your-forums-posts.87212/

Can't tell by the picture but is the upper edge of the flashing under the roofing shingle or on top of it? Is the flashing covered with metal tape?
View attachment 170193 View attachment 170194

The upper edge is not under the roof shingle or flashing though it's not too far off the roof. I did have to cut the back of the cone since the roof was so steep to let the cone flashing lay down. I was (and am) a bit concerned that a hard pouring rain would run down the roof and push up the cone and in so I hope that never happens. I did not add any other flashing to the chimney cone or rain shield but I did add adhesive backed roll flashing all around the edge. We had to use a torch to heat it because it was too cold to be sticky. If any rain gets in I'll have to do something but not sure what just yet.
It has rained here a couple of times since the install and so far it's been ok.
 
The upper edge of the flashing must be under the shingles. That is what stops water from running under it. It looks like you may have bought the wrong flashing. They come in different cone angles based on the roof pitch. I would consider replacing the flashing, maybe in spring when the shingles warm up a bit. The rest looks nice. Is the stove sitting on a tile floor?
 
Last edited:
The upper edge of the flashing must be under the shingles. That is what stops water from running under it. It looks like you may have bought the wrong flashing. They come in different cone angles based on the roof pitch. I would consider replacing the flashing, maybe in spring when the shingles warm up a bit. The rest looks nice. Is the stove sitting on a tile floor?
I'm sorry, I misunderstood. The top of cone flashing is under the shingles, there is also roll flashing over the shingle above that. That cone was part of the chimney kit from Northern tool and it only came with that cone.
Good idea about looking at it again in the Spring time. I would like to have the right cone on there.
 
bryansong: What relationship do you have with a football player who played for the Bears and who died young of cancer?
 
I agree with begreen it looks like the wrong cone angle where the pipe comes through the roof, but otherwise that looks like a top shelf ship shape install.

On the one hand if it ain't broke don't fix it... how many years - about- do you think before the roof needs new shingles anyway?
 
I agree with begreen it looks like the wrong cone angle where the pipe comes through the roof, but otherwise that looks like a top shelf ship shape install.

On the one hand if it ain't broke don't fix it... how many years - about- do you think before the roof needs new shingles anyway?

That's a good question, I didn't really give it a good look except for the part we were working on and that didn't look too bad. I probably should measure that roof's pitch and work on changing out that cone next year, I just hope it holds up for now. The weather in our area has been mild until today and now we're in a Winter Storm Watch with sleet and freezing rain.

Bryan
 
I hate to be negative because you seem like such a nice and happy go lucky guy, but that's going to leak . When installing any type of pipe boot you need to remove shingles in an area around it and have the boot sit directly onto the sheathing. Then reroof it so that the top and two side are under a layer of shingles and the bottom of the metal is over top of the shingle. Doing it any other way will push water down towards the sheathing and the massive hole you drilled in it.

If you need more of a visual I can dig you up something. You'll be able to make it until next spring as is but be prepared to redo it or you'll have long term issues from water intrusion.
 
  • Like
Reactions: Highbeam
That is not my experience. As long as the flashing is under the shingles on it's top edge it should be fine. Here is what is in the DuraVent installation manual. This is how our flashing was put on, 10 yrs ago in rainy WA state. It has never leaked:

9. Attach Flashing: In new construction, assemble the Chimney Sections to a point above the roof, then slip the Flashing over the chimney. On an existing roof, center and install the Flashing before extending the chimney above the roof. Allow space to permit sliding the next Chimney Section up through the Flashing. Always insure the chimney remains vertical (use a level), and that at least a 2-inch clearance to combustible materials is maintained all around. Install the upper edge of the Flashing under the roofing. Nail to the roof along the upper edge and down each side with 1-inch roofing nails. Do not nail the lower edge of the Flashing (Fig 12). Be sure to follow local building practices, as needed. Seal all nail heads with a nonhardening waterproof sealant.
Screen Shot 2015-12-28 at 4.29.42 PM.png
 
I'll just add that you should not try and "seal" the top edge, it has to go under the shingles. I have seen to many done wrong and the owners think they can seal the top edge and stop leaks. All it will do is create a dam that will let water/ice back up under the shingle. Your best bet for a quick fix that might get you until summer is get a 6-8" wide piece of sheet metal and slip it under the upper shingle so that it overlaps the top of the flashing. You can seal down the sides if you need to just not the top.
 
  • Like
Reactions: bryansong
I think my pictures and explanation as to what I did makes it hard to really see just what I did so I'll try be more accurate.
I did buy a DuraPlus chimney kit and pipe from Northern Tools, there is a store near me. I might have jumped the gun a little with that purchase but that is the only option Northern Tool carries, looking back I would have rather gone with DuraTech since it is a smaller diameter. This was pointed out by begreen. I know that really doesn't matter as both will work.
On the roof after cutting out the hole I lifted the shingles above the hole but was unable to get the nails up but the shingle was pulled free of the nails so I could slip my cone flashing all the way up under the shingles. I know it would have been better If I could have got the nails our without ripping through the shingles but is was a pretty cool day and the shingles weren't very flexible. When installing the flashing under the shingles I made sure to apply a large amount of silicone glue under the shingle and the flashing.
I was having trouble with the steep pitch of the roof and getting the cone flashing to lay down at the bottom so I ended up snipping a curve arc section of the upper side of the cone where it meets the flue and then the whole cone flashing laid down pretty much as one might expect. I know this isn't ideal but I figured that this was some universal cone piece and there was no other way for it to lay down, and maybe this might be an approach an installer would take. I did already have a hole in the roof and it was starting to get dark so some how I was going to seal this hole.

begreen, I was trying to not put any nails in the lower section of the flashing but I had to, the silicone just wasn't holding down so after putting nail in I silicone over the nails. I hated this but it had to be done. That night when I got home I order the adhesive backed silver flashing, I really was unhappy with the way that cone laid and wanted to make sure I had good flashing around it. The application of that flashing was a bit of a bear in as it was too cool for the adhesive to be tacky. We used a propane torch to warm it up and worked the flashing down with a was of shop towels. That all seemed to work.

Lastly and an issue I am still dealing with is the High Temperature caulk I bought a Lowes and applied around the rain shield, I'm now sure that that isn't for use in the elements and I think it's leaking a bit and running down the flue, at least I hope that is where the leak is. I am addressing that first.
This morning I ordered the right stuff from Northline Express and sometime later this week I'll get up on the roof and remove that ring, clean it and re-install using the correct High Temp caulk.

I'm sorry this is such a wordy post but if you've read this far I thank you.
One more thing I just remembered, when I get back up on the roof I am going to take an angle finder to read the angle of the roof so I can figure out the pitch. I'd like to order the correct cone to install and hopefully I won't have to do that until next Spring.

Bryan
 
That is not my experience. As long as the flashing is under the shingles on it's top edge it should be fine. Here is what is in the DuraVent installation manual. This is how our flashing was put on, 10 yrs ago in rainy WA state. It has never leaked:.
View attachment 170278

The top edge is the most important to be under the shingles yes. But the correct way to roof back in a pipe boot is for the sides to to be weaved in and cut tight around the cone of the boot and to leave the bottom of the flashing over the layer of shingles at the bottom.

Any other product being sold to circumvent doing so is geared towards people who aren't roofers and find themselves in the position to have to install a pipe boot ; ie plumbers or stove installers .
 
  • Like
Reactions: Retreadsme
Saying the boot will leak is incorrect. Installing in the manner the stove pipe manufacturer recommends works for a retrofit installation.
 
rwhite is correct. There is no need for silicone on the upper edge. His description of the potential problems is right on. Likewise, no sililcone goes on the lower edge. You want any trapped moisture to be able to drain freely out the bottom.
Bryan, the main issue you may be having is the wrong angle cone on the flashing. We can't see how it was cut or how it is fitting to the pipe, but that sounds like what you are fighting with. FWIW, I have always used GE Silicone II for the storm collar. Never had a failure, but admittedly they have been installed in warmer weather. I have pulled it off years later and marveled at how well the stuff adheres.

That cone may be the issue, it sure is a weak point in my installation. For now as you know I'm hoping it's the storm collar. I wish I had that GE Silicone II in the first place. There is ice and snow on the roof now and tomorrow the city permit inspector is coming, I'm guessing he won't be up on the roof.
Saturday's forecast is for 35° so the snow should melt but I bet if the permit guy approves the install that stove will get a fire and the area of the roof where the flue is should be drier.

I don't mean to sound like a broken record here but I just want you guys to know how much I appreciate your help. I have learned quite a lot.
Thanks!

Bryan
 
IF I understand correctly you got the flashing under the shingle but added a adhesive cover piece to hide the job. If this is correct and you actually did get the flashing under a shingle I wouldn't have bothered with the cover flashing. What the cover flashing has the potential to do is trap moisture and freeze in between and create a dam. All that said you may be ok. Just keep an eye on it. If you have any of the adhesive flashing left I'd cut a strip and just slip it under the upper shingle. That may fix it for good and you won' have to worry about doing anything else. All in all it looks good and better than some pics folks have posted of "pro" jobs.
 
Status
Not open for further replies.