
Hope this helps with the Heat exchanger relation with the secondary burn and the primary, my other construction pics air on the other PC I will get soon. I have a piece of carbon steel in the secondary chamber just to see how long it last in these temps, see in pic.
Homemade and Engineered Gasification Boiler
- Thread starter Born2burn
- Start date
-
Active since 1995, Hearth.com is THE place on the internet for free information and advice about wood stoves, pellet stoves and other energy saving equipment.
We strive to provide opinions, articles, discussions and history related to Hearth Products and in a more general sense, energy issues.
We promote the EFFICIENT, RESPONSIBLE, CLEAN and SAFE use of all fuels, whether renewable or fossil.
You are using an out of date browser. It may not display this or other websites correctly.
You should upgrade or use an alternative browser.
You should upgrade or use an alternative browser.
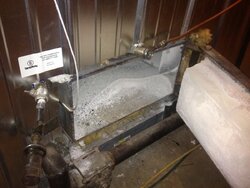
Hope this helps with the Heat exchanger relation with the secondary burn and the primary, my other construction pics air on the other PC I will get soon. I have a piece of carbon steel in the secondary chamber just to see how long it last in these temps, see in pic.
The fire box pic above, I had to modify the primary air tubes they are higher now and the bottom of the pa firebox I v shaped with refractory to the center nozzle, and the nozzle is a little bigger now in length. I will get a new pic on a nice day. I have at least 700lbs of dense refractory on the bottom, sides and front of the pa box. It stays hot for a long time.Hope this helps with the Heat exchanger relation with the secondary burn and the primary, my other construction pics air on the other PC I will get soon. I have a piece of carbon steel in the secondary chamber just to see how long it last in these temps, see in pic.

Very nice setup.
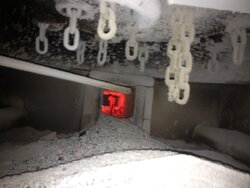
I don't know why, but the glowing red chain turbs are funny to me.
I don't know why, but the glowing red chain turbs are funny to me.
brenndatomu
Minister of Fire
I found this statement funnyVery nice setup.
I don't know why, but the glowing red chain turbs are funny to me.

Nice build Born2!
Whitepine2
Feeling the Heat
Thanks, this is the first season for the chains, I am sure the exposed glowing red ones will eventually burn up! I made them a little long so I could smack the around a little during the season to knock a little ash off.Very nice setup.
I don't know why, but the glowing red chain turbs are funny to me.
Finally got a inside secondary combustion temp reading, my other probe on the back under the heat exchanger gets to about 1500F but it's not in the flame. The k probe was in the middle off the fire and it pegged out at 2000F. The meter only goes that high, the probe is too til 2200F ! Sorry for the vertical video!
Karl_northwind
Minister of Fire
Finally got a inside secondary combustion temp reading, my other probe on the back under the heat exchanger gets to about 1500F but it's not in the flame. The k probe was in the middle off the fire and it pegged out at 2000F. The meter only goes that high, the probe is too til 2200F ! Sorry for the vertical video!
What sort of Flue gas temps do you see at the outlet? that'll give us some idea of the efficiency. I would think under 400. Your draft blower looks pretty big, resulting in more of a forge in that lower area. If I remember right, at 2300 F you start fusing nitrous oxides, so backing down on the burn rate might be a good thing, both to reduce cycling, and reduce secondary temps. 2000F is plenty high to burn off everything in wood as I remember. don't have time to look things up right now.
At the time of this video my temp on the outlet was 280F. My water temp was 178F and the inlet combustion air temp was 74F prior to getting preheated to 300F. Outdoor temp about 10F so it had a decent load on it. I would have to agree on the fan though, it has 3 speeds and I use to run it on the highest but works much better at the lowest. I thing the fan on high is rated for 250~What sort of Flue gas temps do you see at the outlet? that'll give us some idea of the efficiency. I would think under 400. Your draft blower looks pretty big, resulting in more of a forge in that lower area. If I remember right, at 2300 F you start fusing nitrous oxides, so backing down on the burn rate might be a good thing, both to reduce cycling, and reduce secondary temps. 2000F is plenty high to burn off everything in wood as I remember. don't have time to look things up right now.
CFM. I plan on slowing it down further and try to find a sweet spot so it has more time on than off. Surprisingly I still maintain sort of a pilot flame in the burn chamber when it is off and this also extends the down time! I have had it down for 3 hours before on a warm day with no load and it takes off again.
mx842
New Member
Are those black iron pipes you are using for your air pipes? I was wondering how that would hold up in a firebox like you have them set up. I ran some 1/8" square tube in my firebox for air tubes in my old makeshift updraft boiler I was working on and they burned out pretty quickly...(.less than one season). I replaced that with 1" schedule 40 black iron to get through the rest of the season and when I scrapped her they didn't look as bad as the sq tube but I could see they were taking a beating from just the little time it was in there.
Yes they are 2" schedule 40, this will be the last season for them. I plan on replacing them with some 253MA high heat stainless. 253MA takes 2000F for long service. Pricey but I need it to last! Also the pic with the air tubes has changed they are higher and the floor is v shaped to the nozzle slot. I did see one of the air tubes is starting to break downAre those black iron pipes you are using for your air pipes? I was wondering how that would hold up in a firebox like you have them set up. I ran some 1/8" square tube in my firebox for air tubes in my old makeshift updraft boiler I was working on and they burned out pretty quickly...(.less than one season). I replaced that with 1" schedule 40 black iron to get through the rest of the season and when I scrapped her they didn't look as bad as the sq tube but I could see they were taking a beating from just the little time it was in there.

V Shaped with refractory I meant!Yes they are 2" schedule 40, this will be the last season for them. I plan on replacing them with some 253MA high heat stainless. 253MA takes 2000F for long service. Pricey but I need it to last! Also the pic with the air tubes has changed they are higher and the floor is v shaped to the nozzle slot. I did see one of the air tubes is starting to break down
Nofossil
Moderator Emeritus
I love this kind of project - nice work. My brother built a ultra high-efficiency gasser (condensing!) many years ago. Expect to find a few problems - especially material issues like the schedule 40 pipes, but it's great to be able to make something with your own hands.
I'd be interested to see wood consumption as you get it tightened up. Like others, I think it seems higher than it should be, especially given your flue temps (I'm struggling to stay below 500). Are you seeing visible smoke or any sooty flue deposits?
I'd be interested to see wood consumption as you get it tightened up. Like others, I think it seems higher than it should be, especially given your flue temps (I'm struggling to stay below 500). Are you seeing visible smoke or any sooty flue deposits?
brenndatomu
Minister of Fire
I used regular ole 1" 304 SS pipe...works fine. The black iron that I started out with lasted a lil less than one heating seasonI plan on replacing them with some 253MA high heat stainless. 253MA takes 2000F for long service. Pricey but I need it to last
FinsterCT
Member
Wow Man! seriously impressed! I'm an engineer (EE) and grew up in a house where I knew how to weld and use a Milling Machine like a boss before I got my drivers license. After seeing your pics, only thing that comes to mind is the scene from the movie Waynes World...."were not worthy! were not worthy" ") Nicely Done!
Nicely Done!
I bought my Gasser... I was too chicken to put a homebuild in my basement...I've often thought I might try building a second gasser one day (outside)... I've looked at fabrication techniques with refractory, and most talk about complicated curing techniques... cure at such a temp for so long then this temp for so long etc.... what kind of refractory did you use????
I saw somewhere back a few posts that you were learning /trying different controls stuff... I'm pretty solid there...Happy to offer up advice if you get stuck on anything!
Nicely Done!I bought my Gasser... I was too chicken to put a homebuild in my basement
...I've often thought I might try building a second gasser one day (outside)... I've looked at fabrication techniques with refractory, and most talk about complicated curing techniques... cure at such a temp for so long then this temp for so long etc.... what kind of refractory did you use????I saw somewhere back a few posts that you were learning /trying different controls stuff... I'm pretty solid there...Happy to offer up advice if you get stuck on anything!
I love this kind of project - nice work. My brother built a ultra high-efficiency gasser (condensing!) many years ago. Expect to find a few problems - especially material issues like the schedule 40 pipes, but it's great to be able to make something with your own hands.
I'd be interested to see wood consumption as you get it tightened up. Like others, I think it seems higher than it should be, especially given your flue temps (I'm struggling to stay below 500). Are you seeing visible smoke or any sooty flue deposits?
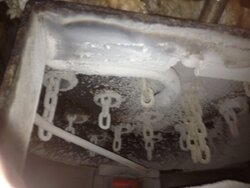
Took a video tonight for you, probably wood have been better during the day! I slowed the combustion fan down today some more, I was reaching over 2000F on secondary combustion, it is helping with short cycling. I don't have any storage, bit looking into it. As fare as deposits in heat exchanger, not much see pics in the beginning of this thread, that was after about a month or so run time. Keep in mind my heat exchanger tubes are about 5 foot long and there are 13 of them. My velocity is pretty slow allowing for good heat transfer and my wood moisture is about 15 now!
Here is a video of a much lower speed on the combustion fan. I have found out it works well at lower speeds but seems to take about 5 minutes to get secondary combustion again, so for tonight I am on speed 3 on my controller and 1 on the fan.
Wow Man! seriously impressed! I'm an engineer (EE) and grew up in a house where I knew how to weld and use a Milling Machine like a boss before I got my drivers license. After seeing your pics, only thing that comes to mind is the scene from the movie Waynes World...."were not worthy! were not worthy"
I bought my Gasser... I was too chicken to put a homebuild in my basement
I saw somewhere back a few posts that you were learning /trying different controls stuff... I'm pretty solid there...Happy to offer up advice if you get stuck on anything!
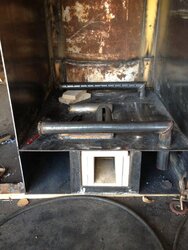
Thanks! I used plastec 85p for the primary firebox, I pounded the sides and the floor and formed it into a V shape to the slot in the floor that is the nozzle. The secondary chamber is just refractory block from Menards and the nozzle refractory is castable refractory with needles!Wow Man! seriously impressed! I'm an engineer (EE) and grew up in a house where I knew how to weld and use a Milling Machine like a boss before I got my drivers license. After seeing your pics, only thing that comes to mind is the scene from the movie Waynes World...."were not worthy! were not worthy"
I bought my Gasser... I was too chicken to put a homebuild in my basement
I saw somewhere back a few posts that you were learning /trying different controls stuff... I'm pretty solid there...Happy to offer up advice if you get stuck on anything!
Do you have any pictures of your firebox with the fire brick laid in?
Warno, this video is all I got, I used platec 85p with needles. I used this because it it poundable forms like playdoe and hardens when fired. I used this because i got it for free because it was past its 6 month shelf life! It is about $100 for 55lb and sad to say I put in I would say 800lbs.
mx842
New Member
I was wondering how regular fire brick would hold up in all three places. When I was playing around with my old up draft gasser I made a fire chamber out of fire brick. I never could get the secondary air right but I was getting 2000 degree temps just as it entered the chamber. I was surprised when I scrapped the whole project to see that it was still very solid, in fact I had to beat the heck out of it to get it out when I tore it apart to rework it the way it is now. Of-course that was only just one season of burning but the fire brick that in on the bottom and sides of the stove has been in there for like 10 years.


I was wondering how regular fire brick would hold up in all three places. When I was playing around with my old up draft gasser I made a fire chamber out of fire brick. I never could get the secondary air right but I was getting 2000 degree temps just as it entered the chamber. I was surprised when I scrapped the whole project to see that it was still very solid, in fact I had to beat the heck out of it to get it out when I tore it apart to rework it the way it is now. Of-course that was only just one season of burning but the fire brick that in on the bottom and sides of the stove has been in there for like 10 years.
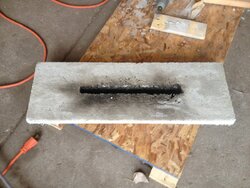
Here is one of the side bricks there was about 5 of These like this with one season, the second layer was normal. I the ones on the floor where not as bad surprisingly. I suppose the ash cover helps a little to. I figured that this was not bad after one season, the top piece which I casted with needles is holding up well! The casting pic the the nozzle that lays on top the side brick in the chamber.
Attachments
Similar threads
- Replies
- 20
- Views
- 863
- Replies
- 4
- Views
- 1K
- Replies
- 5
- Views
- 1K
- Replies
- 10
- Views
- 1K