Identify my "new" stove

  • Active since 1995, Hearth.com is THE place on the internet for free information and advice about wood stoves, pellet stoves and other energy saving equipment.

    We strive to provide opinions, articles, discussions and history related to Hearth Products and in a more general sense, energy issues.

    We promote the EFFICIENT, RESPONSIBLE, CLEAN and SAFE use of all fuels, whether renewable or fossil.

BrassMaker

New Member
Jan 16, 2016
11
Lake County, California
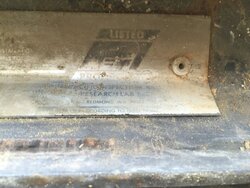
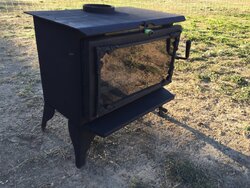
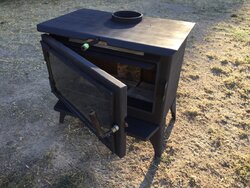
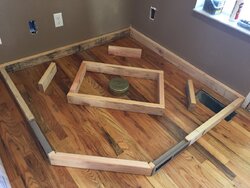
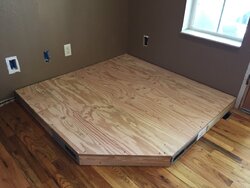
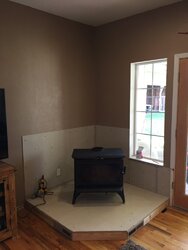
I just bought a new to me older wood stove from a friend and dropped it off to be cleaned up for install. I can't find the brand though (not stamped or tagged anywhere I can find) and want to look up the image.jpeg clearances for the hearth I'll be building/installing. Can someone ID this for me?
 
Last edited by a moderator:
What does that label have on it?
 
There may be more clues in that label. Carefully clean it off for more details. What does the ash lip label say? Is there a date on it? No label on the rear of the stove?
 
I'm thinking fabco. If I recall correctly fabco made the original briarwood. They were bought out by blaze king which now carries the briarwood.
 
I don't know if the blaze king briarwood ever had the ornate doors so I'm guessing fabco made this one prior to the buy out
 
OP, so you're having this refurbished? I'm curious, how different in cost will this approach be than a new epa stove?
 
There may be more clues in that label. Carefully clean it off for more details. What does the ash lip label say? Is there a date on it? No label on the rear of the stove?
I don't have the stove with me; pretty much picked it up from my friend's barn and immediately dropped it off for refinishing. Three of us looked over the stove and couldn't find mfg info, but something might present itself after it gets sand blasted.
 
OP, so you're having this refurbished? I'm curious, how different in cost will this approach be than a new epa stove?
Good question! I looked into this and considered what the three local fireplace shops had to offer. For a similar, new, stove with chimney install I was quoted $5k (low end) several times. That does not include the hearth/mantle. The complete all inclusive setup goes as high as $15k here. As a comparison, I bought this stove from my friend for $200 plus some bags of pellets that came with my new house. Took it to another friend who is a show quality auto body and paint guy. He's soda blasting and painting the stove for me at cost plus a case of beer. I'm still debating making my own hearth or hiring someone to build it, so I have unknown cost there. I was quoted $1200 for chimney install. I budgeted $5k total for this project, so I should be well under budget taking the DIY approach.
 
Honestly if it does not have a legible ul tag on it the make and model doesn't really matter for clearances. With out the tag it is an unlisted stove and needs 36" to an unprotected combustible wall. That can be reduced with proper heat shields.
 
The refinishing took a little longer that expected, but here's how it sits tonight. Very happy with the look. Even happier with the slow burn rate and heat this thing generates. Despite the 80+ degree California weather, I'm cooking off the paint smell outside tonight. Can't wait to get a mantle started. Will post that as well in case others tackle a small project like I did.
 

Attachments

  • IMG_6017.JPG
    IMG_6017.JPG
    279.2 KB · Views: 1,007
  • IMG_6018.JPG
    IMG_6018.JPG
    285.8 KB · Views: 385
  • IMG_6019.JPG
    IMG_6019.JPG
    83.1 KB · Views: 405
The mantle project is under way! I had to delete/move a few outlets and redirect one floor vent. The foundation is 2x4's covered by 3/4" ply and 1/4" cement board. Today I brought home the stove pipe, chimney and fittings to put together once the rain lets up. Here's the progression leading to tonight:
 

Attachments

  • IMG_6510.JPG
    IMG_6510.JPG
    123.3 KB · Views: 230
  • IMG_6627.JPG
    IMG_6627.JPG
    152.6 KB · Views: 231
  • IMG_6629.JPG
    IMG_6629.JPG
    124.4 KB · Views: 242
  • IMG_6669.JPG
    IMG_6669.JPG
    62 KB · Views: 220
  • IMG_6671.JPG
    IMG_6671.JPG
    177.3 KB · Views: 231
The stove pipe and chimney is installed... kinda. The final piece will be placed after I lay the brickwork. I used Selkirk parts from my local Ace Hardware store. One telescoping double wall stove pipe, three 36" insulated chimney pieces and all the misc parts that go with them came to about $800. The pieces went together like a Lego set. Having never done this before, and seeing the (almost) final product, I would recommend the same parts for anyone else wanting to DIY. Here's the new addition to my roof:
 

Attachments

  • IMG_6703.JPG
    IMG_6703.JPG
    98.3 KB · Views: 216
  • IMG_6705.JPG
    IMG_6705.JPG
    74.1 KB · Views: 201
  • IMG_6717.JPG
    IMG_6717.JPG
    102.7 KB · Views: 232
  • IMG_6719.JPG
    IMG_6719.JPG
    264.3 KB · Views: 316
  • IMG_6725.JPG
    IMG_6725.JPG
    334.2 KB · Views: 241
  • IMG_6726.JPG
    IMG_6726.JPG
    229.8 KB · Views: 218
Making good progress there. Were you able to get a manual or UL tested clearances for the stove? If not, it needs to be 36" from the nearest combustibles. Cement board on studs does not rate for a clearance reduction, even with stone veneer. However, a proper, ventilated wall shield will get the clearance down to 12".
 
I located the clearance info yesterday on the label above the door. It was almost completely rubbed off, so I guess the lighting had to be just right. The label says clearance can be down to 8". I assume that's due to the fixed heat shield across the back. I placed it so that the rear outer most corners of the stove are 12" from combustible and since the stove is set at an angle to the walls, I feel pretty safe.
 
Good deal. Were you able to find the hearth insulation requirements too?