
What homemade tools have you designed?
- Thread starter bill3rail
- Start date
-
Active since 1995, Hearth.com is THE place on the internet for free information and advice about wood stoves, pellet stoves and other energy saving equipment.
We strive to provide opinions, articles, discussions and history related to Hearth Products and in a more general sense, energy issues.
We promote the EFFICIENT, RESPONSIBLE, CLEAN and SAFE use of all fuels, whether renewable or fossil.
You are using an out of date browser. It may not display this or other websites correctly.
You should upgrade or use an alternative browser.
You should upgrade or use an alternative browser.
- Status
- Not open for further replies.

Dr.Faustus
Minister of Fire
I made the same cord. really comes in handy!. Not related to the stove, i dremeled an old socket so it would have notches in it. It took the place of a chainsaw clutch removal tool. Worked great too and still usable as a socket.
im sure countless other tools too but just cant think of them right now.
im sure countless other tools too but just cant think of them right now.
I made the same cord. really comes in handy!. Not related to the stove, i dremeled an old socket so it would have notches in it. It took the place of a chainsaw clutch removal tool. Worked great too and still usable as a socket.
im sure countless other tools too but just cant think of them right now.
Yes, I have made specialty tools for other applications also.
I performed some searching on Hearth and surprisingly did not find a thread related to specialty tools for pellet stoves.
Bill
Cedarjunki
Minister of Fire
Yes, I have made specialty tools for other applications also.
I performed some searching on Hearth and surprisingly did not find a thread related to specialty tools for pellet stoves.
Bill
I ran across a thread at some point that was very close. Not sure if it was on here or not. Basically it all boiled down to an old spatula and a big spoon.
I have a small putty knife and a spoon i use daily. Wife got upset over the spoon
 and still complains after i replaced it with 3 more! But anyways... havnt needed to make anything special just yet.
rich2500
Minister of Fire
Here is my modified stainless spatula,allows me to open the door while burning and break up the clinker which the blower then blows out of the pot, then I'm good for another day


broudy
New Member
My stove (an old St Croix Lancaster back when it was a corn only stove) has some really narrow, winding and difficult to reach ash traps. After many frustrating cleans I decided to fashion a couple tools to make the job easier. The most useful seem to be the attachments I made for the shop vac. I took the standard circular tube extension and stepped it down to half an inch with pieces of PVC reducer sections. I slip a piece of flexible fuel line over the half inch tube and use it to get in the hard to reach sections. If I need some rigidity on the line I hook a coat hanger on the end to guide it. Works like a charm!
I also do a monthly cleaning using the "leaf blower" trick.
I also do a monthly cleaning using the "leaf blower" trick.
sparklow
Member
I have not as yet broken up the residue in the burn pot of my Serenity while it is running, but I'd like to. Do you open up the pellet bin door or turn the stove down first? Where did you buy that stainless spatula or did you just have it lying around? Thanks for your tips as always.Here is my modified stainless spatula,allows me to open the door while burning and break up the clinker which the blower then blows out of the pot, then I'm good for another day
View attachment 172559
tiger
Feeling the Heat
No photos because I have not done it yet, but...
The supplied scraper that came with the Harman works fine but ain't much to look at. Well, I kept my pretty bright-brass hearthside tool set from my wood burning days, and a few tools I didn't need anymore but I kept the heavy "turned" handles. I've thought of cutting the scraper in half, get someone to weld a rod to each half and thread them for attaching the brass (plated) handles. This would also get me some welcome extra length for those while-still-burning scrapedowns.
The supplied scraper that came with the Harman works fine but ain't much to look at. Well, I kept my pretty bright-brass hearthside tool set from my wood burning days, and a few tools I didn't need anymore but I kept the heavy "turned" handles. I've thought of cutting the scraper in half, get someone to weld a rod to each half and thread them for attaching the brass (plated) handles. This would also get me some welcome extra length for those while-still-burning scrapedowns.
Great source for used spatula is a thrift store. I bought one there a while ago, but trashed it after I did not like using it.Here is my modified stainless spatula,allows me to open the door while burning and break up the clinker which the blower then blows out of the pot, then I'm good for another day
View attachment 172559
Bill
I did not really consider the leaf blower trick as it was not a self made item. I guess it counts too as it is adapted to pellet stoves.I also do a monthly cleaning using the "leaf blower" trick.
rich2500
Minister of Fire
I honestly don't remember where I got the spatula I actually bought it back when I still had the englander.Sometimes I will open the hopper lid to scrape the pot but most of the time I don't even bother.My stove is always on heat level 1 so no I don't turn it down.but probably a good idea if on higher heat levels.I have not as yet broken up the residue in the burn pot of my Serenity while it is running, but I'd like to. Do you open up the pellet bin door or turn the stove down first? Where did you buy that stainless spatula or did you just have it lying around? Thanks for your tips as always.
Last edited:
funflyer
Burning Hunk

Dr.Faustus
Minister of Fire
Not homemade but I found a seconds timer that I could use to gather data on auger timing at all stove and fuel feed settings. I plan on adding a length of wire and some alligator clips so it can be installed quickly right to the auger terminals.
View attachment 172629
This would also be great at trying to figure out the failure rate of the auger motors. as in how many hundreds or thousands of hours until failure and whether or not motors last the same amount of time or breakdown is just random. may help some in planning their stock of replacement parts.
TimfromMA
Minister of Fire
I modified an APC with a pair of deep cycle marine batteries to make a decent battery backup system for my stove.
funflyer
Burning Hunk
This would also be great at trying to figure out the failure rate of the auger motors. as in how many hundreds or thousands of hours until failure and whether or not motors last the same amount of time or breakdown is just random. may help some in planning their stock of replacement parts.
Good idea, the Cramer timers come in minutes and hours also. It would be interesting to track how many hours our stoves are operated.
I modified an APC with a pair of deep cycle marine batteries to make a decent battery backup system for my stove.
I saw your thread on that mod and am conptemplating this myself. I have a backup that I tested and it will operate my stove for 35 minutes but there has been two occasions where the power has been out for longer, Thankfully I was home when that happened.
Last edited:
TimfromMA
Minister of Fire
Snowy Rivers
Minister of Fire
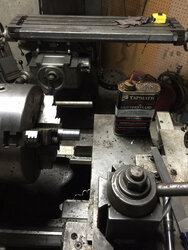
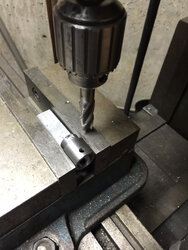
When it comes time to work on an exhaust fan (Combustion fan) if the blade needs to be removed and it has been on the motor for GAWD knows how long life can get tedious.
In the general scheme of things the chances of getting the impeller blade off the shaft in a usable condition is sketchy at best.
Most blades will get tweaked before they are free of the shaft, resulting in it being JUNK
If the blade does not run true it will vibrate and in short order ruin a fresh motors bearings.
Recently I had a fan to remove off of a Whitfield ADV 2 T that had been on there since new in 1992
A cleaning and soaking of the set screw with some good Skunk Pizzz plus an application of some heat got the set screw out of the fan hub (First major hurdle)
Now the fan impeller is stuck and any prying is going to render it to the likeness of a PRETZEL
WE NEED A TOOL
Soooooo, out with some measuring tools and off the the basement shop to make a tool to gently pull the fan off without damage.
Scrounged about and found a scrap of steel round, tossed it in the lathe and laid the tools on it.
Once the inner bore is machined (fits over the fan hub) the piece is turned and the opposite end is finished and the push screw hole is drilled and tapped.
Next it's off to the mill to cut a couple flats on the little fellow so a wrench can easily hold it while the push screw is tightened.
Next there is a hole drilled completely through the end that fits over the fan hub allowing it to align with the set screw in the hub.
One side of the hole is tapped for a set screw and the other is drilled to allow the standard set screw to just slide though.
The pusher tool is slid over the fan hub and a longer version of the hubs set screw is slid in through the oversized hole in the pusher and threaded into the fan hub.
The screw is threaded in but not tightened against the shaft.
(This allows the pusher to lift on that screw)
Next the threaded portion of the hole (opposite side of tool) is fitted with a set screw with a pointed end and the screw snugged up.
Then the pusher bolt (1/4-20 square headed set screw) is threaded into the end of the tool and tightened against the end of the motor shaft.
Using a wrench on the tools two flats and another wrench on the square headed set screw the tool easily pushes the fan blade off the motor shaft in perfect condition.
No bent blades, no fuss, no muss and no expense for a new fan blade.
Interestingly enough, I have never seen a tool made to remove these blades
The HVAC houses have a similar tool to remove the fans off the outdoor condenser units.
These tools are SPENDY too.
Attachments

Last edited:
Watcher1
Burning Hunk
Very nice! While I don't have that shop setup, my best friend is a machinist, looks like a gov. job at work for him next week. He does everything in stainless there. I am also a mile from a very cool old school shop. I have a unit in the shop; a 6500 magnum and I would like to pull the fan on that to clean it up for my 3500 replacement. The 6500 is junk, Magnums conduit tubing for a heat exchanger didn't work out so well.When it comes time to work on an exhaust fan (Combustion fan) if the blade needs to be removed and it has been on the motor for GAWD knows how long life can get tedious.
In the general scheme of things the chances of getting the impeller blade off the shaft in a usable condition is sketchy at best.
Most blades will get tweaked before they are free of the shaft, resulting in it being JUNK
If the blade does not run true it will vibrate and in short order ruin a fresh motors bearings.
Recently I had a fan to remove off of a Whitfield ADV 2 T that had been on there since new in 1992
A cleaning and soaking of the set screw with some good Skunk Pizzz plus an application of some heat got the set screw out of the fan hub (First major hurdle)
Now the fan impeller is stuck and any prying is going to render it to the likeness of a PRETZEL
WE NEED A TOOL
Soooooo, out with some measuring tools and off the the basement shop to make a tool to gently pull the fan off without damage.
Scrounged about and found a scrap of steel round, tossed it in the lathe and laid the tools on it.
Once the inner bore is machined (fits over the fan hub) the piece is turned and the opposite end is finished and the push screw hole is drilled and tapped.
Next it's off to the mill to cut a couple flats on the little fellow so a wrench can easily hold it while the push screw is tightened.
Next there is a hole drilled completely through the end that fits over the fan hub allowing it to align with the set screw in the hub.
One side of the hole is tapped for a set screw and the other is drilled to allow the standard set screw to just slide though.
The pusher tool is slid over the fan hub and a longer version of the hubs set screw is slid in through the oversized hole in the pusher and threaded into the fan hub.
The screw is threaded in but not tightened against the shaft.
(This allows the pusher to lift on that screw)
Next the threaded portion of the hole (opposite side of tool) is fitted with a set screw with a pointed end and the screw snugged up.
Then the pusher bolt (1/4-20 square headed set screw) is threaded into the end of the tool and tightened against the end of the motor shaft.
Using a wrench on the tools two flats and another wrench on the square headed set screw the tool easily pushes the fan blade off the motor shaft in perfect condition.
No bent blades, no fuss, no muss and no expense for a new fan blade.
Interestingly enough, I have never seen a tool made to remove these blades
The HVAC houses have a similar tool to remove the fans off the outdoor condenser units.
These tools are SPENDY too.
When it comes time to work on an exhaust fan (Combustion fan) if the blade needs to be removed and it has been on the motor for GAWD knows how long life can get tedious.
In the general scheme of things the chances of getting the impeller blade off the shaft in a usable condition is sketchy at best.
Most blades will get tweaked before they are free of the shaft, resulting in it being JUNK
If the blade does not run true it will vibrate and in short order ruin a fresh motors bearings.
Recently I had a fan to remove off of a Whitfield ADV 2 T that had been on there since new in 1992
A cleaning and soaking of the set screw with some good Skunk Pizzz plus an application of some heat got the set screw out of the fan hub (First major hurdle)
Now the fan impeller is stuck and any prying is going to render it to the likeness of a PRETZEL
WE NEED A TOOL
Soooooo, out with some measuring tools and off the the basement shop to make a tool to gently pull the fan off without damage.
Scrounged about and found a scrap of steel round, tossed it in the lathe and laid the tools on it.
Once the inner bore is machined (fits over the fan hub) the piece is turned and the opposite end is finished and the push screw hole is drilled and tapped.
Next it's off to the mill to cut a couple flats on the little fellow so a wrench can easily hold it while the push screw is tightened.
Next there is a hole drilled completely through the end that fits over the fan hub allowing it to align with the set screw in the hub.
One side of the hole is tapped for a set screw and the other is drilled to allow the standard set screw to just slide though.
The pusher tool is slid over the fan hub and a longer version of the hubs set screw is slid in through the oversized hole in the pusher and threaded into the fan hub.
The screw is threaded in but not tightened against the shaft.
(This allows the pusher to lift on that screw)
Next the threaded portion of the hole (opposite side of tool) is fitted with a set screw with a pointed end and the screw snugged up.
Then the pusher bolt (1/4-20 square headed set screw) is threaded into the end of the tool and tightened against the end of the motor shaft.
Using a wrench on the tools two flats and another wrench on the square headed set screw the tool easily pushes the fan blade off the motor shaft in perfect condition.
No bent blades, no fuss, no muss and no expense for a new fan blade.
Interestingly enough, I have never seen a tool made to remove these blades
The HVAC houses have a similar tool to remove the fans off the outdoor condenser units.
These tools are SPENDY too.
Great job! I no longer work in the machine shop so I can't copy the design...
I have used similar tools for other applications.
Bill
An hour meter is a fantastic idea! I wish I had thought of that 5 years ago...Not homemade but I found a seconds timer that I could use to gather data on auger timing at all stove and fuel feed settings. I plan on adding a length of wire and some alligator clips so it can be installed quickly right to the auger terminals.
View attachment 172629
I tried this idea, but the power was too low to operate my stove. I still want to do this some day.I modified an APC with a pair of deep cycle marine batteries to make a decent battery backup system for my stove.
slls
Minister of Fire


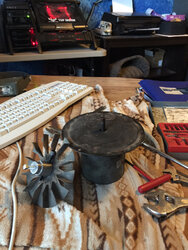
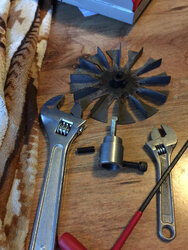
I may never understand how it works because I've never seen a Quadra-Fire in person.Made this tool to remove fans and bearings. Just a piece of channel steel with a 5/16 slot. Just did both my fans, vent was fun.
View attachment 173407
View attachment 173408
Maybe you can give a description for those that do have Quads and may need to make the tool for themselves?
Bill
slls
Minister of Fire
The slotted channel is used to support the fan or bearing, then you can hammer on the shaft with a brass drift. Anyone that has tried to remove a Jakel vent fan would like it.
Jason Knapp
Burning Hunk
I guess I wouldn't call this a tool, but an extension. I used a piece of heater 5/8" heater hose and put it on the attachment on my ash vacuum. I have a 25 EP and trying to get behind the area between the plates is a challenge. This makes life so much easier!
- Status
- Not open for further replies.
Similar threads
- Replies
- 18
- Views
- 605
- Replies
- 3
- Views
- 947
- Replies
- 5
- Views
- 652
- Replies
- 11
- Views
- 2K