You guys and your wiring diagrams - I am electrically challenged, so have a hard time with those. Here are written directions for those that are like me.
It is easy, even for a non-electrical person like me. I put my P43 on a thermostst (not programmable, but should work the same). You need to go to the hardware store and buy spade connectors (at least 1 male and 1 female). I ended up at
Radio Shack and got #6400044 so I had extras (that link will give you the size that will work).
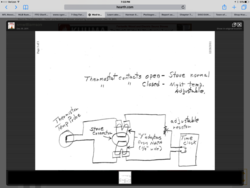
Use 2 wires from you cable (if you have more than two wire, any two will do, just make sure you connect the same colors to the thermostat).
Put a connector on each those two wires that will attach to the stove (use 1 male for one wire and 1 female for the other wire)
Disconnect the left hand wire from the stove (as you are looking at the front of the stove). It will be tough to pull out - just grab as close to the stove and give a strong, steady pull (don't yank)
Connect the female connector you attached to te cable to the stove, push that puppy in firmly.
Connect the male connector/wire of your cable to the disconnected probe wire - once again, push firmly
Connect the other end of the cable to your thermostat's RH & W (using same color wires, but it doesn't matter which wire goes to which connection in the thermostat).
If there are jumpers - you will need to puzzle over your manual several times, but you will eventually get it. Just remember, you are using a heat only device, 1-stage (not 2-stage).
Program your thermostat (if programmable) or at least set temp desired, set stove temp dial to about 80*, turn on thermostat, turn on stove, and walla - you are in business. I have found that my P43 does not work as expected when in Room Temp / manual (the fan doesn't' go on high). But all other modes work the same (except in Room temp / auto - it is controlled by thermostat instead of probe). The stove still behaves as usual if you decide to turn it to Stove temp mode.
Hope this is helpful for those whose heads hurt when they look at the diagrams!